Any pet requires proper care and attention. And aquarium inhabitants in this regard are no exception. For a comfortable life, the owner's admiring glances alone are not enough for them. The aquatic environment in which they live must be cleaned of mechanical contaminants and waste products. That is why every aquarist needs to know how to properly install an internal filter in a fish aquarium. Only in this way will the wards feel good, and the breeder will not cease to admire their beauty for a long time.
Types of filtration devices
Before purchasing a cleaning device, you need to understand which one will be the best choice. When purchasing, take into account the features of the installed fish housing, its volume and dimensions, as well as the expected number of residents and plants. You will have to choose one of the two most common options: an internal or external treatment unit.
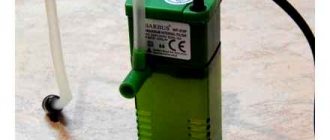
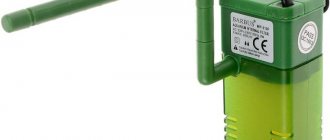
Models for use within an aquarium ecosystem are the simplest. They are easily attached to glass walls using hooks or suction cups. In this case, the liquid is drawn into the lower part of the device, passes through the filter layers (usually a cotton or foam base) and comes out from the top, already cleaned. At the exit, it is enriched with oxygen (via an aerator) and, together with a stream of clean water, the aquarium inhabitants receive the air bubbles necessary for life.
These cleaning devices are extremely easy to use and are great for beginning fish breeders. Even those who have never done this before can understand the peculiarities of their operation and installation.
Popular brands of biofilters
If desired, the aquarist does not have to make his own filter. He has the opportunity to simply purchase ready-made equipment that will ensure high-quality cleaning of the aquarium. It is impossible to list all the options available on the market, so it is better to focus on a few of the most popular brands.
Tetra EX
Perhaps every aquarist has heard about this manufacturer at least once. Its products are known for their high quality, because the German company carefully controls production processes.
Filters from Tetra are no exception, and they have been in demand among lovers of underwater flora and fauna for quite some time. This equipment provides high-quality cleaning of aquariums with a volume of 60-500 liters. As a rule, ceramic rings and biological balls are used as standard.
Before connecting, be sure to read the instructions. The assembly diagram will be indicated there. We recommend that you pre-rinse all fillers under the tap (they probably contain dust and small fragments formed during transportation).
In order for the equipment to work, you must independently create a flow draft. This is done using a special pumping button located on top of the case.
JBL
Another well-known German manufacturer specializing in economical filters. All of their biological filter models use bioceramics. In them, water enters from above, passes through mechanical cleaning fillers, and then returns back through the biological substrate.
The equipment is prepared in the same way as with Tetra.
Aquael
The Polish company is known for producing budget filters. But, despite their low price, they are distinguished by high performance and reliability. The model range includes equipment for aquariums with a volume of 100-700 liters. The most powerful devices have two pumps and four hoses (for drawing in and releasing water), thanks to which it is possible to achieve a stronger flow and mixing of water. Ceramic rings or biological balls are used as fillers.
Recommendations
When understanding from photos and videos how to properly install and place a water filter in an aquarium, how deep and how to immerse the unit, you should take into account several important nuances:
- When installing the device, first fill the container with liquid to at least half. The filtration medium must not operate in contact with air.
- Before assembly, thoroughly rinse and dry all components of the structure.
- The unit can only be immersed when it is turned off.
- The air intake tube is led out. For convenience, it should be fixed on the edge of the glass wall with a special fastener.
- Only after carrying out all the above-described manipulations can the device be turned on.
Location
Looking at the video on installing an internal filter in an aquarium, how it should stand (position) correctly, it is easy to understand that this small world is a home for its inhabitants. And the primary task of every aquarist is to take care of comfortable living conditions for their wards.
Don't make the mistake of thinking that simply changing the water regularly is enough. Systematic fluid changes disrupt the biological balance. This is if you do not take into account that the process itself is quite labor-intensive, exposing aquarium inhabitants to unnecessary stress. To avoid such negative consequences, you should install a special cleaning device.
Internal filtration devices are the best option for use in containers of no more than 200 liters. They are affordable, easy to operate and install. Basic care involves washing the filter material once every 1-2 weeks. Additionally, you can install an aeration system to provide the fish not only with clean water, but also with oxygen. Despite the fact that pets live in an aquatic environment, they breathe air.
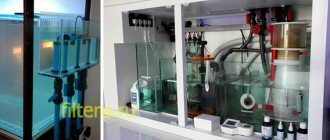
External cleaning devices are located outside the aquarium ecosystem - outside. The cleaning unit does not require installation inside the tank, as a result of which its dimensions can be significantly larger than the submersible version. Accordingly, this type of placement guarantees higher cleaning efficiency. Such devices, as a rule, have two or more sections: a section for mechanical filtration (where contaminant particles settle), a section with biomaterial (the place where bacterial colonies form).
Types of filters
There are internal and external filters. The first ones are installed inside a water tank, the second ones outside the tank. The devices operate on a similar principle.
At the bottom of the aquarium, bottom filter systems are installed on a special mesh. Air circulates through tubes laid along the bottom of the aquarium. For normal operation it is necessary to select the correct soil. It should not clog the inlets of the tubes. The disadvantage of this type of filtration is that in order to install and clean the device, the water must be drained. Move the fish temporarily to another container.
Popular internal filters with mechanical, combined cleaning. Easy to install and clean effectively. The disadvantages include the fact that they take up a lot of space in the aquarium and are conspicuous.
External mounted filter devices are installed outside the aquarium. Some types are mounted on the back or side wall. They work on the principle of glass internal filters. Water is sucked out of the container, which passes through the filter layers. It is enriched with oxygen from the air and returns back to the aquarium.
Important. External canister filters with several stages of cleaning show good results. Due to the larger volume and number of filter elements, external filters purify water efficiently.
Large overall dimensions are a disadvantage.
It is better to disguise the container with cartridges. Usually installed in a closed cabinet below or next to the aquarium.
How to properly install a filter in an aquarium - location and general installation rules
MBFT-75 Membrane for 75GPD
SF-mix Clack up to 0.8 m3/h
SF-mix Runxin up to 0.8 m3/h
When choosing a suitable place to place the device, it is important to understand that it largely depends on the displacement and modification of the fish house. In addition, during installation a number of basic recommendations should be taken into account:
- When starting to assemble the structure, do not be lazy to study the instructions in detail and make sure that all components are available.
- Assemble the device only in dry, clean condition.
- Immerse it while it is turned off in a container that is at least half full.
- When installing a submersible model, first move the aquarium inhabitants to a temporary home.
- If, after all the manipulations performed and activation of the filtration agent, a characteristic flow appears, you have done everything correctly.
Pleural drainage
Pleural drainage is a long-term removal of the contents of the pleural cavity to the outside using special tubes made of rubber or polyethylene.
When is chest drainage necessary?
Drainage of the pleural cavity is indicated for chest injuries, pathological conditions and infectious diseases characterized by accumulation in the pleural cavity:
- blood - the accumulation of blood and its elements in the pleural cavity is usually the result of injuries, as a result of which a vessel or the wall of the aorta is damaged in the chest area. This is also possible in some diseases that cause bleeding disorders.
- lymph - found in the pleural cavity as a result of traumatic damage to a lymphatic vessel or its rupture after blockage by a tumor.
- pus - detected with the development of pneumonia, lung abscess, inflammation of wounds in the chest area, rupture of the esophagus, or as a consequence of the spread of an abdominal abscess.
- air - appears between the layers of the pleura in case of serious damage to the lung.
In general, pleural effusion is observed in the following animal diseases:
- heart failure;
- pneumonia;
- tumors;
- pleurisy;
- oncological diseases;
- viral peritonitis (in cats);
- diaphragmatic hernia.
External signs of fluid accumulation in the pleural cavity in animals are:
- asymmetrical breathing;
- shortness of breath;
- weakness, refusal to eat and apathy;
- low-grade fever;
- the animal prefers to stand or lie down on one side only;
- At the beginning of effusion, breathing is rapid, then the frequency of respiratory movements becomes less frequent than usual.
The drainage system consists of a flexible drainage tube with a tip, which is inserted into the pleural cavity, and an evacuation device. The diameter of the tube depends on the nature of the substance being removed - air, exudate, blood or pus.
Before installing the drainage, a chest x-ray and a test puncture are performed. Drainage is introduced through a trocar in the intercostal space. The trocar insertion site is anesthetized.
In case of injuries, pleural drainage prevents the development of sepsis and accelerates wound healing; for various diseases, the procedure is auxiliary and symptomatic. That is, after alleviation of the condition, it is necessary to establish a diagnosis and treat the underlying disease that caused the appearance of pleural effusion.
Chest drainage performed incorrectly can lead to injury to the lung, heart and blood vessels. In case of chest injuries, the sooner veterinary surgeons begin work, the higher the chances of saving your pet. The Best Veterinary Clinic provides immediate assistance to animals in emergency conditions at the time of treatment out of turn.
The appearance of pleural effusion in pets can be prevented if viral respiratory diseases are promptly treated, stress is prevented, and nutrition is monitored.
What needs to be done besides PD.
When treating patients with renal failure, it is necessary to carry out the entire range of therapeutic measures indicated for critically ill patients.
Installation of the internal filter device
Installing such a unit is completely easy. Even a novice fish breeder can easily cope with the task. As an example, you can consider how to properly assemble and use the internal filter for a Silong aquarium. For this:
- Read the manual for the device.
- Fill the container with liquid and provide residents with a temporary habitat.
- Immerse the collected cleaning product in water (the layer of aqueous medium above it is at least 2-3 cm).
- Securely attach it to the glass wall of the tank using suction cups or hooks.
- Please note that the air tube remains outside.
- Turn on the system and watch for a stream-flow to appear.
In the future, all that remains is to monitor the operation of the cleaning equipment and timely clean the filter base from accumulating contaminants.
Step-by-step instructions for installing filter systems
All devices are supplied with operating instructions. Before you begin installation, you need to familiarize yourself with it in detail.
External
They unpack the packaging and check the contents.
Installation:
- According to the instructions, the filter is assembled in the described sequence.
- Place the flask in water so that it is covered by at least 2 cm with water, without plugging it into the outlet.
- The external pipe of the aerator is brought out and fixed to the wall of the container.
- At the time of the test run, it is recommended to remove the fish from the aquarium.
- Connect the filter to the power supply, the wire should hang freely.
- When the device starts working, you can see bubbles in the water.
After installation, the flow power is regulated by a valve on the air intake pipe. The optimal position is the middle one.
Installing a bottom filter
To install it, you need to transplant the fish into another tray and drain all the water.
Installation sequence:
- Clean the walls of the container from dirt and rinse (without using chemicals).
- A special mesh is placed at the bottom.
- A pump with a cartridge is attached to it.
- Lay the bottom filter tubes.
- Connect all elements of the cleaning system.
- The top is covered with medium-sized pebbles. Do not use fine fractions; the holes in the tubes may become clogged.
- Fill in some water and connect the system to the power supply.
- If bubbles begin to rise from the bottom, then everything is done correctly.
- Place bottom plants, pour water, and transplant fish.
Note. The advantage of a bottom filter system is that it filters evenly and enriches the water with oxygen. In such an ecosystem, bottom aquarium plants develop well, which also purify the water.
How to install an internal filter
Before installation, check the contents. In addition to the two main tubes, there must be a pipe for filling the canister with water.
Sequencing:
- When filling the canister, water may leak; prepare a rag for cleaning.
- According to the instructions, in the specified sequence, assemble all the elements of the filter system.
- A tube with a bent end is designed to collect water.
- Lower the tube into the aquarium with water, open the tap valve, fill the canister with cartridges with water.
- Water flow should not flow out of the second hole.
- When the canister is full, turn off the tap.
- The hose coming from the aquarium is connected to the filter.
- Lightly suck out the air so that the pipe fills with water.
- Connect the second, outlet hose.
- Open the incoming taps on the canister.
- Plug in.
- Water circulation indicates correct connection.
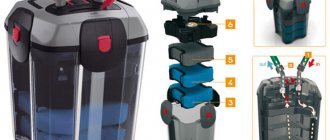
External canister-type filter systems are mainly intended for large-capacity aquariums with seawater. Thanks to a multi-stage cleaning system, they are of the highest quality.
Important. Rinse the filters with room temperature water from the aquarium. It will retain beneficial microflora. After the procedure, the water is poured out.
How to correctly position an aquarium filter, assembling an external filtration device
With such a cleanser, everything is somewhat more complicated. To do everything correctly, do not ignore the instructions supplied by the manufacturer:
- Unpack the components, remove all hoses, sponges, and drains from the box.
- Just in case, take a few rags. Leakage during installation of the unit cannot be ruled out.
- Assemble it according to the instructions in the manual.
- Make sure that the water intake tube is inside the filled container.
- Now fill the special tank with aquarium liquid and open the supply. The water should flow on its own.
- Watch carefully so that it does not come out of the second hole.
- After filling, the supply of H2O must be shut off.
- Next, start connecting the outlet hose. Make sure it is also filled and connected.
- Attach another element to the drainage system and open both taps.
- Connect the power, wait until the water begins to move in the container.
Narcosis and its consequences
The most difficult and dangerous thing for the body during surgery is, of course, anesthesia. It is the body’s reaction to the introduction of anesthesia that determines the severity of rehabilitation therapy on the first postoperative day. Add to this the loss of blood, a painful, sometimes extensive wound, and you will understand how difficult it is for an animal to recover after an intervention.
Most often, a pet’s recovery from sleep occurs in a veterinary clinic. It is not without reason that this moment is considered the most crucial and dangerous - if something goes wrong, your beloved friend will need urgent help from specialists, so no matter how much you rush home, wait until your dog opens his eyes. After this, with a sigh of relief, listen or write down all the veterinarian’s recommendations regarding the postoperative period.
Sources:
https://mschistota.ru/sovety/filtry-dlya-akvariuma.html https://petse.ru/ryibyi/obor_akvar/kak-ustanovit-filtr-v-akvarium.html https://boerboels-kennel.ru/ ustanovka-vnutrennego-filtra-akvarium/
Installation of bottom cleaning device
When familiarizing yourself from photos and videos with the correct installation and location of the Aquael filter in an aquarium or the operation of similar devices, it is worth remembering that they are not only external and internal. Some models are designed for installation at the very bottom of the fish house. They are used if the container is too small and there is no decorative vegetation at all.
Such a unit is made in the form of a narrow plate with a filter material located inside and a large number of holes that are necessary for a constant flow of liquid. In this case, simply lowering the filtration medium into the container and connecting the necessary tubes to it is not enough. You should first remove the soil from a separate area and place a special frame made of environmentally friendly plastic there. The device itself will be installed on this bottom rise.
It doesn’t matter what kind of device you use to purify water, the quality of the unit’s operation and the chemical and biological composition of the liquid environment in which the fish live directly depend on the correctness of the actions performed. When getting down to business (assembly and installation), be sure to read the manufacturer's manual.
External models
External filters, which appeared several decades ago, have become very popular among aquarists. Thanks to the increased size of the compartment with filter elements, it is possible to provide high-quality mechanical and biochemical water purification. Inside such a filter there is a filler, on the surface of which colonies of nitrifying bacteria settle. They perform biochemical purification, removing nitrates, nitrites, ammonia and other dangerous contaminants from the water that can be harmful to tropical fish.
Today you can find various models of external filters on sale, which differ in filler volume, pump power and a number of other characteristics. Accordingly, based on the performance of the pump and the volume of filler, you should choose a filter for a particular aquarium. By correctly selecting the parameters of such equipment, it will be possible to ensure the maintenance of a stable biosystem in the aquarium, providing tropical fish with optimal conditions for keeping them.
The most popular products on the domestic market are from the following manufacturers:
Among the disadvantages of external filters, it is customary to note their high cost, bulkiness and the need to solve problems with equipment noise. The latter will be especially critical if you are choosing equipment for an aquarium that is located in the bedroom not far from the bed. The most silent, reliable and efficient filters are those from the German manufacturer Eheim.
Phytofilter
If you have decided to get fish and are now looking at photos and videos of how a filter should stand and work in an aquarium, how to secure it and use it to filter liquid, you will probably come across information about such devices. The activity of biofilters is based on the work of special microorganisms that intensively absorb ammonia released during the life of the inhabitants.
SF-mix manual up to 0.8 m3/h
AMETHYST - 02 M up to 2 cubic meters/day.
Aeration unit AS-1054 VO-90
As a rule, such devices are made independently. The simplest option is the “bottle” model, the dimensions of which directly depend on the displacement of the fish housing. To do it yourself, you will need to do the following:
- Take a plastic bottle and make small holes in its bottom. The diameter is not important, the main thing is that water flows inside freely.
- Wrap the area tightly with foam material.
- Secure it with plastic clamps to prevent unnecessary contamination of the filler.
- Fill the container about halfway with gravel.
- Place the hose of the spray compressor through the neck.
Thus, due to the “aerolift” effect, the purified liquid will be drawn out of the homemade tank from above, and contaminated liquid will flow from below.
Features of installing an external filter
An external aquarium filter, which is often called a “canister”, is usually installed in a cabinet under the aquarium, much lower than the aquarium water level. After preparing for work, according to the instructions, the release and retraction hoses, which are connected to the device, are lowered into the “can.” Switching on is in progress.
Everything is very simple, but it seems so only at first glance. If we consider only the aesthetic factor, then this installation method is absolutely correct. Many owners of ornamental fish attach hoses through specially prepared holes in the bottom of the aquarium.
However, we need to look at the problem from the other side.
Depending on the model of the “canister”, its pump can lift water to a height of up to 3 meters. And this, in turn, promises high power consumption and increased energy costs. This is why many aquarists install their “canisters” either at the back or side of the aquarium at a height approximately equal to the middle of the water level. There is no need to talk about aesthetics here, but the energy savings are quite significant.
Differences by filtration type
When studying from a video how a filter works in an aquarium and at what depth to install it, it is important to understand how different types of aquatic environment purification differ from each other.
Mechanical
Aimed at ridding the fish habitat of particles of small debris and waste products. For this purpose, devices made of porous structures (sponge) are usually used, which best retain contaminants. It is recommended to use this method in parallel with others, since it alone is not enough to maintain the required quality characteristics of the liquid.
Chemical
Effectively purifies water from harmful impurities that appear over time. Of particular danger in this regard are: chlorine, toxic substances containing nitrogen, heavy metals, and drug residues. It is best to use activated carbon for chemical filtration - it is cheap and effective. As well as zeolite resin, which not only cleans the aquatic environment, but also has a healing effect on aquarium inhabitants.
Biological
It is the reproduction of special microorganisms that rid H2O of ammonia impurities. There is no need to artificially populate them from the outside. They are already available in fish houses, just in limited quantities. All that remains is to propagate, for which it is necessary to create the appropriate conditions. Special fillers can help with this: plastic, padding polyester, bioceramics, foam rubber, pebbles. These materials perfectly enrich the liquid with oxygen.
What to choose?
Before properly installing a filter in an aquarium , you need to make the right choice towards the most appropriate and effective device. There are two types of devices on the modern market: internal and external types. The latter are fixed from the outside, and the second - from the inside of the water container. Making a choice towards a specific option is quite difficult; in this case, you need to take into account not only its effectiveness, but also how to install the filter in the aquarium. It is important to consider the size, volume and variety of aquarium inhabitants.
Monitoring the adequacy of PD implementation.
It is very important to evaluate the results of peritoneal dialysis 1–2 times a day.
Control includes:
Blood tests for urea, creatinine. Body fluid balance.
With successful PD, blood urea and creatinine levels first stop increasing and then gradually decrease.
When the urea is about 30 mmol/liter there is no need to reduce the urea level and therefore there is no need to increase the volume of dialysis.
When urea is more than 50 mmol/liter, it is necessary not only to maintain this level, but to strive day by day to reduce urea to around 30 mmol/liter, by increasing the volume of PD.
The higher the urea level, the more aggressive the cleansing needs to be.
That is, within 3 days you need to approach the urea level of 30 mmol/l.
An indicator for reducing the cleaning rate is an improvement in the dog’s general condition and the appearance of appetite.
There are no target numbers for creatinine, but creatinine should not increase in any case. As a rule, creatinine decreases in proportion to the decrease in urea.
The fluid balance of the body is assessed by the weight of the dog and must correspond to the condition of the animal.
That is: If the dog is dehydrated, then it is necessary to compensate for the lack of fluid, but in kidney patients it is very important not to pour in too much.
An accurate indicator can be considered central venous pressure, which should be kept in the region of 1 5 Washing machine. water column. Other assessment methods are less accurate.
After eliminating dehydration, it is necessary to at least maintain the weight at the same level, subject to at least forced enteral nutrition.
If the dog does not eat and adequate parenteral nutrition is not provided, then the dog’s weight should decrease daily by 1 - 2% of the total body weight.
The dog loses this weight during self-digestion and liquid should not be retained in its place.
To increase fluid excretion, solutions with a large amount of glucose are used. That is, if you used a solution of 1.5% glucose and the liquid is not removed enough, you need to switch to 2.5 or 4.25% glucose.
Total: with successful PD, the levels of urea and creatinine in the blood should consistently decrease, and the weight of the animal before the appearance of appetite should decrease by 1 - 2% per day.
Cleaning the installation
Filtering devices play a vital role in the life of a small ecosystem. In order for cleaning products to function properly and provide clean water for your fish, they must be maintained. For this:
- regularly clean the structure from accumulated plaque and other contaminants;
- when removing it from the container, be sure to disconnect it from the power supply;
- do not leave the device turned off inside, otherwise the fish may die due to the concentration of harmful substances accumulated in the filter base;
- turn off the unit before cleaning;
- Do not turn it on until you put it in water.
Only by following all of the above recommendations will it be possible to maintain the device in working condition and save the lives of your pets.
Main table dispenser AquaPro 919H/RO (hot and cold water)
Main table dispenser AquaPro 929CH/RO (cooling/heating)
Floor dispenser AquaPro 311 (empty, without cooling)
Why do you need a biofilter?
There are several types of cleaning. The most common is mechanical, but there are also chemical and biological types. Scientists believe that it is the latter type that is considered the most important and necessary.
This is explained by the fact that in every aquarium there is organic matter left behind by fish and other inhabitants. Decomposition of feces, food residues, plant leaves and gases exhaled by animals provoke the release of ammonia. It poses a huge danger to all living creatures living in the home underwater world.
At a concentration of 0.2 mg/l, ammonia will kill all fish, and for some varieties the dangerous indicator is 10 times less. Accordingly, the aquarist needs to carefully monitor such biological processes and avoid situations where animals may suffer.
Ammonia can be dealt with in various ways. The simplest is regular water changes. They are held weekly, but not more often. Such procedures are very stressful for the inhabitants of the aquarium and, in addition, they can upset the fragile balance of the home ecosystem.
Therefore, the best way to deal with ammonia is through beneficial colonies of bacteria that oxidize it, thus converting it into nitrites and then into nitrates. The latter, of course, in certain concentrations can also cause harm to animals, but they are also a nutrient for natural plants.
This is the principle of biological filtration. It takes place in several stages:
- Fish leave behind waste products;
- Feces, food scraps and leaves decompose, releasing ammonia;
- Bacteria process them;
- The resulting nitrate is absorbed by living plants.
Bacteria independently form in the aquarium during the nitrogen cycle. They live in water, on walls, on decorations. They help maintain the necessary balance, but sometimes it happens that these colonies are not enough, and then ammonia still accumulates, poisoning all the animals. In this case, the task of the aquarist is to multiply microorganisms so that they can cope with high biological loads.
We recommend reading the article: How to choose lighting for an aquarium
How to properly assemble and install an aquarium filter: instructions for use
An air supply hose is always included with the model from the store. If the product is manufactured independently, it must also be provided. However, they are attached in the same way:
- Place one end of the tube to the hole on the device, and place the other above the surface of the liquid. Fix it to the wall from the outside using a special fastener.
- Make sure that the air intake element is strictly above the water. Otherwise, it will “choke” and suck in air incorrectly.
- Pay attention to the oxygen supply regulator. After installing the structure, place it in the middle position.
- Now observe the behavior of your pets. Some people like a noticeable flow of water, others try to avoid it. Adjust the speed of the current so that all inhabitants are comfortable.
Proper placement and efficient working conditions
In order for the filter system to clean the aquarium well, you need to select it correctly in terms of power and install it.
Performance
Determine the ability of the filter device to pump a certain volume of water. Manufacturers indicate performance parameters on the packaging labeling and in the instructions.
Important. It is necessary that the filter be able to pump from 4 to 10 volumes of water per hour of the capacity of the entire tank. That is, they buy a filter with a power calculation that exceeds the specified performance several times.
If you use insufficiently powerful filters, stagnant zones will form. Disruptions in water circulation lead to decreased oxygen levels. The water may bloom and become cloudy.
No dead zones
Water circulation should be such that stagnant zones do not form. It is necessary to adjust the flow power using a device on the air intake tube. Powerful air intake creates additional noise.
In order to neutralize the noise effect, special attachments are placed on the nozzle, such as a comb, in the shape of a lily. They cut through the air flow and reduce noise levels. A powerful stream can create discomfort for fish. The nozzles evenly distribute the pressure throughout the entire volume, eliminating the formation of stagnant zones.
Accessibility for maintenance and cleaning
Filter devices of various types need to be cleaned regularly. Installed so that there is constant access to it. It was easy to dismantle and clean. There should be a free approach to the aquarium. This point is relevant for external canister-type systems. A special cabinet is installed under them. Make a hole for the outlet pipes on the back or side of the panel. In this position, the tubes do not twist.
The aquarium maintenance device is not striking. The aquarium looks more attractive from an aesthetic point of view. There is free access for maintenance and cleaning of filters.
How to extend the life of filter equipment
Every aquarist wants his pets to feel good and his aquarium equipment to last as long as possible. To achieve this, you should:
- Clean all components of the unit regularly, following the information in the instruction manual.
- To prevent fish and other inhabitants of a small ecosystem from being poisoned by toxic impurities, the treatment system must function uninterruptedly.
- It is necessary to start the filter media when there is a sufficient amount of liquid in the container.
- Cleaning can only be done by turning off the power supply.
- Before work, you should carefully study the instructions from the manufacturer.