A piece of the sea in a cardboard box
There are so many photos of aquarium crafts on the Internet. Try making a product from an ordinary shoe box, and if you find a base with a transparent lid, then nothing will fall out of it, and the aquarium will turn out like a real one.
Necessary materials for the craft:
- shoe box;
- fishing line;
- buttons;
- paints;
- colored cardboard;
- pebbles, shells for decoration.
Preparation method:
- Prepare the base for the aquarium: paint three sides with blue paint and the bottom of the box with brown.
- From colored cardboard we cut out figures of sea animals: fish, octopus, starfish, etc.
- Glue shells, starfish and pebbles to the bottom of the aquarium.
- You need to make a small hole in the fish, thread and tie a fishing line.
- Make cuts on the roof of our aquarium - this way the fish will move inside their house.
- We pass the other end of the fishing line through the hole and tie the buttons.
- Glue the octopus and algae to the sides of the box.
You can add new fish to this toy craft every time.
Necessary materials:
- cardboard shoe or toy box;
- blue shades of paint;
- brushes;
- fish templates, which can be downloaded from this link, or (with older children) drawn by yourself;
- threads;
- needle;
- lids for purees (for example, Agusha);
- scissors;
- stationery knife;
- green colored paper;
- shells;
- pebbles;
- PVA glue;
- semolina;
- chalk (I used purple).
The list of materials turned out to be impressive, but don’t be alarmed, I’m sure that most people have almost everything at home.
Craft “sea in a jar”
An aquarium in a jar craft will be interesting for children 3-4 years old.
Necessary materials for the craft:
- a small jar with a volume of 250-500 ml.
- plasticine;
- pebbles;
- blue food coloring;
- sea fish stickers.
Preparation method:
We recommend reading:
Crafts from tires - a review of the best ideas and step-by-step instructions on how to make a craft from a whole tire or a piece of it (95 photos + video)- Craft vase - how to make a beautiful and original vase with your own hands (105 photos)
- Curtains for the kitchen - photos of the best new designs and successful combinations
- Together with your child, make snails or shells from plasticine and stick them to the wall of the jar from the inside.
- Place pebbles on the bottom.
- Fill with water and add a little dye.
- Invite your child to stick fish stickers on the outside.
For greater reliability, you can roll up the lid of the jar. It is also easy to make a similar product from an ordinary plastic bottle.
Lighting
When it comes to lighting, most masters advise using fluorescent lamps with a light transmission coefficient of at least 60 Ra. The equipment is attached to the lid. This homemade attribute is ready.
The idea of creating an aquarium with your own hands can lead to certain difficulties. But sometimes the design permissions of apartment owners simply do not allow them to turn to the options offered on store shelves.
Paper fish for volume applique
- take note paper;
- fold the square diagonally. Cut the top of the triangle so that there is a semicircle on one side and a small angle on the other;
- straighten out a square of paper;
- cut the lines without reaching the end of the square;
- there should be a pair of strips - six or eight pieces;
- start “braiding” the strips; the intersection must be glued with glue. Glue the two inner strips and so on until you have joined the last two outer strips;
- Draw the eye and fin with a black felt-tip pen.
Make several fish from different colors in this way. Crafting an aquarium with fish will turn out to be varied if you add figures of other sea inhabitants to it.
Equipment options
For successful bottle fishing, you can use different equipment options. Each fisherman can make tackle taking into account the characteristics of the reservoir and the type of fish he wants to catch. Let's look at the two most popular equipment options.
Bottle for fishing from a boat
“Bottle tackle” for fishing from a watercraft resembles the equipment of a circle. But due to some features of the plastic container, fishermen have to resort to certain tricks.
- To complete the gear, an empty, undamaged PET bottle with a capacity of 1 to 2 liters is suitable.
- A piece of fishing line 8-15 m long is attached to the plug area. The thickness of the monofilament should be in the range of 0.3-0.4 mm.
- A sliding sinker weighing up to 100 g is mounted on the fishing line.
The moment of a bite can be determined in different ways. Some fishermen paint longitudinal stripes with paint. Others mount flags that are used on winter girders. A leaf spring is tied to the bottom of the bottle, and the flag itself is bent towards the neck and secured with several turns of fishing line. When the bite occurs, the fish will begin to reel in the fishing line, the spring will straighten, and the flag will rise above the surface of the water.
Advice! In order for the bottle to be positioned bottom up, it is filled 2/3 with water and lowered with the neck down.
Shore fishing tackle
Bottle fishing from the shore is carried out using more primitive gear.
On a note! When catching catfish with a bottle, the rope is connected to the main fishing line and attached to the container in such a way that the bottle can come off when bitten.
The equipment can be mounted rigidly to the plastic using adhesive tape or electrical tape. In this case, the bite will be determined by the movement of the bottle, which will act as a float.
Shore fishing allows you to throw several tackles into promising places. Each of them can be attached to tree branches or bushes and left overnight. And in the morning all that remains is to get the gear and enjoy the catch.
Decorative craft-card
Another interesting product can be made from paper. This craft is suitable as a symbolic gift.
Necessary materials for the craft:
- thick blue paper;
- PVA glue;
- paints or markers.
Manufacturing stages:
- On both sides, retreat 2-3 cm and draw a line. Next, fold the paper in half and draw wavy stripes 1.5-2 cm wide from the fold to the drawn line.
- Using scissors, carefully cut out the strips.
- Open the paper and bend the strips in opposite directions.
- The result is a three-dimensional figure.
- Now you can decorate the frame with algae and fish.
- To do this, cut out wavy green stripes and glue them onto the waves.
- You can draw the fish figures yourself, make them three-dimensional (as already described above in the article) or cut them out from a magazine.
- Glue the fish onto the craft.
You can also cut out shell shapes and place them on the bottom of the aquarium with glue.
We recommend reading:
Decorative crafts - original craft ideas and do-it-yourself interior and exterior decorative options (115 photos)Original crafts: how are beautiful and unusual things made from improvised materials? (115 photos + video master class)
Crafts for the kitchen - tips, drawings, diagrams, patterns and options for using various crafts in kitchen interior design (95 photos)
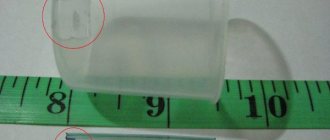
Suitable glass
It is advisable not to skimp on this material, since the structure must be especially strong to prevent cracking and flooding of the room. As you know, glass has different thicknesses, on which its strength depends.
- There is no point in using increased thickness for the manufacture of small models. At the same time, thin glass will not withstand water pressure in large structures.
- It would be correct to calculate the thickness of the sheet based on the volume of the container. To do this, you need to measure the sides and calculate the number of liters.
Next, you can rely on standard calculation data:
- Volume 30 l - 4 mm;
- Volume 80 l - 5 mm;
- Volume 150 l - 6 mm;
- Volume 250 l - 8 mm.
Only new glass should be used. Used material loses strength. It is better to order blanks from a workshop, since the cutting quality there is much higher to obtain perfectly straight edges.
To understand how to make an aquarium correctly, you need to study tips and tricks for assembling and installing it.
Craft “Aquarium on a plate”
Necessary elements for the craft:
- plastic plate;
- universal glue;
- colored cardboard;
- acrylic paint;
- pebbles for decoration.
Manufacturing stages:
- You need to cut out the top of the plate - about 5-7 cm. We glue this piece of plastic to the bottom side of the container as a stand.
- Paint over the plate. Let it dry for a while.
- Apply brown paint to the bottom and glue pebbles.
- Cut out the shape of a fish and seaweed from colored cardboard. We also glue them onto a plate.
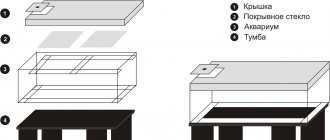
Beautiful DIY cardboard box: diagram and technology
The box can be used for different purposes: for giving gifts, storing useful little things or shoes. It can be either with or without a lid. There is also a separate category of boxes, the so-called “tea houses”, in which tea bags are stacked and it is very convenient to take them out one at a time during the tea ceremony.
Multi-colored cardboard is perfect for making a beautiful gift box.
There are many techniques for making cardboard boxes. It will be difficult for novice craftsmen to make a complex craft the first time, so it is recommended to start with simple options. You can download ready-made, lined templates from the Internet and print them or draw the diagram yourself.
To work you will need:
- Colored or white cardboard;
- Hold the pencil;
- Scissors;
- Glue stick or regular PVA.
The printed template must be attached to a sheet of cardboard and traced along the contour, the fold lines must be marked immediately. The contours of the future box are cut out and bent along the marked lines. Next, the walls must be glued together, and the finished box must be decorated with ribbons, lace, colored cardboard applications or wrapping paper.
Plasticine fish
The crafts described above are made mainly of paper. In addition to paper material, you can experiment with cereals, pasta and plasticine.
Necessary materials for the craft:
- thick cardboard;
- pasta;
- universal glue;
- PVA glue;
- buckwheat;
- plasticine.
Stages of making crafts:
- Glue the blue paper onto the cardboard with PVA glue.
- Make some fish and seaweed from plasticine.
- Stick them onto cardboard.
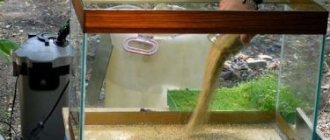
- Apply a layer of universal glue from below and add buckwheat - this will be the bottom of the aquarium.
- Also glue pasta in the shape of shells at the bottom in different places.
- Place the finished painting in a small frame.
Felt is not inferior to plasticine and paper. It’s pleasant and easy to work with, and the crafts come out excellent.
Progress
An arsenal of tools in the work process is a key link. After all, nothing can be built without available tools. With the right selection of tools, you are guaranteed a positive result in the end.
Usually, at home, a rectangular aquarium is made, and this is done in this way:
For example, let’s take the manufacture of an aquarium with a capacity of 20 liters. The first step is to measure the glass for the side walls, the bottom and the two remaining sides (back and front).
Felt aquarium
For it you will need:
- felt of various colors;
- for the base - blue cardboard;
- universal glue.
Manufacturing stages:
- Cut out sea creatures from felt.
- Apply glue and have your child glue fish and other sea creatures to the base.
- Small pebbles and shells will serve as decoration.
Making a children's craft "aquarium" is an interesting and exciting process. The finished product can be given to a friend or close relatives. A homemade aquarium will not leave anyone indifferent.
Features of fishing from a boat and shore
The technique for catching fish with plastic bottles depends on whether the fishing will take place on the shore or on a boat. In each option, success largely depends on the right location. Promising areas are the boundaries of clear water and algae, the junction of the river with the oxbow lake, bays, entrances and exits from holes, channel edges, and snags.
Shore fishing technique
When fishing from the shore, the angler must not only think about the casting distance of the equipment, but also about the likelihood of successful reeling. Since there is no fishing rod in the gear, the coastal area must be clean. In this case, you will be able to remove the fish from the water without any problems.
- Before throwing equipment into the water, it is important to prepare thoroughly. First you need to unwind the tackle.
- The nylon cord is carefully laid in rings on a clean bank. Its end is tied to a driven peg or bush.
- The equipment is fixed on the bottle. The container is filled with water.
- Live bait or other bait is attached to the hook.
- The bottle goes into the water.
The fisherman just has to wait for the bite.
Photo 3. Bottle in firing position.
Features of fishing from a boat
The watercraft provides the angler with more opportunities for fishing with “bottle tackle”. You should start by choosing an interesting site. Bottles can be installed along the shore or in a checkerboard pattern. In any case, you should choose some landmarks so as not to lose your gear.
The boat must be positioned downwind. After installing the first gear, you can start equipping the second bottle. During this time, the boat will be carried to the required distance of 10-15 m. Installation of the entire “squadron” will require a minimum of physical effort and time.
After the bite, it is important to approach the triggered gear as quietly as possible. Otherwise, the fish will get scared and make another jerk. To remove a large trophy from the water, a landing net is required.
Photo of crafts aquarium
2+
2
Terrarium for hamsters
Such dwellings provide for ventilation and sound insulation systems. Their prices vary depending on the size, quality, and included accessories. Among the materials from which structures are made, experts recommend choosing inorganic glass; it is much stronger than other options.
Advantages and disadvantages
The proportions of the terrarium are designed to provide sufficient air for all its inhabitants. As a rule, there are 3 main elements inside such a structure: a feeder, a drinking bowl and a small house. To entertain hamsters, it is also recommended to install gaming accessories inside the terrarium: a wheel, hammocks, ladders.
The advantages of a terrarium are:
- absence of noise from animals in the room;
- blocking unpleasant odors;
- ease of monitoring the hamster;
- saving time and effort when cleaning the home - the terrarium for hamsters is easy to clean and disinfect.
Important! When selecting detergents, it is necessary to take into account their aggressive effects on animals.
The disadvantages of the terrarium are minor:
- We'll have to think about a way to strengthen the drinking bowl.
- Communicating with your pet through glass is less fun.
Important! Many breeders of pet rodents place a Velcro drinking bowl inside the terrarium.
How to make a terrarium with your own hands
The basis is a plastic container. It is better to choose larger sizes. For example, for 2 dungeons, a plastic box with dimensions of 57x39x27 cm will be enough. For work you will need: a metal mesh with small cells, scissors, an awl, and wire.
Manufacturing instructions:
- On the lid of the container, mark the perimeter of the hole on which the mesh will be installed.
- We apply the mesh and use an awl to poke holes for the wire.
- We cut the required piece of mesh and secure it with wire on the lid.
- From the inside of the lid, cut out a rectangle along the contour of the wire fastenings, and you also need to leave a gap (1 cm).
- We make several holes in the bottom of the container for additional ventilation.
The modified lid conveniently “snaps” onto the container - the animal will not be able to move it. This terrarium is easy to move and wash. It is advisable to choose transparent containers for homemade designs.