An aquarium filter is one of the most important parts in a home pond, prolonging the life of waterfowl. Cleanliness depends on it, because the device provides mechanical and biological cleaning, and also saturates the water with oxygen. The installation of this device may be different, depending on its type and purpose. It is sometimes difficult for a novice aquarist to understand the instructions that come with the filter, so it is worth considering in detail the types of aquarium filters and the rules for installing them.
Types of filters for aquariums
Before you begin installation, you need to understand which filter you need.
Manufacturers offer external and internal filters. The first ones are attached outside, the second ones - inside the aquarium. Choosing the right filter should be based on the characteristics of a particular aquarium, its size and volume, as well as the abundance of living plants and fish.
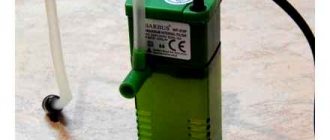
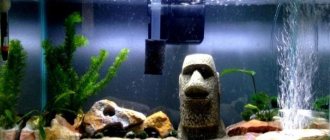
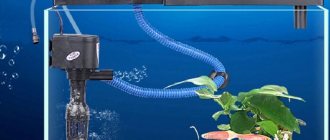
Internal filters are the simplest type of filter, held on by hooks or suction cups. Water enters the lower part, passes through the filter layers (synthetic wool, foam rubber) and exits through the upper part.
The jet is directed towards the surface, due to which the water is enriched with oxygen. This option is suitable for beginner aquarists with small aquariums who want to independently learn the features of its operation and installation.
Advantages of the internal filter:
- affordable price and the ability to purchase at any pet store,
- low energy consumption,
- sufficient water filtration for fish to live in a compact aquarium.
Flaws:
- takes up space in the aquarium,
- Suitable only for small aquariums,
- To clean, you need to put your hands into the aquarium, which can lead to infection of the fish with microbes.
What are the pros and cons of external and internal aquarium filters?
On the market today you can find a huge variety of filters, some even combine two functions at once - cleaning and aeration. But experts still recommend purchasing these mechanisms separately.
Regardless of the choice of filter, it is important to pay attention to the manufacturer. For many Chinese devices, it is impossible to buy spare parts, so if the device breaks, you will most likely have to throw it away.
In this regard, it is better to overpay a little, but purchase a reliable filter with the ability to repair it.
The internal filter, as mentioned above, is placed inside the aquarium. This simple design is usually chosen by beginning aquarists. The filter material is often cheap foam rubber. The material must be periodically removed and washed.
Such devices are good at a low price, they are not difficult to purchase at any pet store, and they can also be easily repaired.
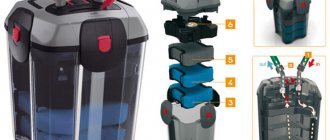
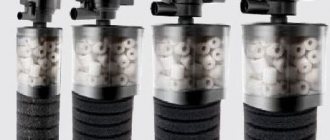
External filters are a more complex device. Due to its large size, it is not placed in the aquarium, but outside. It has several stages of mechanical and biological purification and is used by experienced aquarists to keep particularly demanding fish.
Such a device can operate for quite a long time without special maintenance. And the cleaning procedure involves only washing the stages of mechanical water purification.
The “residence” of beneficial bacteria should not be touched so as not to damage the bacterial colony.
During operation of the device, it is necessary to periodically check the reliability of fastening of all elements in order to prevent possible water leaks. Such devices should be purchased only from well-known and trusted manufacturers who have service centers, and you can easily buy spare parts for repairs.
Recommendations before installation
- Before installing the device, you should fill at least 50% of the aquarium with liquid, because cleaning equipment is used only when filled.
- Before assembly, you should check that all parts are perfectly dry.
- As for the internal filter, it should be located approximately 2-4 cm below the surface of the water, and if the aquarium space allows, then lower it even lower, but so that it does not reach the bottom. Be sure to check the filter every day. It must be completely covered with liquid, and it tends to evaporate.
- The device may only be placed in liquid when it is turned off.
- A special air outlet tube is brought out (it is advisable to fix it).
- After these manipulations, you can plug the device into a power outlet. If a current appears, it means the device is connected correctly. It is not recommended to fix the wire from the filtering equipment, but leave it in a free position.
There is also a special valve on the cleaning filter, with which you can regulate the direction of movement and the pressure of the purified liquid. Before using it, you must unplug the power cord from the outlet.
Trouble-shooting
Despite the reliability of devices, they can still fail. This often happens due to gross violations of operating rules. For example, if an electrical wire is damaged somewhere, or the motor winding burns out, then when the plug is plugged into an electrical outlet, the mechanism will not work. Due to the high requirements for waterproofing, there is no point in repairing this - you just need to purchase a new filter.
Inactivity of a device when connected to the network or intermittent operation does not always indicate problems with the wiring. The cause may be excessive dirt in the rotor chamber, including lime deposits. This is easy to fix; you just need to disassemble and wash the rotor. If there are limestone deposits in the chamber, then special means are used to remove them. The success of cleaning depends on whether the installed rotor can rotate freely on the axis.
Most malfunctions occur due to improper operation of the device
Water pressure can be weak for two reasons:
- Flow power is not configured.
- Excessive clogging of the device.
In the first case, you need to change the position of the power regulator located on top. If it is turned correctly, you will have to disassemble and clean the mechanism.
If the filter is working properly, there may be difficulties with aeration. In most cases, the problem is solved using this list of faults and how to fix them:
- The minimum position of the power control is simply to change it.
- Air flow switch at minimum - change the position to the desired one.
- If the aeration hose or nozzle is dirty, clean it with a regular needle or strong water pressure.
- Installation of the filter too deep - the device must be placed higher so that it is at least three centimeters from the surface of the water.
- If the sponge or other parts are clogged, completely clean and replace the filter elements.
It is important not to forget to install the plug on the air flow regulator, otherwise the filter will squelch loudly. To prevent the aeration nozzle from making unnecessary sounds, you can set a less powerful air flow.
Installing the internal filter
Installing an internal filter in an aquarium will not take much time and effort if you follow the rules and read the attached instructions. After purchasing the purifier, you must remove it from the packaging and assemble the unit following the manufacturer's instructions.
As soon as the water purifier is ready for installation, there is no need to rush to install the filter in the aquarium. First, all residents of the reservoir are evicted into a separate container. The procedure is not mandatory, but if the purchased unit has a manufacturing defect, then when it is turned on, pets may suffer. Experienced aquarists recommend not to risk the health of the fish, but to temporarily move them into a fish tank, and only then install an internal filter in the aquarium.
So, as soon as the fish are resettled and the device is in combat readiness, the device is installed inside the aquarium. The water purifier must be installed so that the device is completely submerged in water, and the height of the liquid above the unit cover should be 3–5 cm. The structure is attached using suction cups, which are certainly included in the device package.
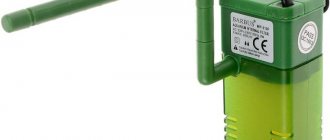
Standard internal models have a colorless elastic tube. Its purpose lies in the supply of oxygen, so the first end of the tube is adjacent to the device, and the second remains outside the water column.
After successful installation of the internal purifier, a test operation is carried out. If the filter functions correctly, the pets are returned to the aquarium. It is very simple to check whether the purifier is working: put your hand into the aquarium and bring it to the device - if you feel a stream of water, then everything is in order. The power is set based on the preferences of the fish. That's all you need to know about how to install an internal filter.
Important fact: the device in an artificial reservoir should not touch the bottom.
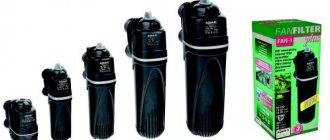
Advantages of Aquael
The effectiveness of Aquael products is confirmed by the experience of many aquarists. Transparent water improves the aesthetic component of the appearance of the vessel indoors, and also guarantees good health for the fish and prolongs their life.
The manufacturer takes his business seriously. High-quality high-tech devices produced by the company last longer than their competitors. The warranty period for the FAN series is three years.
Aqual filters are easy to use and good for beginners. The devices are easy to install and clean.
There are no products in the series with a degree of protection lower than IP68. This marking means that the mechanism is completely protected from water penetration. Thanks to this, complete safety is achieved during uninterrupted operation and complete immersion of the body in water.
How to extend the life of filtering equipment?
To extend the period of use, perform the following measures:
- All elements and components are cleaned in accordance with the recommendations specified in the instructions.
- To prevent fish, shellfish and plants from absorbing toxins and harmful substances, the units must work constantly.
- The devices are started only if there is a sufficient amount of liquid in the tank.
- Cleaning of the unit is carried out after the electrical power supply is interrupted. The wiring is disconnected carefully.
- Study the instructions, which describe how to properly install the equipment.
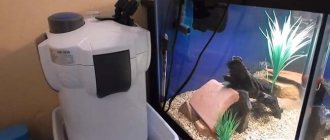
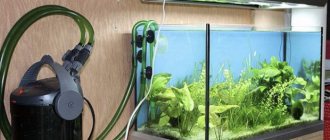
Features of installing an external filter
An external aquarium filter, which is often called a “canister”, is usually installed in a cabinet under the aquarium, much lower than the aquarium water level. After preparing for work, according to the instructions, the release and retraction hoses, which are connected to the device, are lowered into the “can.” Switching on is in progress.
Everything is very simple, but it seems so only at first glance. If we consider only the aesthetic factor, then this installation method is absolutely correct. Many owners of ornamental fish attach hoses through specially prepared holes in the bottom of the aquarium.
However, we need to look at the problem from the other side.
Depending on the model of the “canister”, its pump can lift water to a height of up to 3 meters. And this, in turn, promises high power consumption and increased energy costs. This is why many aquarists install their “canisters” either at the back or side of the aquarium at a height approximately equal to the middle of the water level. There is no need to talk about aesthetics here, but the energy savings are quite significant.
Installation of the bottom filter
Already from the name of this purifier it is clear that it is installed on the bottom of an aquatic fish house. But the choice of this type of filter is resorted to only when there is very little or no decorative bottom aquatic vegetation in the aquarium.
Such a device is a relatively thin plate with internal filter material and many holes through which water flows. Some believe that such a plate with tubes attached to it can simply be placed on the ground and that will be enough.
This is a misconception - the bottom cleaner must be installed, and not just placed.
First, you need to remove the soil from the bottom of the aquarium (or from a separate area) and place a plastic frame that will raise the false bottom by 2-3 mm. Only after this can the technical device be covered with soil and then put into operation.
Not only the purity and high-quality chemical and biological composition of the water, but also the degree of its saturation with air depends on the correct installation of any aquarium filter. In addition, this determines the reliability of the device itself. In any case: before the water purifier is put into operation, you must carefully read the instructions attached to it and strictly follow the rules specified in it.