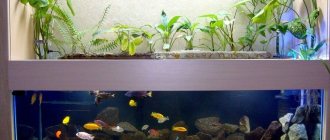
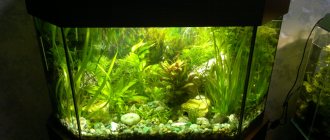
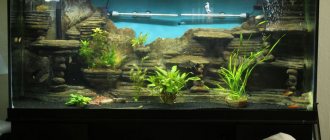
Aquarium lighting is required when breeding fish from tropical or subtropical climates, where daylight hours are long throughout the year.
The microclimate is created using water heating and lighting systems. If with the heating of water everything is more or less clear and with the help of the air flows of the compressor it will mix and the heating will be more or less uniform, then with lighting everything is somewhat more complicated. Depending on what kind of fish and plants you keep, the necessary conditions will change.
Why are LEDs better than halogen, fluorescent and incandescent lamps?
Before the advent of new generation lamps, lighting was done on:
- Fluorescent lamps;
- halogen lamps;
- incandescent lamps.
Now everything has shifted towards lighting the aquarium with LED lamps, why is that? Incandescent and halogen lamps emit a lot of heat, which causes additional heating of the water, sometimes excessively, which requires heat removal. Heat was removed using forced air cooling, i.e. cooler (fan). This caused additional noise and costs.
Lighting an aquarium with LED strip produces less heat and produces more light. This is especially true for plants that require strong lighting: from 6,000 to 10,000 or more Lux of illumination. An incandescent lamp produces from 9 to 20 Lumens for every Watt of its power.
Let's compare classic and LED aquarium lighting, using the simplest calculations of power and illumination as an example.
Comparison of lamp types
1 Lux = 1 Lumen/m2. That is, to provide a classically shaped aquarium (depth less than its length) with a minimum illumination of 6000 Lux, you need about 400 W of incandescent lamp light. When its efficiency is less than 10%, it turns out to be a rather powerful heater, not a lamp.
Halogen lamps have a higher luminous flux, fluorescent lamps have an even higher luminous flux, and the heating of water from them is less. But the latter contain mercury vapor, which, if the lamp is damaged, can bury all living creatures in the water.
However, LED aquarium lighting, as of the day this article was written (end of 2021), is the most effective. LEDs provide 80-140 lm for every W of their power, which is 5-10 times more efficient than competitors.
Lighting is more important for flora. LED lamps in the aquarium will provide the necessary illumination for plants and save money. Think for yourself how much it will cost to operate an incandescent lamp with a total power of 0.5 kW, which operates for 5-12 hours a day. Even the use of automation will not allow you to achieve significant savings. Light from LEDs consumes from 50 to 150 watts, depending on the size of the aquarium.
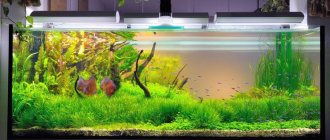
LED lighting in an aquarium can be used both as decorative lighting and as functional lighting. Spotlights and ribbons can be placed in the lower layers of water, both for illumination and to provide light to plants located at the bottom of the container.
Driver setup
According to our scheme, we will need two driver options - 500 mA and 700 mA. The ones that are sold are generally always set to 700mA. In order to make such a driver 500mA, it will be necessary to replace the resistors that set the current. The current on our PT4115 is set according to the plate:
| I mA | R oM |
| 350 | 0,28 |
| 500 | 0,2 |
| 700 | 0,14 |
| 100 | 0,1 |
Resistance calculation for PT4115
From the factory, the driver is configured for a current of 700 mA and therefore three parallel-connected resistors with nominal values of 0.5 Ohm, 0.4 Ohm, 0.4 Ohm are installed between the VIN and CSN pins, which are according to the formula:
we are given 0.14 Ohm, which corresponds to 700 mA. The easiest modification option is to buy 0.2 Ohm SMD resistors (from the link above in the spare parts table), unsolder all three that are on the board and instead of any of them solder your own 0.2 Ohm resistor. For example like this:
There is only one question left - the radiator. We need one that can dissipate 120-150W of heat without fans and distribute all 48 LEDs on itself. Personally, I prefer the TPK-011 radiator from Techno-Logic
You choose any one that suits the characteristics.
Types of LED lamps
The variety of LED lighting options for an aquarium confuses a person when choosing. Let's look at the types of LED light sources and how to install them. This will help you make your choice when making your own lighting.
LED Strip Light
LED strip is available in various classes of protection from dust and water.
If you plan to use the tape for mounting on the aquarium lid, protection class IP65 is suitable for you. It is protected from splashes and large drops, but cannot be immersed in water. She will feel great near/above water.
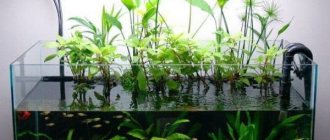
In some cases, to illuminate plants located near the bottom and in places with complex terrain, you need to use an LED strip laid along the bottom of the aquarium. You can place it outside the aquarium with the LEDs facing inward, or in the water, placing it on the bottom.
In such cases, use only IP68 rated tape. It is used to illuminate the bottom of fountains, pools and aquariums. The main task is to ensure reliable insulation of the connection point of the supply wires.
Colored lighting in an aquarium looks interesting. Use RGB tape to add some color to your interior. Please note that a long show of this kind can negatively affect the flora and fauna of the aquarium.
Blue illuminated aquarium at night
Lighting with powerful diodes (1-3 or more watts)
Such diodes must be installed on a heat sink; this can be either an aluminum sheet, a common radiator, or radiators for individual LEDs. LEDs can be mounted on the lid of the aquarium. Install diverging lenses on them to ensure greater uniformity of light flux.
There are no special nuances here; detailed production with photos and examples is discussed further in the “do-it-yourself” section.
Aquarium lighting with LED lamps and spotlights
The easiest way is to use a ready-made product, such as an LED floodlight. It provides good brightness and quality of light, and the wattage range they are sold in will allow you to choose the ideal LED lighting option for your aquarium.
Lighting with conventional LED lamps is also possible, but the main task will be their placement and protection from moisture. If the lamps do not come into contact with moisture, this is a good and budget solution.
What difficulties may arise
A favorable climate for fish and plants at home is created in two ways: by heating inside the aquarium and by installing special lamps. With the first one, everything is quite simple, but with the calculation of the required lighting and installation of the lamp, especially if it is a homemade option, difficulties arise. The conditions for keeping fish and plants in an aquarium depend on their species and the size of the aquarium.
The second difficulty is proper installation and connection. For a person who would like to make the life of pet fish more comfortable, but does not have much experience working with electricity, he has to follow the instructions and try not to make mistakes. You can, of course, buy the necessary spotlight, or even order specialists to come to your home, but this is not cheap; for a large aquarium, purchase and installation can cost tens of thousands of rubles, or even more. Therefore, we recommend making a homemade lamp for the aquarium.
The third main problem is the question of which lamps to choose to continue daylight hours for pet fish. We recommend choosing LED systems.
How much light do you need? Calculation of LED aquarium lighting
Calculating the number of LEDs must begin by calculating its area. If your aquarium depth is less than its length and width, you can neglect the loss of light in the water column, and make calculations with a margin of 1.3-1.8 times.
Let's say we have a capacity of 1x0.6x0.4 m, which gives us a volume of 240 liters, and the illuminated surface area is 6000 cm2 or 0.6 m2.
Required illumination (from the directory):
- If the aquarium contains mainly fish, 3000-6000 Lux is enough;
- 6000-10000Lx for algae and fish;
- 10000-15000Lx is needed for herbaceous and bright plants.
The exact values of the required illumination for specific types of fish/plants can be found in modern directories of aquarium flora and fauna.
Chinese LEDs from the lower price segment produce from 80 to 100 Lm/W, expensive LEDs from well-known brands (OSRAM, Philips, etc.) up to 140 Lm/W.
Let us remind you that 1 Lux = 1 Lumen / 1 m2.
E = F / S , where E is the illumination Lx, F is the luminous flux Lm, S is the area m2.
Let's apply the formula. Let's express the luminous flux:
F=E*S
Let’s take as an example the required illumination of 10,000 Lux; we calculated the area to be 0.6 m2.
F = 10000 * 0.6 = 6000Lm
The propagation of light and the change in brightness with distance are affected by the inverse square law. Those. with an increase in distance by TWO times, the illumination will drop by FOUR times, and this is provided that the environment is transparent, not smoked or dusty.
6000Lm is the required luminous flux, provided that light passes through clean air at a distance of 1 meter. In our country, water is a denser medium, so the light flux should be several times stronger. On the other hand, the depth (distance from the lamp to the bottom) is almost half the calculated one (1 m) and the luminous flux (according to the inverse square rule) at this distance will be 4 times stronger. Therefore, these two indicators exclude each other and do not affect the result.
Now you need to select LEDs for the aquarium based on their spectral composition. Take a look at the chart:
Choosing LED power for an aquarium
Photosynthesis is affected by red and blue colors. As a basis, we will choose a white ribbon 5730 60 pcs/m, its luminous flux is about 2000 Lm/m, and its power is 14.4 W/m. This means we need about 2.5 meters of such tape, this will be more than 5000 lm. Let's add red and blue LEDs 5050 30pcs/m, 2 meters of each color. The luminous flux of each is about 300 Lm/m, power 7 W/m.
In total it turns out 2.5 * 2000 + 4 * 300 = 6200 Lm , which is already enough.
When lighting with discrete LEDs, the technique is the same: divide the required luminous flux by the luminous flux of one diode and get the required number of discrete LEDs.
Power supply power:
(14.4 * 2.5 + 4 * 7) * 1.25 = 80 W
This is with a decent margin of a quarter of the power.
Here you can read about calculating a power supply, and here how to make one yourself.
Which brand of LED strip should I choose for my aquarium ? It doesn’t matter, you just need to take into account important rules:
- Remember about the dust and moisture protection class. When the tape is immersed in water - IP68, when installed on the inside of the lid above the water of the aquarium - IP65;
- cheap Chinese tapes always overestimate the real luminous flux indicators. Take them only if you are on a limited budget and as a temporary solution;
- give preference to proven manufacturers such as Philips or Osram. The high price is compensated by high performance and service life.
How to count incorrectly
Everywhere on the Internet you can find calculations of illumination based on the volume of the aquarium in liters. This is a fundamentally wrong approach. The W/L figures were derived empirically and were previously only used for incandescent lamps. Today, the luminous flux of LEDs is an order of magnitude stronger than the luminous flux of incandescent lamps, at similar powers (W).
For example, it is often recommended to use a ratio of 0.9-1W/L. Those. with our estimated volume of 240 liters, we need a light source with a power of 216-240 W. And this is 3 times (!!!) more than necessary. Be careful and don't make this mistake.
How to place diodes on a radiator?
I did this. To evenly distribute the diodes and their glow, I divided the ice into groups - primary clusters. For me, such a cluster was 9 ices: 3 RB, the rest one each B, CW 10000, CW 20000, DR, G, UV.
It turns out that you need to arrange 10 clusters (90 of my diodes / 9 pieces in a cluster = 10). I calculated the dimensions of the sides of the cluster: there should be 90 ice blocks on the area of my radiator, i.e. radiator width * radiator length = 90 ice. The sides of my radiator have a ratio of 700/300 = 2.3. So x*2.3x=90. Hence 2.3x2 = 90. x2 = 39, x = 6.24. It turns out that for optimal heat dissipation, 6 diodes will be used for the width of my radiator, and for a length of 2.3 * 6.24 = 15. The result is a cluster of 9 ices, this is a square of 3 ices by 3 ices, which means two rows of clusters of 5 pieces.
How to make a lamp for an aquarium with your own hands?
The simplest option for making a backlight with your own hands is to place the lamp in a plane parallel to the bottom of the aquarium, evenly distributing the light over the bottom area. Depending on the power of the light source, the need for additional cooling must be considered.
Homemade LED lighting for an aquarium can be divided into three types:
- Stationary above the aquarium;
- pendant lamp, height adjustable;
- illuminated cover.
If you have little experience in electronics and soldering, lighting an aquarium with LED strips will be a simpler option than discrete LEDs. Only low-power tape that does not require additional cooling can be glued directly to the lid. When the cover is made of heat-conducting material, larger diodes can be installed.
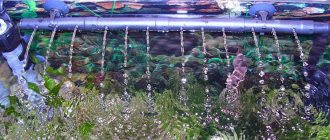
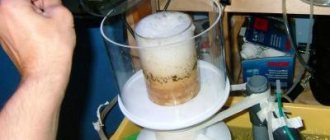
For illuminating an aquarium with tape, the body of a fluorescent lamp lamp is perfect. Use a plastic pipe (3/4 or 1 inch) and attach the LED strip to it as shown in the picture below.
You can use high-power discrete LEDs - 3W. Such LED lighting requires additional cooling. Calculate a radiator area of at least 25 cm2 for each watt of power. Learn more about how to make a radiator with your own hands.
An example of making such LED aquarium lighting with your own hands is shown in the photo below.
The LEDs must be secured either with heat-conducting glue, or through a STAR-type adapter plate with thermal paste, and to the radiator with self-tapping screws or rivets.
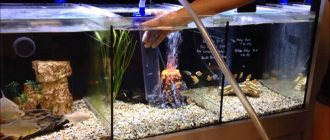
When it is not possible to provide the required cooling area and the LED aquarium lamp gets very hot, provide active cooling using a cooler. A cooler from a computer power supply will do. The photo below shows suspended lighting for an aquarium with active air cooling.
A DIY LED aquarium light will allow you to control and adjust both the amount and color of your light. By increasing or decreasing daylight hours and light intensity, you can control the growth of aquarium animals.
Please rate the article. We tried our best:)
Did you like the article? Tell us about her! You will help us a lot :)
Purchase of components
| 1. LED Chanzon Royal Blue 3W, 6pcs | Ali link: Buy |
| 2. LED Chanzon Deep Red 3W , 12pcs | Ali link: Buy |
| 3. LED Chanzon Amber 3W , 6pcs | Ali link: Buy |
| 4. LED Chanzon White 3W , 18pcs | Ali link: Buy |
| 5. LED Chanzon Cool White 3W , 6pcs | Ali link: Buy |
| 6. Adhesive for LEDs, 5 pieces | Ali link: Buy |
| 7. Stars for LEDs, 48pcs | Ali link: Buy |
| 8. Power supply 24v 5A, 1 piece | Ali link: Buy |
| 9. 16-channel 12-bit PWM PCA9685, 1 piece | Ali link: Buy |
| 10. Driver PT4115 700ma, 8pcs | Ali link: Buy |
| 11. Resistors 0.2 Ohm, 4 pcs | Ali link: Buy |
| 12. Connectors from the lamp to the drivers | Ali link: Buy |
For installation you will need wires, connectors, breadboards for assembling drivers, and soldering supplies:
| 1. Excellent installation wire | Ali link: Buy |
| 3. Good solder | Ali link: Buy |
| 4. Development boards | Ali link: Buy |
| 5. No-clean flux RMA 223 | Ali link: Buy |
| 7. Soldering iron with temperature control | Ali link: Buy |
Programming arduino nano.
Despite the fact that I had ready-made sketches, I decided to go to my friend who works on microprocessors. Unfortunately, the algorithm couldn’t write it in the language I needed, so I had to dive in myself. Of course, I didn’t write the sketch again, but to perform the compilation I had to adjust the two existing algorithms. I read about the basics of programming and was able to do everything easily. When checking (compiling) an algorithm in arduino, it is written which line contains the error, what it is, and what needs to be done. As easy as pie. The main thing is to understand the basic variables, their meanings and their correct use.
In general, I spent Saturday evening and the first half of Sunday completely setting up the Arduino. And then I tinkered more with the RTC clock. I didn’t fully press the Arduino to the board and there was no GND contact to the clock and they gave me adabra-kadabra.
Now to the nuances. For all this mess we need the Arduino 1.0 program. RTClib and Wire databases, sketches, driver for your Arduino board for your OS. Download the program, launch it, connect the Arduino via USB, install the driver. The green light on the scarf will start to light (this means power is supplied to it) and the red light will blink at a frequency of 1 Hz. Next, look in the device manager in the COM ports subsection to see which new serial port has appeared. Let's remember the number. Next, in the Arduino 1.0 program, open the Tools – serial port tab and select the one that was created for Arduino. Next, select our Arduino nano 328 board from the Tools-Board list. Next, add libraries: unpack and transfer to the arduino-1.0\libraries folder. Ready.
Let's start the RTC clock. Arduino – file – examples – time – processing – syncArduinoclock or Arduino – file – examples – time –TimeRTCset
Or manually:
#include #include "RTClib.h" RTC_DS1307 RTC; void setup() { Serial.begin(57600); Wire.begin(); RTC.begin();
RTC.adjust(DateTime(2013, 8, 6, 10, 30, 1)); //Set the date and time in the format year, month, day, hour, minute, second. } void loop () { DateTime now = RTC.now(); Serial.print(now.year(), DEC); Serial.print('/'); Serial.print(now.month(), DEC); Serial.print('/'); Serial.print(now.day(), DEC); Serial.print(' '); Serial.print(now.hour(), DEC); Serial.print(':'); Serial.print(now.minute(), DEC); Serial.print(':'); Serial.print(now.second(), DEC); Serial.println();
delay(1000); }
Change the time and date to the real one. We fill it into the Arduino, open the Serial monitor and look, if the right time goes by - great. Let's move on to the sketch.
Uploading a sketch.
Download the sketch (here's mine). Let's unpack. Open it through the program itself - Ctrl+O or place it in the directory C:\Users\your user\Documents\Arduino.
Next, select it in the program: file - sketchbook-avtomatmoj. We check Sketch – verify/compile. Everything compiles perfectly. To get the brightness you need, do the following: if you want 100% brightness, set it to 255. If you want 30%, then 255*0.3 ~ 76. Channel order: CW (white), TV (purple), RB (royal blue), NB (blue) ), DR (red), NG (green). We upload the sketch to the Arduino and enjoy the sunrises and sunsets.
Discussion of the article on the forum.
This article was written specifically for Aquamania.by.
Author: Komyakovich Alexander, aka voodoo, 2015
Copying of material is permitted only with a link to the source.
Join us on social networks:
How to arrange diodes by color?
Since there are 3 RBs, they will be diagonally along the cluster. Those ices that have an average position retain their location since they will illuminate both the upper and lower boundaries of the cluster equally.
Ices of one row located in the top position of one cluster in the neighboring cluster will occupy the bottom position with a different arrangement, and in the next cluster again the top one, alternating.
The bottom row of clusters is a mirror reflection of the top row, first vertically and then horizontally (this reflection is done in order to avoid neighboring ice of the same color). The result of the approach is shown in the figure.