Tap water is almost universally unsuitable for drinking and requires preliminary preparation. Boiling and settling are simple methods, but not very effective.
Household filters cope with this task much better, but the highest degree of purification is achieved by a reverse osmosis unit. The method is expensive, but completely worth the investment.
Water purification using reverse osmosis is the most advanced method yet. The principle of its operation is similar to the metabolism of a living organism. With its help, it is possible to rid water of almost all impurities, viruses, bacteria, nitrates, etc.
It is easy to install reverse osmosis with your own hands, it is assembled like a construction set, and the work does not require special tools - a minimal amateur kit is enough.
System Description
Today, many different filters are used to purify water. But reverse osmosis is the most effective of them. This system allows you to remove almost all impurities from water. At the same time, connecting a reverse osmosis filter with your own hands is not difficult even for a person who is very far from plumbing work.
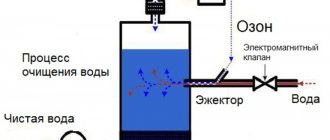
Reverse osmosis is a process by which a stream of water is split into two parts. Each of them has unequal density. The first stream has a high degree of purity, while the second contains a large amount of contaminants. To do this, the system has a special membrane. Very small holes are made in it, the size of which is only 0.0001 microns. Only water molecules can pass through it.
To prevent the membrane from clogging very quickly, the system includes several more prefilters. The stream, undergoing preliminary purification, is freed from chlorine, suspended particles, organic matter, etc. These are larger fractions.
The membrane is the final filter, which carries out the finest cleaning. The flow is divided into two parts. Contaminated water is discharged into the sewer system. The clean flow enters the storage tank. It is needed to improve the comfort of using the system. The fact is that the flow of water passes through the membrane rather slowly. It is not able to provide a sufficient amount of liquid in flow mode.
It is worth noting that the membrane pores are 4000 times smaller than bacteria, and also 200 times smaller than viruses. Therefore, only water and oxygen molecules can pass through them. To prevent large particles of pollutants from clogging the pores of the membrane, the system uses 3 filters with different fillers. It depends on the impurities that are contained in the water in a given area. Most often, one of the prefilters has a carbon filler. Other cleaners can be made from various artificial and natural materials. The holes through which the liquid passes in such pre-treatment systems are 5 and 1 microns.
To install a reverse osmosis system with your own hands, you will need to review the manufacturer's instructions. All actions are performed according to a certain method.
Structural elements
Let's look at the performance and role of each:
- Polypropylene cartridge – consists of 100% polymer, helps remove mechanical impurities. It lasts a long time, as it resists bacteria and chemicals, and its fibers on the inside are even stronger than on the outside.
- Carbon filter – with granular loading, responsible for eliminating organic matter and chloride compounds. It is a mandatory functional part of any equipment.
- STO-catcher - helps to trap even particles of contaminants 5 microns in size and larger (including harmful bacteria). It is a pressed block with a retaining shell made of polypropylene, which helps remove the coarsest fractions. It is made quite rigid - due to the built-in core.
- The membrane is a semi-permeable structure with the most dense mesh, allowing only O2 and H2O molecules to pass through. Since it is very sensitive and easily clogged, all the previously described elements are located in front of it to prevent it from clogging. All impurities that it stops must be washed off.
- Post-catchers have a service life of up to 5-6,000 liters, so they are replaced relatively often. They are placed after the main cleaning element, hence the name. They are used until the liquid is finally ready for consumption for food purposes.
MBFT-75 Membrane for 75GPD
SF-mix Clack up to 0.8 m3/h
SF-mix Runxin up to 0.8 m3/h
Contents of delivery
To install reverse osmosis for an aquarium or for household consumption with your own hands, you will need to familiarize yourself with the delivery kit. It includes everything needed to install the system. Depending on the model, the list of components may vary, but most often it includes the following components:
- membrane;
- pre-cleaning flasks installed in the block;
- postfilter;
- faucet for purified water;
- mineralizer;
- key for replacing filters in flasks;
- membrane replacement key;
- mounting panel for installing a crane;
- tees for connecting system elements;
- flexible water hoses.
It is necessary to determine what performance the system should have. You may need to install additional modules. For example, a mineralizer is not supplied in every kit. The fact is that water after such serious purification has a rather unusual taste. Beneficial minerals that a person needs for normal well-being are also removed from it. To replenish the natural composition of the liquid, a mineralizer is installed. It fills the water with essential minerals.
Connecting reverse osmosis with your own hands does not cause any particular difficulties if all the necessary steps are performed consistently. It is worth considering that usually all elements of the system have standard sizes, which allows replacement without difficulty if necessary. It is worth purchasing just such reverse osmosis. For systems with non-standard component sizes, it is difficult to select suitable elements.
What aquariums is it used for?
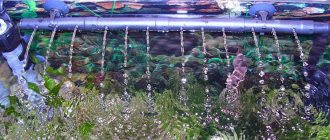
Almost all fish and plants require a special environment with appropriate acidity and hardness values. It is almost impossible to create it using running water, since this water has an unpredictable composition. The only way out of the situation is osmosis for the aquarium. The system uses pressure in the water supply, causing it to force water through a membrane, filtering out contaminants and allowing only H2O to pass through.
After the cleaning itself, the parameters change. Using a mineralizer (necessarily included in the kit), the necessary minerals are added to the water. In this case, the aquarist can add fertilizer himself, that is, micro- and macroelements. Stiffness can also be affected. If the water is too soft, shells and other decorations or substances are added to the aquarium to dissolve and increase dGH levels. You can also affect the acidity. For example, you can add leaves of some trees. They release substances into the water, disinfect and slightly oxidize.
In fact, the system has been successfully used for two types of aquariums:
1. Osmosis for a marine aquarium. For domestic tanks of this type, this system is a prerequisite. This also requires high-quality filtration so that there are no organic substances in the water. That is, the content of nitrates, phosphates, ammonia, nitrites, and sulfates should be zero. Sea water itself, of course, is not brought by nature. The aquarist makes the composition himself, at home. First, osmosis water is taken, to which the finished mixture is then added. It consists of a number of chemical elements. First of all, it is sea salt. But, of course, there are other minerals present. Only this approach allows you to be confident in the composition and quality of water for a marine aquarium;
2. Osmosis for a freshwater aquarium. It all depends on what exactly is contained in the aquarium. Often this cleaning system is used in containers where invertebrates (often shrimp) live. This is explained by the fact that it is especially dangerous for them if the water contains various gases and metals (especially copper). But at the same time, they need calcium, microelements that strengthen the shell or membrane and generally promote growth. Osmosis will also benefit plants. Many species of underwater flora prefer fresh water and grow better there. As for the fish, they also need water with a certain composition. Exotic animals from South America, Africa, Asia and so on can often be found in pet stores, where, of course, there is a “microclimate” in the reservoirs. For example, regular blue neon also lives in hard water, but only reproduces in fresh water, so distilled water is also used for spawning.
Operating principle of the system
To assemble a reverse osmosis filter with your own hands, you will need to consider the operating principle of the system. First, a hose is connected to the water pipe, which will supply water to the pre-filters. Mechanical and chemical contaminants of a certain size are retained here. The prepared flow is supplied to a membrane through which it passes at a certain speed.
Two hoses extend from the membrane body. One is for dirty water (connected to the sewer system), and the second is for clean water (enters a storage tank). It is impossible to do without a special container into which the filtered flow will flow.
A conventional membrane can pass through up to 7 liters of liquid per hour. This is not enough for household needs. The presence of a storage tank in the system completely solves this problem. After this, the water flow is supplied to the tap, but most often several additional elements are installed in the system.
In most modern systems, a post-filter, mineralizer, and other additional devices are installed after the storage tank. You can choose a kit with two valves on the tap. Purified water will flow through one of them, and enriched with minerals through the other. For cooking, it is enough to use water that does not contain additional minerals.
When installing reverse osmosis with your own hands, you should clearly understand the operating principle of this system.
Tips for use
If, after starting the system, the drinking water has a milky tint and contains small air bubbles, do not worry. This is the influence of air dissolved in water, it is not dangerous. This effect will disappear after a few days or weeks.
If the pre-filters become dirty too quickly, as well as the presence of mucus on the cartridges, this may be a symptom of low pressure in the water supply network. The problem is usually solved with a pump.
Sometimes washing the carbon filter can cause the third filter to become dirty immediately after installation. To prevent this from happening, it is better to install the third filter after the carbon cartridge has been washed. But you should not try to rinse the carbon filter under running water, as this can ruin it.
Do not neglect washing the carbon cartridge, as this can lead to rapid clogging of the membrane. The same effect can be produced by too high pressure in the water supply system, too infrequent replacement of pre-filters or the use of low-quality cartridges, or clogging of the sewer system.
If scale forms in the kettle when boiling water, you should check the connection order. There may be a hose connected to the drinking tap through which the concentrates are supplied, and the purified water goes down the drain.
If the purified water has acquired an unusual smell and taste, it is necessary to check the pre-filters as soon as possible. Perhaps their resource has been exhausted and needs replacement. This phenomenon may also indicate the presence of bacterial contamination.
The membrane cartridge of the reverse osmosis system is housed in a plastic housing. It must be replaced every 3-5 years depending on the salt content in the purified water
Pre-clean cartridges should be replaced every six months or more frequently. A new membrane usually needs to be installed every three to five years. The condition of the purified water should be checked annually. If the salt content exceeds 20 mg/l, the membrane must be replaced.
Installation location
If you want to install reverse osmosis for an aquarium with your own hands or a system for domestic use, you will need to choose the right place for installation.
If you plan to use water for cooking or drinking purposes, reverse osmosis is installed in the kitchen under the sink. Its size is usually quite compact. A tap for drinking water is installed on the sink, for which you will need to drill an additional hole.
It is convenient if all elements of the system are located close to each other. The efficiency of the system largely depends on the length of the hoses for moving the water.
Before assembling reverse osmosis with your own hands, you will need to check all the elements of the kit for compliance with the included parameters. However, the packaging of each system component is not opened, otherwise it will be difficult to return it.
During this process, the membrane pressure, inlet water temperature, and flow pressure are checked. The manufacturer's instructions indicate what these indicators should be.
It is also worth considering that the system will need to be installed away from heating objects. Reverse osmosis should not be exposed to direct sunlight. First you will need to turn off the water (cold and hot). Next, the tap is opened, which allows the pressure in the system to be relieved. Then it is closed again. Next, the cartridges and membrane, as well as your own hands, will need to be disinfected.
How to build?
A few more recommendations. If you do not have DIY skills, it is better to make a doghouse with a pitched roof. Although, of course, the gable one looks more beautiful, and it is also more practical. Having golden hands, you can experiment and make, for example, a roof with an attic. A very convenient solution - you can store your pet’s things: food, dishes, toys. It will be possible to supplement the kennel with a canopy, which will add aesthetics and allow the animal to leave the house in any weather.
Tools and materials
Standard tools will be required. Any more or less skilled owner has all of them. Use a hammer, screwdriver, tape measure, pliers, wire cutters, hacksaw...
As for materials, even at home, a kennel can be made from anything. From pallets, bricks, gas blocks or chipboard. We offer a standard and simple, but at the same time good option.
Our scheme assumes the presence of the following materials:
- bars, mm: 40x40, 100x100, 50x100;
- plywood;
- linings;
- decorative slats;
- floor board;
- polystyrene foam or mineral wool;
- roofing felt;
- glassine;
- tarpaulin;
- bitumen shingles;
- polyethylene;
- galvanized nails;
- antiseptic.
There is no need to treat the “interior” of the booth with antiseptics. Don’t forget about a dog’s sense of smell – the smell will constantly irritate your pet.
Step-by-step instruction
- Frame. The bottom is mounted from 40x40 bars. After this, nail the floor board tightly, avoiding gaps. If the dog is large, the bottom is additionally reinforced with a pair of bars of the same section. The vertical frame is assembled from 100x100 parts, nailing them to the corners of the bottom. Between the verticals, symmetrically to the bottom, a ceiling frame is nailed.
- Walls. We use clapboard as external cladding. Unlike plywood, it will last a long time and without the risk of delamination. The cladding is secured with galvanized nails with small heads.
- Ceiling. If the kennel is under a canopy, then the ceiling will also be the roof. Otherwise, these structures must be made separately, leaving attic space between the roof and ceiling. The ceiling is mounted from 40x40 bars and plywood, insulated on top with foam plastic or mineral wool and laid with glassine. A second plywood sheet is installed on top of the insulation. It is recommended to make the “pie” removable in order to have access to the interior of the kennel and to the animal itself in an emergency. If there is no roof according to the design, the ceiling is “crowned” with roofing felt and then bitumen shingles.
- Insulation and waterproofing. Next, you should turn the future kennel upside down, treat it with an antiseptic, insulate it with roofing felt and nail 50x100 bars on top. Additional bars are also impregnated with antiseptic. The next step: you need to return the booth to its original position, cover the bottom with glassine, insulation and glassine again. After this, you need to install the finished floor, insulate and clapboard the walls from the inside, install a threshold and make an entrance frame.
Roof. A simplified, single-pitched option will require a frame made of 40x40 bars located on a slope. When installing a gable structure, pediments are first installed, serving as support and guide slopes made from the same bars. At the end, glassine is laid from the inside and lined with clapboard on top.
It is advisable to treat the outside of the constructed kennel with Pinotex to increase its service life. It is recommended to cover the hole with a tarpaulin curtain to protect the animal from the wind. The tarpaulin can be weighted with sand poured into pre-made polyethylene pockets.
The do-it-yourself dog house is ready.
Installation of a drinking water tap
How to make reverse osmosis with your own hands? After completing the preliminary manipulations, you will need to install a drinking water faucet on the sink. Some sink models already have an additional hole. If it is not there, you will need to make a seat for the crane yourself.
You need to be especially careful if the sink surface is enameled. Otherwise, chips may appear on the surface. The crane is mounted on a flat horizontal surface. The diameter of the hole should be approximately 4 cm. You need to make sure that there is enough space under the sink to allow the tap to be installed correctly. This is important so that the tubes can be connected to the system without kinks.
After drilling a hole, you need to remove the chips and thoroughly clean all surfaces. Metal particles left on the surface can rust, leaving unsightly marks on the sink.
Before installation, a special decorative cover and a rubber washer are placed on the lower part of the faucet. This will make the joint airtight. Next, the base of the tap is inserted into the hole. Next, a rubber and then a plastic washer is put on it on the other side. A metal ring is fixed on them. The entire structure is tightened with a nut. You will need to screw a fitting onto the bottom base. There is a rubber gasket inside it.
Real benefits
What are the benefits of the osmotic system:
- removal of chlorine and chlorine-containing compounds;
- remove water hardness;
- eliminate germs;
- cleaned from nitrates and pesticides.
Of the known methods, reverse osmosis is the simplest, most effective and affordable. Distillation is a reliable, but long and labor-intensive process; after boiling, the water requires cooling, and heavy metals, herbicides, and petroleum products remain.
Multi-stage reverse osmosis water purification allows you to safely drink the liquid, cook with it, and use it to wash your face and hair.
Connection to water supply, sewer connection
Do-it-yourself reverse osmosis will need to be connected to the water supply. To do this, the water supply must be shut off. A special adapter in the form of an adapter is used for connection. It is most convenient to install it at the junction of a water pipe and a flexible connection for a conventional mixer.
Before this, you will need to place a basin here. The remaining water will drain into it. Next, the flexible line will need to be disconnected from the pipe. The adapter must have a rubber seal. The adapter is screwed onto the liner from both sides. Fixation is carried out with a wrench.
You will need to unscrew the ball valve nut from the adapter. This is necessary in order to put it on a plastic tube. The latter is pulled onto the ball valve. The nut must be tightened by hand so as not to overtighten the fitting. To improve the tightness, tow or Teflon tape is wound onto the external thread.
Next, you need to cut into the sewer system to drain the dirty water. A drain clamp is used for this. You need to cut into the sewer at the level of the siphon. Above it, on a horizontal or vertical section, you will need to drill a hole with a diameter of 7 mm. You cannot install a drain clamp on an uneven, rounded area.
It is worth noting that it is almost impossible to achieve tight joints. You will need to glue rubber to the bracket or purchase special fasteners. It already has this softening element. After this, secure the clamp by tightening the screws. A black tube is inserted into this fitting. It is pre-lubricated with silicone and equipped with a tightly but not tightly tightened nut.
How to make it yourself
To assemble a filter using a reverse osmosis system and install it, you must first find out what water pressure is in the water supply system and determine the need for cleaning it. The first will help determine the pressure gauge, and the second will help you and your family. This indicator will determine which membrane you need to purchase; they are available for 50, 75, 100 gallons per knock.
You also need to consider exactly what degree of filtration you need, so you can choose the required number of degrees of filtration. You can buy a standard triple filter for cleaning, or you can buy a smaller one if the water allows it. There are some filters that can combine the properties of several.
The already mentioned membrane is attached to the filters using fittings or clamps (see photo). An additional cleaning filter is attached to the top if necessary. To make it more convenient, mount the structure on chipboard or other convenient surface. In addition, you will need a flow limiter - it is a calibrated tube with a hole and a plastic insert, through which water will flow into the sewer.
If it is necessary to increase the performance of the cleaning system, you need to install a gearbox. All components must be connected to each other in the correct sequence. This is done using plastic pipes. All connections must be sealed using tow with sealant or FUM tape. Before assembling a reverse osmosis purification system, you need to think it through carefully.
Required parts and components:
- Mechanical cleaning filters.
- Membrane.
- Membrane housing.
- Carbon and additional filter.
- Storage tank.
- Tap.
- If you need a gearbox.
- Pressure gauge.
- Tees.
- Ball valve.
- Transition coupling.
- Knee.
- Throttle.
- Drainage clamp.
- Flow limiter.
- Tow or fum tape.
- Pump.
- Pipe.
- Board for fastening.
In order to do everything right, it’s rational to watch the video
Valve for storage tank, filtration block
When installing reverse osmosis with your own hands, you will need to properly install the storage tank. It will need to be mounted on a special stand or brackets. If there is not enough space under the sink, the tank will need to be placed nearby, for example, on a cabinet in the kitchen.
Next, a plastic tap is attached to the threaded connection of the tank. You will need to screw fum tape onto the thread. The tap is screwed onto it until it stops manually. You don't need to use a tool for this. You will need to insert a plastic tube into the faucet fitting. The second end is connected to the post-filter.
Next, you need to use a pressure gauge to check the pressure in the tank. Then, if necessary, you need to increase it a little.
When installing reverse osmosis with your own hands, you will need to proceed to installing the filtration unit. It is worth considering that the tubes supplied by the manufacturer are 1.5 m long. Moreover, they should not be stretched or have kinks. You can hang the block on the inside wall of the cabinet.
The ball valve must be freely accessible. The pre-cleaning filters are mounted on a bar. It can be hung on the wall of the cabinet under the sink. This place should be easy to get to. In this case, replacing reverse osmosis filters with your own hands will not cause problems. The location of each filter in the block cannot be changed. Otherwise the system will not work correctly.
Hydraulic and technological diagram of reverse osmosis assembly
They look like this:
Attention, in the second case, a timer is responsible for regeneration: at the right moment it allows topping up for a while, and when the H2O level in the tank reaches a certain point, it also gives a signal about the end of the intake.
Filling, washing the block
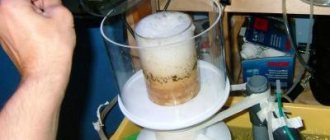
Before using the system, you will need to fill it with water. To do this, you will need to close the valve on the tank, as well as the corresponding fittings on the pipeline. Then you will need to open the tap that was previously installed to supply purified water. The ball valve also opens, through which water is supplied to the filter.
In the first 10 minutes, air leaves the system. When water appears, its pressure will be very small. This is explained by the closed tap on the container. It should remain closed for now. You will need to wait until the water flushes the entire system. When a certain amount of water has been drained, the tap can be turned off.
Then wait about 10 more minutes. At this time, you need to check the system for leaks. If they are, you will need to tighten such connections. If the system is working properly, you can open the valve on the tank. This is how you wash the reverse osmosis membrane, as well as its other elements, with your own hands. The tank fills up within a few hours. The system is then flushed again. You cannot drink the water that is filled into the tank for the first time. Water can only be used when it has been filled a second time.
Pathogenic bacteria interfere with intestinal cells
Cholera bacteria imaged using a scanning electron microscope
Type: Exosmos
Some pathogenic bacteria, such as Vibrio cholerae, are capable of interfering with the ion transport channels of human intestinal cells. They produce enterotoxins, which alter the permeability of epithelial cells of the intestinal wall through the formation of pores.
Osmosis removes water and other fluid compounds from the body, leading to severe dehydration and diarrhea. These bacteria can hold tightly to the intestinal cells while the normal bacteria living in our stomach are washed away. This gives the cholera bacteria enough area to grow and reproduce. Smart little microbe, isn't it?
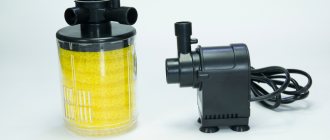
Pump
In order for the system to function correctly, in some cases it is necessary to install a reverse osmosis pump yourself. This is necessary if the pressure in the water supply does not exceed 2.8 atm. Otherwise, reverse osmosis will not last long. It is best to select a pump from the same manufacturer as the system. The instructions provide a detailed connection diagram.
The pump must be installed in conjunction with a sensor that monitors the pressure in the water supply. It is responsible for turning the pump on and off if the water supply changes. The sensor is installed in front of the drive. To do this, you will need to rupture the tube. If the quality of the water in front of the pump is poor, you need to install an additional main-type coarse filter.
If pressure surges of up to 3-4 atm are possible in the system, a special valve is installed in front of the pump to prevent leaks. It will reduce the pressure to the required value.
You should not repair the reverse osmosis pump yourself. This can lead to failure of the entire system. This work should definitely be entrusted to professionals.
Gargling with salt water relieves sore throat
Type: exosmosis (excess fluid is expelled from the tissues of the throat).
Salt water doesn't actually cure a sore throat, but it does help relieve pain and discomfort. This is because salt water contains a higher concentration of solute (salt) than what is present in the tissues of our throat.
More specifically, the osmotic pressure of salt water is greater than the fluid pressure of the surrounding cells. Therefore, when we gargle, excess fluid is released from the tissues of the throat, reducing swelling and relieving pain.
Service
To ensure that the water supplied by reverse osmosis is always clean, you need to change the filters and membrane in a timely manner. Using the water meter, you can determine how much water has been purified by the system. Most often, filters will need to be changed every 3-6 months (depending on water consumption).
The membrane, depending on the characteristics specified by the manufacturer, is changed every 1-5 years. This procedure is performed if sediment appears in the membrane block, the water quality has deteriorated, and the pressure has decreased. If the system has not been used for several weeks, the membrane will need to be disinfected.
To replace system elements, you will need to turn off the water and open the tap. After releasing the pressure, unscrew the flasks (the key is supplied). Old cartridges are taken out. The flasks need to be washed. Next, the same new cartridges are installed.
Briefly about the main thing
Reverse osmosis is a technology for purifying water by forcing it through a membrane that allows only liquid molecules to pass through.
The design of a reverse osmosis filter includes: three fine filters in the form of flasks with fillers, a membrane filter, a mineralizer and a device that finally purifies the water.
The main characteristic of this filter is its productivity, which varies from 150 to 250 l/day.
For correct operation, a certain water pressure of the water supply network is required - 3 atm.
All filtration elements are periodically replaced with new ones, which is included in the expenses of the family budget.
Ratings 0
Why are reverse osmosis filters popular?
Compared to other methods, filtration by osmosis is a convenient way to get rid of harmful impurities, salts, and bacteria. The neat design does not take up much space; if necessary, the installation can be completed during the process. When the pH of the water is low and the salt content is low, a mineralizer is selected; if the smell and taste are not satisfactory, the system is supplemented with a bioceramic filter device.
From the very beginning, do not skimp on enriching the liquid with minerals; with constant consumption of such water, osteoporosis develops, teeth and bone tissue become fragile.