In nature there are fish of completely different sizes and different colors. Children from a very young age are trying to learn how to draw a bright fish step by step. There are many patterns: from the simple classic one for kids, from the image of a fairy-tale heroine who fulfills any desire, to the famous Disney cartoon character Nemo the fish.
How to draw a fish?
Children love to draw, especially if adults help them. Dolls, animals, and toys remain popular subjects among young artists. Many people prefer to depict sea creatures, in particular the goldfish from everyone’s favorite fairy tale. At the same time, not all kids have enough skills to draw a sea mistress. Parents can show their child how to draw different fish, thereby making their child happy and making them believe in themselves. Well, it’s natural that before an impromptu drawing lesson, adults should prepare themselves.
How to draw a fish step by step: for the little ones
Even younger preschoolers can create a cute fish: even a three-year-old child can draw it. It is important to explain correctly, and then a new “masterpiece” will appear in your collection of your beloved child’s crafts.
- First, we draw an oval and an adjacent triangle - the body and tail of the future fish
- Then we add small triangles of different sizes at the top and bottom - these are the fins of the sea creature.
- We draw a small circle and an arc in the oval, we get the eye and the outline of the gills.
- Now you need to draw the lips of the fish and round the transition from the body to the tail.
- We draw the details: stripes on the fins and tail, arcs on the body to give the outline of the scales.
- All that remains is to decorate the fish with pencils or paints.
As you can see, the fish is very easy to make.
Line of movement and shape
To correctly display the position of the body in water, the drawing must begin from the line . In most cases, this line will coincide with the position of the spine.
When a fish swims, its spine wriggles in a wave-like manner, so we start from the line indicating movement:
The red line shows the direction of movement, the blue line shows the body shape, and the green line shows the fins and tail. It is noteworthy that the direction of the head and tail do not coincide.
Thus, already at the initial stage, the sketch reflects movement, and not a static position. In this position it is impossible to freeze or drift, but you can only move quickly and confidently.
If your task is to depict a fish in a calm, static position, it is enough to show a straight or slightly curved axis showing the position of the body.
The center line is our frame, the skeleton on which we can put the shape of any type of fish.
Next, we outline the shape . This is very easy to do because it is streamlined, the head smoothly flows into the body, and then into the tail, only the fins stand out.
We outline the body and head with a simple geometric figure, and then attach the fins and tail to it. This way we get an approximate silhouette. From a difficult angle, you can easily fit circles or ovals into the body, so the sketch will take on a more clear and voluminous appearance.
How to draw a red tulip
At this stage of work, we apply all the lines very easily, barely noticeable; for this it is better to use a hard pencil.
From ancient times to the present day
The first artificially colored fish appeared in Ancient China, where they were considered a noble and expensive gift. The color changing technology has remained unsolved. However, it is known that the Chinese could even apply patterns and hieroglyphs to the bodies of silent underwater inhabitants. A little later, artificial coloring became popular in Europe, as well as in Russia, where bleach was often used for stenciling.
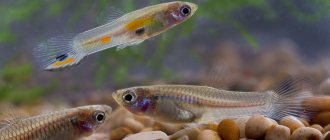
Most often, transparent fish were stained, because The artificial colors looked especially bright and rich on them. It is because of their colorlessness that Indian glass perches became victims of experiments. As a rule, they are not completely painted, but only create a green, blue, orange or red stripe on the back.
In addition to colorless species, albino fish, as well as individuals with white or any light coloration, are stained. For example, whitish-pink thorns are boldly “painted” in the most unimaginable colors of fruits and berries, and sometimes they are even given the color of national flags.
Clarifications and details
Now is the time to clarify the silhouette and outline the main details. From the generalized figure, select the head, easily outline the line of the eyes and mouth. We clarify the shape of the body, fins and tail.
We draw all the lines on top of the previous ones, trying to make them more accurate. It should be an easy sketch that can be easily modified and corrected.
Next, we detail and refine the sketch. Select the head, outline the eyes and mouth. Showing protruding lips or teeth in an open jaw. Let's draw the fins and tail more accurately, showing the raised edge, rays and transparent veins.
We easily outline the scales.
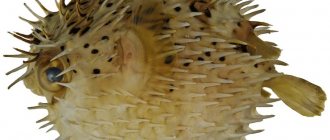
Hammerhead fish (shark) – how to draw
Draw an oval again. Since the hammerhead fish has a unique shape, the oval should be slightly wider on one side. We divide the oval in half with an axis. We cross it with another line. Draw the body of the fish.
Erase the extra lines. Draw the hammerhead face and tail. Let's add fins and strokes that will give the drawing volume.
This fish is also part of the shark family. Her eyes and nostrils are placed on the sides of the hammer. Therefore, she sees and smells prey better. The hammerhead shark is a very dangerous predator.
When coloring a picture with a drawn shark or hammerhead fish, pay attention to how smoothly the tones of the paint change
Color
If your drawing needs to add expression and color, work like this:
- First paint in the general shapes without going into detail. For example: the body is greenish, the fins are reddish, etc.
- Do not paint each scale individually. First, give them all one general color, and then highlight some of them. Detail only what you want to focus on, and not everything at the same time.
- At the end of the work, add a highlight along the entire length of the fish’s body and in front of the eyes.
Why artificial coloring is dangerous for fish
But let's get back to artificial coloring. During the color change process, up to 80% of the fish die. The remaining 20% are doomed to a difficult existence, because... a foreign substance in their body causes severe irritation. Young individuals in most cases stop growing, lose the ability to reproduce and, due to decreased immunity, become more susceptible to diseases. In other words, their life expectancy is reduced dramatically. By getting sick and dying, such fish threaten the health of other inhabitants of the aquarium. If the dead specimen is not removed in time, hazardous chemicals will enter the water. But the death of fish only benefits those who sell them. After all, there is a high probability that exotic lovers will return to the pet store for new unusual pets.
The answer to the question why fish are painted is obvious.
If there is demand, there will be supply. But does the death and suffering of silent underwater inhabitants justify the selfish desire to have a curiosity in your aquarium? Creation date: 02/06/2020
Structural features
There are a huge number of species of fish, all of them have some serious or minor differences in structure, color, shape and size. Still, we will try to highlight the main important points that you need to know when drawing underwater inhabitants.
Fins and tail
Your work will look more natural if you place the fins correctly. In all typical sea and river fish, they are located as follows:
The picture shows how the fins are most often located. The pelvic and pectoral fins are always paired, located on both sides of the body. The dorsal fins sometimes merge into a single shape, and the subcaudal fin is barely noticeable.
Fins help to move in the water, balance, maintain course and change direction, sometimes attract attention, camouflage or scare off other inhabitants of the water kingdom. Naturally, they look different in different species, and sometimes take on completely bizarre shapes.
What does GLOFISH mean?
Another fashionable “new product” in the world of aquariums is genetically modified fish of the GloFish brand. No one bullied them to change their color. Their unusual ability to fluoresce is the result of human intervention in their genetic code.
The goal of Dr. Zhiyuan Gong's experiment in 1999 was to create a kind of indicator to determine whether there were toxic compounds in water. However, a photo of a glowing zebrafish was seen by a representative of a company that breeds and sells aquarium inhabitants. And in 2003, a contract was signed to create genetically modified fish GloFish. The result of the joint work of businessmen and scientists were colored fluorescent zebrafish, thornets, barbs, labeo, angelfish and black-striped cichlids.
The fluorescent gene is inherited. That is, GloFish fish will not only not stop glowing after a while, but will also be able to transfer this ability to their fry.
Bright and beautiful drawing for children
In one of our lessons we talked about how to draw a mermaid. Now let's find out how to depict a brightly colored fish for kids. The work is very easy, so even the smallest children can handle it, of course, with the help of their parents and our instructions. Before starting the creative process, prepare markers and, of course, a sketchbook. Let's get started:
- Starting from the left side of the sheet, draw an arc and tilt it down. We add a large check mark to this arc. On the right side of this sketch we show the tail of the fish with an arcuate line.
- Next, from the left side of the picture we draw an identical silhouette. Using an arcuate line we separate the heads from the body. We draw this area with a thicker line. At the top, starting from the head section, draw the upper fin.
- Now, under the bottom of the fish we draw a small lower fin. Below the silhouette of the head we show two more small fins. Use short pieces to refine the details of the fins. Draw round eyes on the head. We detail them and draw a mouth in the front part of the sketch.
- On the body we finish drawing the scales, they are in the form of many arches. We separate the tail from the body and detail it with four segments. We show several bubbles in the front of the fish. It’s clear how to draw a fish step by step, but for even a baby to like it, it needs to be painted in bright colors.
- Use a pink felt-tip pen to color the tail. We make the remaining fins purple. We paint the first row of scales red. We make the second row of fins green, and the third row blue. Use a green felt-tip pen to color the next row of scales. We color the next two rows with red, and the penultimate row with lilac. We color the rest of the tail and the bubbles in front of the fish with blue. Use a white pencil to make the drawing three-dimensional.
The picture is ready. A child can easily cope with this work, the main thing is to follow our instructions.
Fish from the cartoon Finding Nemo
We continue to learn how to draw sea animals. In one of our articles we taught lessons on drawing dolphins, now let's portray the main character from the famous cartoon. This fish's name is Nemo.
We will work with a felt-tip pen; for beginners, we recommend using a simple pencil. You will also need oil pastels for this work. How to draw a fish for children:
- On the sheet we draw an oval, on the left side it should decrease. On the left we display the silhouette of the character's tail. We place two vertical stripes in this area.
- Now we separate the head from the body and show stripes on the body. Closer to the head in the lower part of the sketch we draw a fin in the form of a triangle with a rounded lower part. At the very bottom of this sketch we draw a segment repeating the recess.
- Next, we draw a wavy segment of the fin on the back of the fish. We complement the upper fin with stripes. At the bottom of the head we show a smile and add teeth. We rise from a smile and show two round eyes.
- In front of the drawing on the right side we show several bubbles. The drawing is ready, now you need to color it.
- To color the image we will use oil pastels, but if you do not have such material, you can use felt-tip pens. Using orange chalk, color the entire drawing, but do not touch the stripes. Add red on top of this color; this should not be done over the entire painted area, but only in some places.
- We paint the mouth with black chalk and draw stripes. We cover some areas of the stripes with gray pastels so that they are uneven. Color the eyes brown. Use blue chalk to color the bubbles.
Cartoon fish Nemo
It is possible to draw your favorite cartoon character Nemo the fish if the drawing is done step by step.
There are many air bubbles around it underwater. The real name of the fish is clown. It is distinguished by its bright coloring. There are bright orange, red or yellow individuals.
The Nemo fish image diagram is divided into stages:
- A small oval is drawn in the left zone of the landscape sheet.
- An elongated oval appears in the right zone. It intersects with the circle at its bottom.
- Ovals of different sizes are connected by curved lines.
- Fins are curved, smooth lines connecting ovals.
- The mouth and eyes are drawn inside a small circle.
- Lines are drawn along the body and fins, which form stripes.
- The main lines are outlined with a black pen, extra lines are erased.
- The stripes are left white, their borders are thickened with a black outline, and the fish is colored with a bright orange pencil.
- The background is painted blue.
- Circles of different sizes are drawn to imitate bubbles.
- The highlights add volume to the bubbles.
Clown fish are drawn in different ways, allowing you to choose your favorite fish. And her non-color drawing with a simple pencil will be interesting for the smallest artists to color.
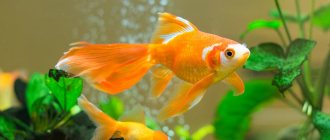
How to draw a Goldfish from the fairy tale About the Fisherman and the Fish
We suggest continuing with drawings from fairy tales. This time we will teach you how to portray a Goldfish. She is one of the main characters of the Soviet popular fairy tale. To organize this creative process, prepare paints, brushes and a container of water. Let's start the creative process:
- Using the largest brush, pick up blue paint. Using strokes in different directions, until approximately the middle of the sheet, we make the sky. Using blue and emerald paint colors we show the sea in the foreground of the picture.
- Now, use a thin brush to pick up golden-colored material. We roughly sketch out the silhouette of a fish against the background, in the form of a slightly inverted comma. To this sketch we add the outline of the upper fin. Next, we show the tail, which consists of two parts, and draw the lower fins almost in front of the sketch.
- Then add the eyes and lips of the Goldfish on the head. We separate the head from the body and mark the place for the crown. Draw an oval on the head.
- Take a thick brush, pick up orange paint and cover the top of the fish with this color. Use orange paint to highlight the areas around the eyes, and use this color to show the right side of the tail. We collect golden paint and highlight areas on the head.
- Mix yellow paint with white and refine some light areas on the silhouette. We add brown material to this color and show dark areas in the image. Using dark red gouache we highlight the lips and areas on the back.
- We make a mixture of yellow and brown material and draw a crown on the head of the Goldfish. Using a mixture of yellow paint and white paint, we place dots at the top of the crown. Add to the back and upper fin, add an orange tone.
- Using a thin brush, add white and use it to define the eyes. We complement the cheeks with a light orange color. With brown we go through the shadow areas. Using white gouache we show highlights throughout the entire drawing. Using black paint, we show the pupils, and with brown material we draw eyebrows and eyelashes.
- We put highlights in the eyes and on the eyelashes. Again we use brown material to show the shadow areas in the picture. The picture is ready.
Now you know how to portray the Golden Fish from the Soviet cartoon. The work is difficult for beginners, but if you follow our requirements, even children can handle it.
Continuing the theme of fairy-tale characters, you can draw Pinocchio.
Easy drawing of a pike
We've sorted out the bright and fabulous fish, now let's try to draw a pike. Almost every person has seen a pike, some even caught it while fishing. To work you will need a pen and colored pencils. Let's draw:
- First, draw a long oval at the top, with a sharp left edge. We add another similar oval to it in the lower part. We supplement them with lines and get the volume of the silhouette. In the center we add many small and sharp teeth.
- Starting from the top edge of the sketch, we begin to draw out the body. Draw the eyes in the form of circles. We draw the fins and finish drawing the body. At the end of the body we show a wide tail. We detail the fins and tail, and show shadows on these parts.
- In the upper left corner we draw a thread, at the end we draw a hook and show on it the bait that the pike is chasing. Against the background of this sketch we draw algae. Once you've finished drawing, you can start coloring.
- Use a yellow marker to place dots on the body. Use a green pencil to color the back of the fish. We color the fins with a pink pencil. We make the mouth and belly of the pike gray. We paint the bait with a red pencil. We color the algae green, and show the water around the picture in blue.
Drawing diagram of a small funny fish
For a beginning artist, learning to draw a fish will be easier if the diagram is simple and the image itself is fun. For these purposes, a lesson is chosen on how to draw a small funny fish.
In the first steps, a soft pencil is selected for the lesson.
The drawing is done in steps:
- The body of the fish is drawn, pointed towards the tail and with a sharp long nose. Visually it resembles a knife blade. Two circles are drawn above it instead of eyes.
- A small mouth is drawn under a funny nose and funny eyes.
- The triangle represents the fin below the mouth.
- In the shape of a young moon, a tail is added to the sharp side of the body.
- A second fin is added below. Elongated in shape, one fin appears at the top.
- Small circles in the eyes represent the pupils.
- The mouth, outlined with a small stroke, begins to smile.
- A sharp tooth will make the fish brave, because it will be able to stand up for itself.
- The pencil drawing is ready after the fins and tail are painted.
How to draw a goldfish with a pencil? Step by step instructions
Beautiful drawing is not only for experienced artists, who have been creating real masterpieces since childhood. This type of fine art can be learned independently at any age. You can always please children with bright drawings. In addition, such creations quite claim to be very
stylish element of apartment decor. This time we will learn how to draw a goldfish step by step. The work will be done with a simple pencil. However, you can very well add color and brightness to the picture. This option is considered the basis for more complex modifications.
Start of drawing
The landscape sheet must be placed horizontally in front of you. The goldfish's head will initially be drawn as a small oval. He switches to a similar figure of a larger size. This will later turn out to be the body. Draw the tail symbolically: wide and forked at the end without any additional details. All this will appear later. With the help of such a blank you can easily draw a goldfish from a fairy tale. After all, their general contours and body structure are, in principle, similar. At this point, the preparatory stage can be considered complete.
Shaping
Our fish should become less sketchy. Using separate segments
give it the required shape. At the same time, the head will become somewhat pointed at the end, and fairly wide solid fins will appear below and above. The body at the base of the tail will become very narrow. But that's not all. Our work as artists continues.
Create roundness
How to draw a goldfish more realistic? This is very easy to do. Using an eraser, remove the angularities of the individual strokes that we drew in the previous step. Add characteristic notches at the end to the tail. Another small long fin appears at the head. Mark the place where the eye should be located. As an addition to the picture, you can depict several air bubbles. This will add realism to the final result.
Final touches
How to draw a three-dimensional goldfish? Just shade it correctly. It is recommended to do this using a pencil with a hard lead. In this case, the sheet of paper will not get dirty, and the drawing will not be smeared or lose clarity. But don't choose pencils that are too hard. They can even rip through paper. Strokes should be made without strong pressure, neatly and clearly. How to draw a goldfish and give it volume? Start shading from the head. Many professionals recommend doing it this way. However, you can easily start shading from any other part of your drawing. Identify the darker parts first. Start shading with them. This will be much more convenient. The dark areas should be the bottom of the abdomen, the base of the fins and tail, and the top of the head. Ready. As a result, you should get a charming goldfish that looks so much like a real one swimming in an aquarium. As you can see, everything turned out to be not at all as difficult as you might think at first. Now you know how to draw a goldfish with the most ordinary pencil.
Methods for coloring fish
To give fish an original appearance, people use a variety of methods. Most of them are quite cruel.
- Coloring food.
This method is the most humane. Young individuals are given special food with dyes. Natural dyes are relatively safe. True, all they can do is make the scales a little brighter. Artificial pigments change the appearance of fish more radically, but at the same time they are more harmful to the health of aquarium inhabitants. In any case, when the fish stop receiving food, their color will gradually return to their natural color. - Injections.
This is the most common method in which dyes are injected into the fish under the skin, into the muscle or into the circulatory system with a thin needle. One injection changes the color of only a small area, so the individual undergoes the procedure repeatedly until the desired result is obtained. It is with the help of injections that the astronotus can become bright blue, and the Corydoras catfishes have multi-colored tails. - Dipping in dye.
This procedure claims to be the most cruel. It is carried out in three stages. The fish is placed in a caustic alkaline composition, which dissolves the protective mucous film on its body. Then - into the dye. And finally - into a fixative chemical that stimulates the development of a new film that laminates the paint layer. The most famous victim of such beauty baths is the Red Parrot cichlid. - Laser tattoo.
Using a low-frequency laser, any image can be applied to the body of a fish. “Painted” individuals become an original souvenir. They are given for good luck or even as a declaration of love.
All these methods cause pain and suffering to the fish. Many will say: beauty requires sacrifice. But the worst thing is that the “beauty” will disappear in 6-8 months, and sometimes earlier. Whether the boring fish will be needed by its owner is another question.
Shape and size.
To make the fish more like a real one, we suggest drawing it in real size. Then it will look proportional on a sheet of paper. It's easy to draw. It is enough to draw an elongated oval, a large tail, an upper large fin and small fins in the form of small ovals.
Erase the unnecessary lines and connect the small fins to the body.
2
Making the correct contours.
We connect the body with the tail. We update the fins with smooth, wavy lines, giving them the correct shape.
Using several semicircular lines we separate the gill. Draw a fish eye from two circles. Color the fins with thin lines.
3
Scales.
The body of fish is covered with scales.
Draw small plates from head to tail.
On the abdominal part, the scales should be larger in size, gradually decreasing towards the tail. Then the fish will not look flat. The shape can be given with a pencil by shading the upper part.
4
The final stage.
To make the drawing more interesting, press harder on the pencil and trace the contours of the scales on the top of the outer cover.
Use a pencil to shade some parts of the body to give shadow. Look like in the picture.
Our drawing is ready. You see, nothing complicated!
5