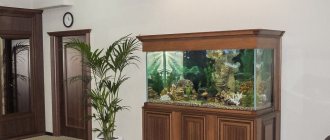
A beautiful and large aquarium in the house is a stylish addition to the interior, helping to create a unique and cozy atmosphere. A living area with a complex ecosystem requires special care, and a do-it-yourself aquarium cabinet will be an excellent addition to the arrangement.
A stable and practical piece of furniture ensures that the tank is installed in one position and will facilitate maintenance procedures. Before starting the creative process, you should carry out detailed preparations, select a project or draw it up yourself, and prepare materials.
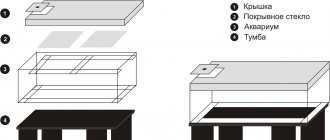
Preparation of the drawing
Before the actual work, it is important to make a special drawing according to which all stages of the process are implemented. If you do not have the skills to independently draw up drawings and diagrams, you can use special programs, and it is also possible to find suitable ready-made drawings. During the creation of the drawing, the main issues regarding the future design are resolved:
During the creation of the drawing, the main issues regarding the future design are resolved:
- dimensions, and they must be optimal so that you can easily install an aquarium of a certain shape and dimensions on the product;
- shape, since it can be a standard cabinet or corner, as well as triangular, rectangular or asymmetrical;
- height, and it is advisable to choose this parameter in such a way that the process of cleaning and changing water in the aquarium is simple and does not require removing the product from the stand.
Once the drawing is completely ready, you can begin the actual process of creating such a bedside table.
Door installation
Often bedside tables are created with drawers or compartments inside. To gain access to them, you should make high-quality and easy-to-use doors. The entire process of their installation is divided into stages:
- blanks for the doors are made, for which the optimal choice would be to purchase a joiner's panel, and the size of the doors should correspond to the dimensions of the resulting blank;
- for loops, markings are applied for the sockets;
- holes of the required size are made;
- the doors are fixed to the hinges on the side of the bedside table, for which it is advisable to use four hinges;
- Handles are attached to the doors to make them easy to open and close.
Doors can be made from other materials, and it is advisable to pay attention to their decoration so that the facade of the bedside table looks really attractive and interesting.
Side trim
Door installation
Which glue to choose
To attach parts, you need to choose a special glue designed for aquariums. The most popular is silicone. It comes in three colors - white, black and transparent.
The first option is rarely used, as it can spoil the appearance of the interior. For large-volume containers, choose black, which will emphasize the sophistication of the design. For small aquariums, transparent silicone is suitable.
Professional advice for decorating an aquarium is not limited solely to the external design of the structure.
It is important that aquarium silicone glue meets the following requirements:
- provided fastening strength and was elastic;
- did not have harmful impurities, antifungal and antibacterial additives;
- retained its original properties and appearance over a long period of operation;
- dried quickly;
- provided the required level of adhesion;
- was easy to work with.
Main indicators of practicality
In addition to its pleasant appearance, do not forget that the bedside table for the aquarium must perform a number of functions included in it by the manufacturer. To do this, there is a list of criteria that determine the practicality of the product:
- moisture resistance - each material used in the design of the product must not absorb moisture. The constant use of fish food, the procedure for cleaning the tank and other manipulations lead to water flowing onto the cabinet. Manufacturers try to additionally treat chipboard and MDF with compounds that prevent moisture penetration;
- tendency to deformation - among furniture products there are also those that can crumble into pieces with a slight impact. Keep in mind that the aquarium is heavy, and during operation the cabinet should not deform under load;
- strength - the back wall of the product must be reinforced with metal racks. Using fiberboard alone will not be enough if you plan to use a 200 liter aquarium with a stand. It is best if not only the rear pillars, but the entire product is equipped with metal inserts;
- holes for cords - it’s a good idea if the future bedside table is equipped with additional openings for power cords and tubes. For example, it is very convenient to place a corner aquarium on such a product: you will not need to look for a way out of the situation where to place the protruding connections to the tank;
- doors - think about the fact that all the equipment for feeding and caring for the fish needs to be located somewhere. Most likely, these will be shelves in a cabinet, so it is better that the doors cover them.
It is also worth paying attention to the thickness of the tabletop, on which the stability of the bedside table will depend. The photos presented in our material show that this value should not be small
Taking into account the main strength indicators, you can proceed to choosing a model.
For 300 liters
To manufacture a structure intended for installing such a large aquarium, it is worth paying attention to the quality of the material. The countertop of a 300-liter container should be made of a material that is resistant to moisture. This is an important requirement, since in the process of washing glass and installed equipment, accidental spills cannot be avoided, which will lead to deformation of the surface and its gradual failure. The best option would be to use a high-quality MDF sheet or standard particle board.
How to make a cabinet with your own hands for an aquarium?
Having received an accurate design diagram and having determined what basics will be required, it is necessary to translate the plan into reality. So that the process of creating a structure does not take much time, so that the result is a structure that is unique in all respects, it is worth relying on the sequence of actions presented to your attention:
- Preparing parts. You can cut chipboard panels into pieces yourself, or you can contact a special furniture and woodworking workshop. By paying a little money, you can get not only a cut of the material, but also special edges on the cut areas.
- The assembly of a cabinet for a 60-liter aquarium must begin exclusively with the installation of the side walls and the back. This will be the base of the structure. Vertical walls must be connected using clamps. After this, all angles are carefully verified and compliance with the design dimensions is specified. It is necessary to carefully align all corners; it is impossible to allow any deviations from the previously developed drawing to form. It is worth knowing that a small tilt, one degree, can lead to serious distortion and deformation of the entire structure as a whole and automatically the aquarium. In the process of choosing a suitable drill for a door, you need to rely on the size of the selected confirmation minus one mm.
- Fastening the walls. For this purpose, it is recommended to use confirmat or euroscrew ties. The screed is carried out exclusively using a screwdriver. After assembling the main box, all vertical partitions corresponding to the project are installed.
- Fastening the table top. This is a critical moment in the assembly process. It must be fastened so that during the process of drilling holes on the fastener, it does not move. First, two through holes are made, and if the element fits correctly, you can drill other holes around the entire perimeter. This approach will allow you to avoid not only shortcomings, but also the need to waste time drilling extra and completely unnecessary holes.
- Doors. It is advisable to fasten them using ordinary furniture overhead hinges and it is advisable to install closers. They will allow the doors to open and close correctly and softly enough. At this stage, the installation of the horizontal shelves and built-in drawers provided for in the drawing is carried out. If the drawers will be drawers, you need to properly secure all the guides used.
- Holes of a special technological plan. After the assembly work, holes are cut out in the back side for wires and various hoses. If the arrangement plan has been planned very clearly, this process can be carried out in advance. In all other cases, holes can be made upon completion of the work.
- The base of the cabinet for a 200 liter aquarium. It is advisable to install the structure on special stands made of thickened metal. They can be found and bought in salons. These legs need to be screwed under the main vertical partitions. This will effectively distribute the weight. It is worth putting heel pads on the fixed legs to avoid scratching the floor surfaces when moving the structure.
After carrying out this work, the cabinet can be installed in place. Here you also need to make some efforts so that the bedside table takes up a place that fully corresponds to the space of the room. To ensure the tabletop is moisture resistant, when installing the structure under the container, you need to lay a material similar in properties and characteristics to construction laminate.
It is important to ensure that the floor surface where the aquarium will stand is as level as possible. Otherwise, all the efforts of the master will be nullified.
Due to the fact that the weight of the finished bedside table with the container already installed on it will weigh like a monumental product, the installation location should be thought out in advance
It is very important to take into account the availability of regular outlets. No need to install near windows, balcony doors and sleeping areas
How to make a cabinet for an aquarium with your own hands
Stand Requirements
The cabinet for the aquarium must have the correct dimensions, withstand the necessary loads, be easy to use and moisture resistant.
There are a number of requirements:
- Reliability - the stand must withstand the weight of an aquarium filled with 100 liters of water. Therefore, it is necessary to use an internal frame in the design and observe the exact dimensions of the building according to the drawings.
- Waterproof - the material from which the stand is made must repel water, otherwise the stand will simply rot. For this purpose, chipboard with PVC treatment is used.
- Aesthetics - the cabinet should not only be reliable, but also beautiful. Since it will take up a lot of space in the apartment.
Materials and tools
Materials:
- Chipboard
- Bars and metal slats
- Furniture canopies with closers
- Doors by size
- Metal legs.
It is recommended to use exclusively waterproof materials for the cabinet
Tools:
- zhmenya confirmats;
- screwdriver with attachment for confirmations;
- drills 4.8-5 mm, 7 mm;
- pencil and ruler.
Manufacturing instructions
The article will describe a cabinet for a 100 liter aquarium. The first step in building a stand is preparing a drawing. We draw the drawing based on the main parameters, namely:
- The size should be optimal to support the weight of an aquarium filled with 100 liters of water.
- The height should be small so that you can safely feed the fish and clean your home pond. This parameter also depends on what room the aquarium will be in, where people usually sit or stand.
- The shape is angular, triangular and rectangular, it all depends on your taste preferences and the place where you plan to place it.
An example of a drawing of an aquarium cabinet
Also, the drawing should take into account additional functional fixtures, such as countertops and shelves. It is recommended to design the tabletop so that its parameters coincide with the aquarium parameters. Shelves need to be installed for every 30 centimeters of the height of the future stand.
The next important point is the choice of material for the back wall. The back wall takes on the maximum load, so it is necessary to use a very durable material. I recommend taking chipboard at least 25 centimeters thick.
To protect the cabinet from bending under the weight of an aquarium with water, it is necessary to make an internal frame.
We make the frame from vertically located partitions, the distance between two adjacent beams is at least 30 centimeters.
It is recommended to create a design in which the tabletop will match the parameters of the glass flask or slightly exceed them
After studying the drawing, we get to work.
We cut chipboard into parts for a future stand. You can do this yourself, but to save time, you can contact specialists in a furniture workshop. In the same workshop you need to order PVC edges for chipboards. Let's start with the actual assembly. It begins with the installation of an external frame, which can be beams or metal slats. Once again we check all the angles according to the drawing. Then the side and back walls are attached to the frame. After installing the outer frame, we install the inner frame. We take chipboard cut to size and attach two partitions, keeping the distance between them 30-0 centimeters. All fastenings are carried out using a screwdriver or Euroscrew. Then we proceed to attaching the tabletop. To begin with, we make two holes at its diametrically opposite corners. We fasten and check for any errors; if there are none, we perform the final screwing. The next step is to install horizontal shelves and hang the doors. Hinged doors are mounted on furniture canopies. In order for the door to close softly and without problems, closers should be used. After complete assembly, the cabinet is turned over onto the side wall, after which the legs are attached
It is very important to fasten them exactly at the corners to ensure 100% reliability. The final stage of assembly is making holes for electrical wires and water hoses.
Assembly
The next stage of creating an aquarium product is to assemble the resulting elements, which are components of the structure. This process is considered quite specific, so it is recommended to use the help of a second person, since certain heavy objects will need to be kept suspended for a long time, and it is impossible to perform these actions alone.
The entire assembly process consists of implementing sequential actions:
- special grooves and ridges are prepared for the rear wall, for which they are cut with a saw or electric jigsaw;
- the same elements for fastening are made in the bottom of the future bedside table, in its sides and lid;
- two parts of the upper corner of the rear part of the product are glued together, and the resulting workpiece will be mounted behind a special module designed to create high-quality lighting;
- the planks are tightened with clamps, after which you need to wait until they are completely dry;
- special plinth bars are screwed to the bottom of the cabinet, and to form them it is recommended to use high-quality and properly dried wooden blocks, the thickness of which will be more than 40 mm, since it is on them that the entire cabinet with a heavy aquarium will rest;
- plates are screwed to the inner sides of the side walls to secure the middle cover;
- the front edges of each part must be installed so that they are level with the edge of the middle cover and bottom of the product;
- then take the internal central partition, which is glued to the middle lid and bottom;
- the back wall is inserted into the corresponding groove in the bottom;
- one side wall is attached to the bottom, after which it is fixed to the middle lid, for which dowels and high-quality glue are used;
- the back wall is connected to the side using the existing grooves and tenons;
- a corner is attached to the top of the sidewall, for which dowels set with glue are also used;
- it is on this corner that the upper part of the product will rest;
- the second side of the bedside table is attached in the same way;
- the following steps involve assembling the upper frame of the structure;
- interesting lighting is installed in it;
- the resulting box is fixed to the bedside table, and for this it is recommended to use piano hinges, since they make it possible in the future to simply fold back this box if necessary.
Thus, building a special bedside table designed for an aquarium is quite simple, and this process does not take much time if you approach it really responsibly. It is allowed to use other materials during work, and the procedure will be similar, but the methods of preparing different parts will differ.
Joining workpieces
You must first make holes for the screws
Installation of legs
The frame must be impregnated with drying oil
Shelf holders made from plywood scraps
The holders are attached to the inside of the legs
A hard sheet of plywood is used as the bottom.
Inserting shelves
The structure is covered with waterproof paint
Design principles and dimensions
Project. Such work begins, of course, with a sketch and calculation of dimensions. When determining the height of the stand, it is usually assumed that it is convenient to observe life in the aquarium in a sitting position. Therefore, it is not advisable to do it above 60-70 cm (taking into account the height of the legs).
The horizontal dimensions of the cabinet are usually calculated relative to the length and width of the aquarium. For example, if the size of the tabletop is usually either equal to or slightly larger than the size of the bottom of the aquarium, then the whole structure looks very neat and attractive.
What is the back wall made of? The main difference between an aquarium cabinet and a linen chest of drawers is that the back wall is made of thick and durable material (chipboard or MDF with a thickness of at least 22 mm).
This is due to the fact that it is the back wall that holds the vertical partitions, preventing them from folding under the weight of a heavy aquarium.
Many home craftsmen advise building the back wall between the side ones, rather than placing it on top. The structure will be stronger.
Frame. Vertical internal partitions are installed every 30-40 centimeters. They are the ones who protect the tabletop from sagging. Of course, the distance between the internal partitions is determined depending on the equipment that will then be installed.
The countertop is a very important element. It must be strong, smooth, waterproof. It is better to let it be thicker than thinner, especially for large aquariums (from 150 liters and more). For such a weight, a 22 mm chipboard panel is quite suitable.
Drawing. Based on these calculations, a drawing is made with the exact dimensions of the parts.
Particular attention should be paid to the presence in the project of shelves for equipment (external filter, power strip, places for storing aquarium accessories).
Varieties
Coasters come in different shapes and sizes. Role played by:
By shape
To size
The cabinet matches the size of the aquarium or exceeds it. Depending on the tank, the tabletop can be 60 by 60 cm or 150 by 50 cm. The bedside table for the aquarium reaches a height of 70–90 cm, including the legs. This height will ensure observation of the underwater world in a sitting position.
According to the material of manufacture
Applicable:
How to make an aquarium cabinet
If you can’t find the desired sample on sale, you can make an aquarium table at home.
Preparing for work
Before work, decide what shape and size it will be, as well as how many compartments to store the equipment. For an aquarium up to 100 liters, blocks and plywood are enough; for a tank with a volume of 200 or more, you will need a cabinet with a metal frame.
Preparation of the drawing
Calculate the length and width of the tabletop based on the size and shape of the tank. So, for a rectangular container, a classic stand is suitable. It is possible to choose ready-made cabinet models.
Example drawings
Deciding on materials
When making a stand for an aquarium with your own hands, you need new and high-quality materials. For the back wall you will need chipboard or MDF with a thickness of 2.2 cm. The surface will keep the vertical supports from falling under the weight of the pond.
Assembly
Assemble the aquarium cabinet that you make with your own hands sequentially:
- Cut the material into parts according to the drawing. You can contact a woodworking shop, where you can also order sizing tape along the cut edges.
- Assemble a frame from metal or beams.
- Attach the back wall to the base, then the side walls. For better strength, it is installed between the side parts.
- Secure the walls with confirmations. The holes for them are made with a diameter 1 mm smaller than the thread and a depth less than the length of the Euroscrew. Make the tie with a screwdriver.
- After assembling the box, install shelves and drawers inside.
- Secure the tabletop, drill two through diagonal holes, tighten and measure. If the tabletop is positioned correctly, make the remaining holes and tighten all the confirmations.
- Install the doors using standard hinges. Use a pencil to mark the installation locations on the side walls and doors. Use a round cutter to make recesses for the hinges. After installing the hinges, hang the doors and adjust the adjustment screws.
- If necessary, make holes in the back wall for wires and hoses.
- Turn the cabinet on its side, screw the legs along the edges of the frame.
- Decorate as you wish. Paint or cover with decorative film. Remember that the materials must be waterproof.
Installation
The location of the aquarium stand should:
- fit harmoniously into the interior of the room;
- to be level;
- be located in a convenient place, not to interfere with free movement;
- be isolated from noise;
- Avoid exposure to direct sunlight;
- make it possible to operate aquarium equipment from the network.
Place a mat or mat under the glass vessel.
Installation
The resulting bedside table, intended for an aquarium and having high strength and stability, must be installed correctly, for which it is important to determine the optimal location for it. Additionally, the area where this structure will be located must be prepared. To do this, follow these steps:
- the place is carefully prepared, for which it is important to make sure that it is perfectly level and resistant to high loads;
- the area is cleaned and leveled if necessary, since even minor transitions are not allowed;
- the selected area of the room should not be exposed to direct sunlight;
- the necessary equipment for the aquarium is purchased in advance, which includes a filter, compressor and heater;
- a rubber mat or other lining that can withstand significant impacts is laid on the prepared area;
- The product is being installed.
Thus, it is important not only to take care of creating a high-quality bedside table, but also to prepare a place for its installation.
What to do in case of a leak
It may turn out that after assembling and filling the aquarium, it begins to leak. Of course, this does not mean that all the work was in vain and you can get rid of your homemade product. It is enough to determine the cause of the leak and eliminate it. While maintaining the integrity of aquarium glass, the causes of leakage can be different. Accordingly, the methods for eliminating them will also differ.
Leaks in the corner
If a leak is found in the corner of the tank, you should drain the water, dry the aquarium and prepare it for gluing. The area is re-treated with silicone from the inside. If after a couple of days a leak is noted again when filling, you should cut off the silicone, cut the structure in the problem area, treat the edges again with alcohol and glue them with silicone.
Leaks along the seam
We proceed in the same way if the leak is noted along the seam. First, we clean the area and try to re-glue it. If this procedure does not give results, you will have to cut out the wall, clean the joints from silicone, degrease and glue again.
Bubbles
In some cases, no leak is noted, but upon closer examination, rising bubbles are noticeable in some places. Experts say that this problem is not dangerous for the fish or for the structure as a whole, so there is no need to do anything.
By following simple recommendations, you can not only create an aquarium of any shape, but also save some money, since the cost of its production will be minimal.
Design
You can take diagrams from the Internet, look for suitable drawings, repeat the manufacturing and assembly procedure using photo and video instructions, or do everything from start to finish with your own hands.
The most popular are 200-liter aquariums, for which a cabinet is made on a rigid frame and covered with sheets of laminated chipboard. Financially, this is the most profitable option, plus the material itself is not afraid of moisture.
Pure metal does not look very aesthetically pleasing, weighs a lot and is expensive. Wood is also expensive, and its moisture-resistant properties are significantly inferior to those of laminated sheets.
As for size, there are several factors to consider.
- The optimal height is considered to be 60-70 sizes. This will allow you not to bend too much, but at the same time not to place the aquarium too high;
- When calculating the height, do not forget about the presence of legs on the cabinet;
- The width directly depends on the size of the tank itself;
- Cabinets whose size is equal to or literally slightly larger than the size of the tank look beautiful and neat;
- If this is an aquarium with a capacity of more than 200 liters, it is highly advisable to make a separate cabinet with a reinforced frame;
- You should not make furniture wider than the container in order to use the space for other things. A more rational solution here would be to install shelving, as well as store things in the cabinet itself.
Please note that the aquarium is an independent piece of furniture in your home. Therefore, you should not use the cabinet as a place where you will store your socks or some tools.
The bedside table is dedicated strictly to the needs of the aquarium. That is, you need to place food there, equipment for filtration and cleaning, and everything else that is directly related to the aquarium and its contents.
Summing up
When starting to decide how to make a cabinet for an aquarium with your own hands, you should be prepared for the fact that purchasing the necessary materials, creating a project and cutting out the elements will take quite a lot of time. As for assembling the structure, a home craftsman can complete the entire work process in literally three to four hours.
The cost of the finished aquarium product will be much lower than the purchased one. At the same time, you can achieve full compliance with personal preferences in size and interior solutions. The information in this article will allow you to make a cabinet that is as durable and functional as possible.
Making the right choice
When an aquarium is purchased, it is worth thinking about where it will be located. It is highly recommended not to place the product on furniture items not intended for this purpose. Firstly, the furniture simply will not withstand the load, and secondly, it will not perform the functions required for cabinets
We will tell you below what subtleties you should pay attention to:
displacement of the aquarium - depending on the volume of the tank, stands for the aquarium are selected that can withstand the existing weight. For example, choosing a bedside table for an aquarium - a panorama needs to be done wisely. Only reinforced products can withstand such a huge load distribution; shape of the bedside table - if the aquarium is corner, then the model of the bedside table should be appropriate. It is hardly convenient to place square or rectangular containers on such products. A corner cabinet for an aquarium will be the best option for a triangular-shaped fish tank; the presence of additional devices - depending on the manufacturer of the aquarium, it may have various accessories necessary for the location
For example, the use of a 60-liter reef aquarium cabinet implies the presence of additional holes for tubes; evenness of the tabletop - do not forget that before installation it is important to check how level the tabletop is. Usually, an additional sheet of plywood is placed under the cabinet itself so that the weight is distributed evenly
Some products do not have full doors and are made in the form of a stand. In such cases, the leg of the cabinet must be stable, and the tabletop must bear the entire load; appearance - choose the product to suit your interior. If the room is made in strict classical colors, then the glass for the cabinet can be tinted; in the case of a romantic interior style, you can purchase a product with milled facades.
Having made the right choice, the consumer receives a high-quality result suitable for use over a long period of time. A beautiful and reliable cabinet will please the eye and perform its functions.
Tabletop
A special tabletop can be placed on top of the bedside table, which can withstand severe impacts and is easy to clean. It can be made from different materials:
- wooden will go well with the bedside table itself;
- glass provides an unsurpassed view of the entire structure;
- metal can withstand significant impacts;
- plastic can be presented in different colors and shapes, but it is important to make sure that special high-quality plastic was used for its production.
The tabletop may extend slightly beyond the resulting bedside table, which will add attractiveness and uniqueness to the design. Thus, making your own cabinet designed for installing an aquarium is quite simple. Photos of the finished results are located below, so it is possible to create a variety of designs that differ in dimensions, colors, internal contents and other parameters. During the production process, you can use different materials, and you do not need to use specific or complex tools. By doing it yourself, you won’t have to spend a lot of money to get a high-quality and reliable cabinet. This will result in a design that fits perfectly into the room and suits the tastes of the homeowners.
Tabletop installation
Decoration with decorative strip
Varnish coating
Design Features
There are a number of characteristic features that distinguish aquarium stands from a simple chest of drawers. If the capacity is small, then the aquarium can be placed on a regular shelf without wasting time and effort on a homemade bedside table.
In the absence of factory options, a DIY aquarium cabinet may turn out to be a little cheaper. But the main thing is that it will be made for a specific tank and will easily fit into the interior of the apartment.
You should start preparing by selecting and developing a drawing. The cabinet for the aquarium must withstand significant loads, i.e., have a good margin of safety. Don’t forget about the convenient compartments that contain cans of food, various care products, etc. There are a number of general tips:
- The structure for containers over 100 liters must be reinforced with a metal frame. For small aquariums, bars with a cross section of 50 by 50 mm are suitable.
- The main load falls on the back wall of the cabinet, so during installation it is recommended to fix it between the side ones.
- Additional stiffening ribs are installed every 30–50 cm of the tabletop length to avoid sagging. The slightest unevenness or distortion of the entire bedside table can lead to the appearance of cracks at the bottom of the container.
- The thickness of the table top and back wall must be at least 22 mm, the side posts and additional ribs - 18 mm.
- Wheeled legs are extremely undesirable for this type of structure. They have the smallest margin of safety, but moving such a colossus still won’t work.
- When choosing legs, emphasis is placed on their strength. These should be metal, but not thin aluminum, height-adjustable legs. The optimal number is twice the total number of partitions and side walls.
- The best option would be to install the cabinet directly on a carefully leveled floor. This will minimize distortions when installing the aquarium.
- An important issue is the choice of height. As a rule, the aquarium is located in a recreational area, which means that it will be viewed from a sitting position. In this case, the height of the aquarium table ranges from 60-70 cm.
The last point is easy to check. You will need a comfortable chair, a three-liter jar filled with water, and an assistant. One person sits in a chair or on a sofa, and the second person changes the position of the jar, into which several balls are added for clarity. When contemplating the balls is most comfortable, measure the height from the floor to the bottom of the container.
A drawing of the cabinet will help you avoid mistakes when assembling it.
When creating a drawing of a cabinet for an aquarium, it is worth thinking about its purpose. As a rule, it houses external pumping equipment and filters, as well as feed that does not require special storage conditions. This means that when designing, it is necessary to lay out openings for communications, and when choosing a location, make sure that there is a power outlet nearby.
The final stage in the development of the drawing will be the selection of the external facade. These can be special panels that match the overall design of the room, or simple overhead slats. The latter are especially suitable for country style, where wood dominates.
Externally, the aquarium should fit into the overall interior of the room
For 60 liters
This version of the stand is not much different from the 50-liter one. These two types and categories of design can be done with your own hands without any problems. If you make furniture yourself, you can solve a large number of issues:
- Design customization;
- Optimal match with the overall interior design;
- Accurate calculation of strength level;
- Product quality and reliability.
Having made the stand himself, the craftsman can rest assured that it will last a considerable amount of time and will not cause any trouble to its owner.