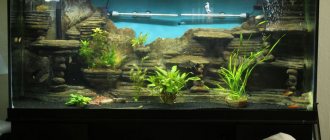
The desire to have fish at home often remains unfulfilled due to lack of space for an aquarium - especially when it comes to large volumes. After all, if a small container can be placed on a table, window sill or in a cabinet niche, then for large structures you cannot do without a special stand. It can be purchased in a store or made to order. But the most profitable option is a stand for an aquarium with your own hands, especially since not much time is spent on its manufacture. The result will be savings and furniture that fully matches the dimensions of the tank in length and width. In addition, it will be of a suitable height, capable of supporting the weight of glass, frame, soil, stones and, of course, the aquarium inhabitants themselves.
- Design
- Selection of material and accessories
- Manufacturing process
- Material cutting
- Frame assembly
- Tabletop installation
- Installation of shelves, drawers, hanging doors
- Attaching the legs, preparing holes for cables
- Decoration
- Installation Rules
- Video
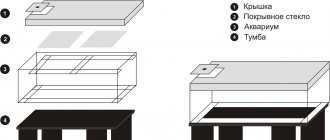
Design
Making a stand for an aquarium with your own hands begins with creating a drawing. When designing, it is taken into account that the main purpose of the structure is to support the weight of the tank and ensure its location at a height convenient for observation. If you do not have the skills to draw up diagrams, you should use special software, for example, the Astra furniture designer.
You can take ready-made sketches and adjust them to the size of your aquarium.
When creating a drawing, you should consider the following points:
- The length and width of the tabletop should be slightly larger than the same parameters of the tank. The design will look neat if you don’t leave more than 3–5 cm at the edges. The cabinet that fully matches the size of the aquarium looks interesting.
- The height of the stand depends on its location. The optimal value for any room is 80–90 cm. If the installation is carried out in a bedroom or living room, where aquarium inhabitants are observed while sitting or lying down, 70 cm from the floor level is sufficient.
- The plan usually indicates a rectangular shape. But you can also make a corner tabletop, where the container will stand parallel to the long side.
- A cabinet for an aquarium of 200 liters or larger volume must be equipped with a metal frame. For 100–150 l, reinforcement is allowed, but it is not necessary.
In addition to the main frame, the drawings may take into account additional details: shelves, drawers, doors. Partitions will help ensure the stability of a long stand; the distance between them should not exceed 30–50 cm. So, for an internal space 1.2 m long there will be at least two such elements.
Selection of material and accessories
It is necessary to select materials taking into account operating conditions. The tabletop, walls and partitions must be moisture-resistant, because water almost always gets on them. The best option is laminated MDF or chipboard. The first material is highly durable, the second is more affordable, but is only suitable for aquariums up to 150 liters. A countertop made of stone or metal will provide even more strength, but will be too expensive and heavy.
The back and side walls of the cabinets can also be made of laminated chipboard panels. Moreover, for large volumes (from 150 liters), a laminated MDF sheet reinforced with a frame made of steel angle is suitable. Smaller tanks can be installed on chipboard supports. If you make the entire cabinet from one metal, it will begin to rust, so wooden elements should also be used.
The dimensions of the container are also taken into account when choosing legs. A large aquarium - 300 liters or more - can completely do without them. It will be enough to install the frame and side supports directly on the floor. For other options, screw legs are suitable, height-adjustable to compensate for uneven floors.
The legs should be made of metal or thick wooden blocks. Metal elements are guaranteed to withstand a large aquarium, but require additional costs and time to attach to the frame. Wood is easier to process and install on a cabinet; it does not corrode, but it is not advisable to heavily load such material. The best option is thick-walled aluminum pipes - stainless, lightweight, easy to process.
Self-tapping screws, special furniture screws and confirmation screws are suitable as fasteners for wooden parts (table top, side supports and back wall). Metal elements are best fastened by welding. Aluminum legs are installed using nuts, washers and bolts.
To match the aquarium cabinet with the interior of the room, you should use decorative elements. Doors are often made of glass, chipboard or MDF, handles are usually metal, and plastic can be used to cover the body.
Manufacturing process
The manufacture of a cabinet begins with the selection of materials and drawing up a drawing. First you will need to cut the blanks to size, then assemble the frame, install the table top and legs. At the final stage, holes are drilled in the back wall for wiring, doors are hung, and decorative elements are attached.
Material cutting
Work begins with preparing all the parts that will be attached to each other. The process of their manufacture consists of the following stages:
- Drawing patterns on paper and cutting with scissors.
- Attaching paper templates to the materials from which the bedside table will be made.
- Cutting blanks using a jigsaw or other tools.
- Manufacturing of stiffening ribs, which for aquariums of about 100 liters in size can be made of chipboard.
If you have the right tools, experience and space, you can do the sawing yourself. If there are no conditions, and there is nothing to cut blanks for the cabinet with, you should contact a furniture store or workshop - for example, the one where the material is purchased.
Ordering sizing tape along the cut edges will help increase the attractiveness of the product; such a solution will also reduce the amount of waste during installation.
Frame assembly
Assembling an aquarium stand with your own hands begins with the frame. To do this, all wooden beams or metal corners are connected using the chosen method (welding or self-tapping screws). All angles and distances are accurately measured - even a 1-2 degree difference will lead to serious distortion and deformation of the table, and therefore increase the risk of the tank falling.
Overview of varieties
There are many shapes and sizes of this structure. The design can be either a cabinet for 2 separate aquariums, or an entire 2- or 3-tier structure. The rack can become part of the interior, decorating the room (for example, if part of it is harmoniously hidden with decorative elements). In this case, the choice of material is also of great importance.
This design can be from:
Steel profile pipe;
Installation Rules
When deciding how to make a bedside table for an aquarium with your own hands, you need to make sure that the product is as stable as possible. Only after this can you safely place a container of water on it. During the placement process, the following nuances are taken into account:
- the floor in the location chosen for installation must be perfectly level; unevenness of the floor covering is compensated in two ways - either using a rubber mat or other lining, or by adjusting the height of the legs;
- The installation site should not be illuminated by direct sunlight - because of this, the water in the tank may “bloom”.
Immediately before installing the container, you should place a polystyrene foam pad on the countertop. It will compensate for unevenness on the surface of the cabinet and protect the glass from abrasive substances that accidentally fall under the bottom - sand or other small but solid particles.
To prevent the water in the aquarium from blooming, the place where it is installed should be away from direct sunlight
Possible unevenness on the floor is compensated by laying a rubber mat or adjusting the height of the legs
Step-by-step photo report
For ease of viewing, the photos are small in size, but they are all clickable, you can enlarge them.
Photo 1
Photo 2
Photo 3
Photo 4 Marking the racks of the 1st tier
Photo 5 Stands for cabinet-shelving
Photo 6 Stands for cabinet-shelving
Photo 7 so that they are the same size, you can pull them together with something
Photo 8
Photo 9
Photo 10 Can be sanded
Photo 11 Trying it on
Photo 12 It is convenient to use a clamp to tighten the block at 90 degrees.
Photo 13 Be sure to make holes with a drill
Photo 14
Photo 15 I attach the second rack
Photo 16
Photo 17
Photo 18 I constantly check the level
Photo 19 I fasten the two halves of the 1st tier together
Photo 20
Photo 21
Photo 22 Frame of the 1st tier of the cabinet-rack
Photo 23
Photo 24 Fastening the racks
Photo 25 Attaching the crossbars
Photo 26 I also use a clamp
Photo 27
Photo 28 Cross members are ready
Photo 29 If desired, all connections can be made with construction glue
Photo 30
Photo 31 I attach the jumpers of the bottom (floor) of the 1st tier of the cabinet
Photo 32 I install the second racks (at an angle)
Photo 33 General view of the 1st tier of the aquarium cabinet-rack
Photo 34
Photo 35 Laying plywood on the 1st tier
Photo 36 Completely finished 1st tier
Photo 37 I decided to attach a small shelf for small items
Photo 38
Photo 39
Photo 40
Photo 41 Moving on to the 2nd tier
Photo 42 assembly of the second tier
Photo 43
Photo 44
Photo 45
Photo 46
Photo 47
Photo 48
Photo 49
Photo 50
Photo 51
Photo 52 Cutting plywood for the 2nd tier
Photo 53 Cuts for racks
Photo 54 I move on to assembling the 3rd tier
Photo 55
Photo 56
Photo 57 General view of all tiers assembled
Photo 58 I burn the structure with a gas burner
Photo 59
Photo 60
Photo 61
Photo 62 Final appearance and permanent installation location
Well, I don’t know how anyone likes this collapsible cabinet-stand-rack, but I managed to assemble it with my own hands.
Plywood shelves and aquarium body kit
Hello! In this project, almost all shelves are built-in. The shelves are made of plywood, the edges are varnished, and the face is enamel. The thickness of the shelves and walls is 30mm. The aquarium body kit is also made of plywood and assembled in parts on site
Interesting offers
Comments
This aquarium costs 700 liras, but its dimensions are such that you can reach the bottom with your hand. I don’t know the intricacies of cleaning and maintenance, but there are a couple of holes at the bottom/bottom, as I understand it, for changing water or.
In general, the project was agreed upon with a company that maintains aquariums; in the end, they will do this, not the owner))
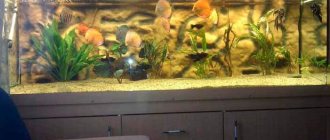
The column with the aquarium in the photo, of course, looks impressive. But when faced with the cruel reality, it turns out that servicing this aquarium through the narrow upper cabinet doors is very, very inconvenient.
A striking example of when it looks beautiful on a picture, but in everyday life it is inconvenient and impractical.
I decided to immediately save the blog to my favorites, the question is WHAT to do with the aquarium and how to decorate it... but then I remembered HOW I clean it... I have 400 liters, I will buy a smaller volume, But the option with the upper cabinet is very beautiful and very inconvenient . It’s just that the bottom of the aquarium needs to be cleaned with a “vacuum cleaner” and I can’t imagine how to do it, but once a year the aquarium can generally be cleaned..
the rest of the shelves and cabinets are chic, beautiful and practical))))
It depends on what tool you have. For example, I don’t like all sorts of standard hidden ties for chipboard, they are of little use, they don’t hold well and become loose over time.
I am currently using the Festool Domino system, it allows you to join parts using beech tenons.
If you want to make furniture at home, having a jigsaw and a drill, assemble it using wooden dowels (chops). Place more, every 70-100mm, mark more carefully and safely glue the parts together. Must hold tight.
DIY wall aquarium
Actually, on the subject. I quickly sketched out a sketch for a future jar, about 70 liters, I plan to make it on the wall, dimensions. 100x400x170 and even 68 liters, 6mm
Will it work for these purposes or do you need something thicker? Is it possible to glue it with simple silicone? I saw that Evgeniya glued it with a seemingly simple one (20l), but I don’t know if 1 meter will work or not. I plan to make a stand from chipboard, fasteners with 4 brackets on anchor bolts. And does the stiffener in the middle need to be glued?
something like this..)) and from above
Somehow I’m afraid to hang something like this on the wall.. 68 liters plus about 25 kg of soil plus driftwood fish, etc., etc.. why don’t you want to make a cabinet? Among other things, it perfectly fits devices for servicing the same aqua, plus you can put an external device there and hide all the wires there..
The screen is not practical in my opinion. Sooner or later, everyone comes to the understanding that the classic aquatic shape - a rectangle - is universal and fits almost all needs. An example is ADA aquariums. Everything about them, except the price, is correct.:biggrin:
Built into the wall - have you considered this option?
Well, about reliability. Here is an example for all doubters - 100 liter metal. el/titanium hangs in the bathroom on two standard spacer dowels, it hangs normally, it’s always full to capacity.
“I used to think that weirdos were people who did weird things. Now I know that they are the ones who call others weird."
Sir James Paul McCartney.
By the way, at what height from the floor do you plan to hang it? do not forget that you will need to siphon somehow, plant grass, etc. - i.e. It’s advisable to reach the bottom without a ladder, and you also can’t put something big under it (like a table) for the same reason. IMHO
The screen is not practical in my opinion. Sooner or later, everyone comes to the understanding that the aquatic classic shape - a rectangle - is universal and fits almost all needs. An example is ADA aquariums. Everything about them, except the price, is correct.:biggrin:
Built into the wall - have you considered this option?
Well, about reliability. Here is an example for all doubters - 100 liter metal. el/titanium hangs in the bathroom on two standard spacer dowels, it hangs normally, it’s always full to capacity.
I want to go into the kitchen and put neons and guppies there)))) I’ll do it myself, at a price I’ll write back and post a photo))
at eye level, or a little lower, siphoning is not a problem, I think the most important thing is that it is beautiful and practical)
I’m still thinking about the displacement, maybe I’ll make it a little smaller
I once saw something like this type of aquarium. made of plexiglass, self-adhesive. without a filter. with one-time feeding (in the sense that if I remembered, then I fed it. But I remembered it no more than once a week). 1/4 of the aquarium was tightly filled with Valisneria, another 1/4 with the related crypt. no changes, just topping up. self-sowing guppies lived there in countless numbers. I must admit - we managed to live for a very long time without degeneration of the line; the overall impression is a swamp.
Before making such an aquarium, think about how you will decorate it. so that you don’t regret the holes in the wall later
if at eye level, then you will only serve it with a ladder. which is what I’m hinting at.. I’m not trying to dissuade you in any sense, I just, for example, can’t imagine how to have something like this.. of course it’s beautiful and it can be tempting.. but.. the main thing is not to say later, damn why did I start this? I’ll do it for you keep your fists
Glass 6 with a margin. Silicone is ordinary, as I already wrote. Penosil, for aquariums, keeps the devil in a mortar. The only thing about the expiration date, please pay attention to this. There is fresh one in Swift. (Khabarovsk) Regarding the choice. I didn’t hold it myself and didn’t have it. try it. I don’t want to give unfounded advice and I won’t. The only thing is, if possible, make it wider. To put in at least something from the filtration. Although I often go to SAMBERI, there is an exhibition there from the Japanese in a small section. So, the so-called nano aquas are presented there in the form of a 200g jar, closed with a lid. After 7 months, 2 fish are still alive, the only one is covered with green algae on the walls. I’m surprised how an almost closed system, without filtration, substitutions and oxygen, can work for so long . There is food for thought
Aquarium cabinet and how to make it yourself
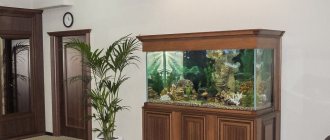
Watching peacefully swimming fish and plants swaying in the water is calming and relaxing, which is why aquariums are popular in the design of houses, apartments and offices. However, such a thing as an artificial pond requires constant care and attention from the owner, and cannot exist without a special stand for the aquarium. Aquarium cabinets not only perform a decorative function, but also serve as a support that ensures the safety of the tank and its inhabitants. The ideal option is to purchase a cabinet complete with the pond itself, but sometimes for a number of reasons this is impossible, and aquarists inevitably think about how to make a cabinet for an aquarium with their own hands.
Racks for aquariums: selection and creation
join the discussion
Share with your friends
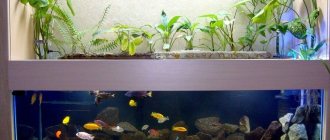
An aquarium rack is perhaps the only way out when one aquarium is no longer enough and the space does not allow placing several artificial ponds in the room.
And, of course, pet stores cannot do without such irreplaceable equipment, where the problem of accommodating a large number of aquariums with minimal replacement of room footage is also acute.
The meaning and functions of an aquarium cabinet
Aquarium cabinets are an integral part of arranging a home pond, which performs the following functions:
- Maintaining the weight of a tank filled with water.
- The cabinet under the aquarium is convenient for storing inventory and equipment for maintaining the tank.
- Aesthetic completeness – aquariums with a stand look harmonious and attractive.
In most cases, aquarium stands are purchased along with the tank, but sometimes aquarists have to start making an aquarium stand themselves.
It is important to note that an artificial pond with a capacity of 50 liters or more cannot be placed on a regular table - an aquarium requires a special stand that can withstand the colossal weight of the structure. The fact is that the pressure of a tank with a capacity of 300 liters is so enormous that the surface of the bedside table can bend. And this will inevitably lead to destruction of the integrity of the container. Therefore, aquarium cabinets have three features:
- The presence of vertical supports that will prevent the surface from sagging.
- The material from which the stand is made. It must be moisture resistant, so it is preferable to use laminated MDF or chipboard.
- Stability – the aquarium stand does not have legs or other supports. The structure must fit tightly to the floor so as not to fall if the support breaks.
Making a rack for aquariums
Sometimes, for lovers of fish and other representatives of the underwater world, one aquarium is not enough; they want something larger. The only problem is that there is not always enough space in the house to implement such an idea. A self-made shelving unit will help you solve this problem. Thanks to this versatile shelf design, it will be possible to place several aquariums in one room at once, without crowding the entire room. When making a rack, preference should be given to natural wood: pine, mahogany or oak. For this purpose, you can also use laminated chipboard, OSB board and plywood.
First, a solid base is installed, which involves fastening the frame with self-tapping screws and reinforcing the corners with additional strips. To avoid distortions during the assembly process, be sure to use a level. The finished base must be attached to the wall. Armed with the necessary tools, you should cut the side walls from pre-prepared material, and then cut grooves into them using a router, install shelves in them and secure them with self-tapping screws.
Please note that the minimum thickness of each shelf should be 2.5-3 cm, and the distance between them should be 30-60 cm. The assembled rack must be installed on the base and securely fixed. To give the structure a more attractive look, you can drill plywood trims to the side walls and cover them with laminated chipboard.
When is it profitable to make bedside tables yourself?
As mentioned earlier, in most cases, tables for an aquarium are purchased complete with a tank, which is much simpler. However, sometimes an aquarist has no other option but to build a homemade cabinet for an aquarium. This is beneficial under the following conditions:
- If the tank is of a non-standard shape, or assembled at home.
- The stand cannot be delivered.
- There is no aquarium stand available in stores because some tank models are not supplied by the manufacturers.
- If an aquarist wants to build an original bedside table, try his hand at carpentry.
There is also a small material benefit if you make the cabinet yourself.
Review
Having an idea of what kind of aquariums are needed, you can choose a ready-made industrial stand - there are many options available.
Russia can offer a huge variety of equipment for pet stores and aquarium farms. The company produces aquariums and, accordingly, stands for them. The racks are equipped with a lighting system and electrical equipment that allows the connection of any other aquarium electrical appliances.
For the manufacture of load-bearing structures, square steel pipes made of ordinary or stainless steel, coated with a polymer composition that prevents corrosion, are used.
Rack CA 3/1 (aquarium stand, three-tier, single-section) can be combined with other similar stands , filling the retail space with aesthetic and convenient shelving that can accommodate aquariums with a volume of about 150 liters.
At the customer's request, aquariums can be equipped with partitions, which doubles the number of reservoirs.
Moscow production company Metallvarim. ru offers aquarium stands for individual orders. The company's specialists will help you design a product for aquariums of any size and shape. The company can produce both all-welded structures and prefabricated ones, if the product cannot be brought into an apartment or store as a whole.
Company employees recommend first designing a stand taking into account the specific features of the room space and only after installing it, ordering aquariums of sizes and shapes that match the interior of the room.
By purchasing a ready-made rack, you can significantly reduce your time costs. If an aquarist is unsure of his ability to create an acceptable homemade structure, then the best solution would be to purchase or order a ready-made rack.
Principles of cabinet construction and general information
A stand for an aquarium with your own hands must be made reliably, which cannot be done without knowing the features and principles of self-production. Otherwise, the structure will turn out to be unreliable and will collapse at one point, burying the water world and its inhabitants. General information about manufacturing principles:
- The tabletop for a cabinet for an aquarium of 100 liters or more must be moisture resistant. Regular chipboard or chipboard is not suitable for making homemade products, since these materials do not have sufficient strength and reliability, even taking into account vertical supports.
- Internal vertical partitions are the main support in the cabinet, therefore they are installed at an equal distance from each other. This will help distribute the weight of the tank evenly. In addition, the bedside table for the aquarium should have the same length and width as the artificial pond - if the edges of the stand exceed the dimensions, this may cause improper distribution of the load.
- The height of the aquarium stand should not exceed 90 cm, since the stability of the structure is considered the primary task when constructing a stand yourself.
- Internal shelves, if you plan to store inventory and equipment in the bedside table, are installed between vertical partitions. In addition, the placement of shelves will give additional reliability to the structure, so you should not refuse them. Holes for equipment hoses are made in the back of the cabinet, which will save space and simplify maintenance of the tank.
In order for an aquarium with a cabinet to turn out right the first time, experienced aquarists recommend first making a drawing according to which they carry out the assembly.
Assembly materials
Before you start building an object such as an aquarium cabinet with your own hands, you should decide on the materials:
- Thick plywood - suitable for making a bedside table for a tank with a capacity of up to 100 liters. Before use, you must first coat the plywood with a moisture-repellent material to prevent the material from swelling. Otherwise, unevenness will form on the surface of the stand, which will lead to damage to the reservoir, and even a 300-liter aquarium will not be able to “press” and level out the unevenness.
- Chipboard - only laminated chipboard panels are used, and the joints are additionally insulated from liquid, since they absorb moisture and are deformed.
- MDF - these panels are similar to the previous version, but have increased density and reliability. In addition, MDF panels can be purchased in different colors, thanks to which the cabinet for a 200 liter aquarium will fit into any interior.
- Metal – only the frame is made of metal; completely metal stands cannot be made. Metal rusts under the influence of liquid, and, being used as a skeleton, it does not come into contact with water and provides high strength. The best option is to make a frame from a steel angle if the tank capacity exceeds 300 liters.
- Used materials - the use of such materials when assembling a cabinet at home is unacceptable, since this is a direct threat to the life and well-being of the inhabitants of the underwater world. Used materials do not have sufficient strength and reliability, and are not able to support the weight of the tank.
How to do it yourself?
Despite the wide selection of ready-made equipment, there are still quite a few aquarists who prefer to make a rack with their own hands. Such a decision may be quite justified for a home if:
- a design of non-standard dimensions is required;
- there are available materials, the use of which will be several times cheaper than purchasing a ready-made rack;
- The aquarist has sufficient skills to work with the material.
It is better to use a steel corner. Of course, it will be better if it is galvanized, although this is not at all necessary, because you can create a completely acceptable rack for aquariums.
In terms of the ratio of weight and strength, the best can be considered a corner with a shelf 50 mm wide.
You need to work with such material outside the apartment, for example, in the garage. You will need a set of tools: a tape measure, a pencil, a grinder with several cutting wheels for metal, a drill or a hammer drill with a set of drills. Bolts with a diameter of at least 6 mm (preferably 8 mm) are also required.
Stages of building a bedside table
You cannot build an aquarium cabinet with your own hands without creating a drawing and plan. It should be remembered that the safety of fish, plants and shellfish depends on the quality of the work done. The stages of making an aquarium stand include 5 steps, each of which must be taken responsibly.
Step 1
First, you should draw a sketch of the bedside table on paper to roughly understand what the interior detail will look like. After this, they begin to measure the dimensions of the tank and transfer the dimensions onto paper, creating a drawing. To be sure, measurements are taken not once, but several times.
Step 2
The second stage is assembling the back wall of the aquarium stand. It is important to note that this piece is different from the back wall found in regular furniture. The back of the aquarium cabinet must support an impressive mass, so MDF panels are used in its manufacture. In rare cases, it is permissible to use chipboard, provided that the panel thickness is at least 22 mm. The rear part is installed not behind the side walls, but between them, in order to increase the stability and reliability of the structure.
Step 3
The third step on the way to the bedside table is making the frame. The skeleton of the structure is made of durable material, such as metal. Vertical racks are installed inside, with a distance between 30-50 cm. It is important that the distance between the racks is equal, otherwise the load will be distributed unevenly, and the bedside table will turn out to be unreliable.
Step 4
The penultimate stage of assembly is the tabletop for the stand. Be sure to use moisture-resistant material. The use of MDF or chipboard panels is allowed, provided that they are resistant to moisture and have a thickness of at least 2.5 cm. In addition, regardless of the type of material, the countertop must have a flat surface. Otherwise, the bottom of the tank will burst or crack, so for a glass container, the stand should be strong and thick.
Step 5
The final stage of assembly is the installation of parts, which is performed sequentially:
- First, fix the back wall of the stand to the frame, then attach the side panels.
- Then vertical racks and a table top are installed, and shelves are attached.
- Next, doors are installed (if provided) and holes are made for equipment hoses.
- The cabinet is placed in a place with a perfectly flat floor.
An aquarium cabinet is an important element of installing a home pond, which requires attention on the part of the aquarist. With certain skills and knowledge, you can make a stand by hand, using reliable materials and following the instructions and advice of experts.