Quickly navigate to the article
- 1 Making an aquarium with your own hands: when is it profitable?
- 2 Materials for work
- 3 Glass selection
- 4 Selecting glue
- 5 How to glue an aquarium
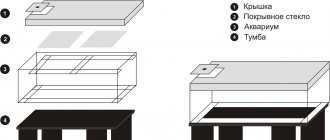
- 6 Aquarium cover
Glass rectangular aquariums with fish, decorating the interior of homes, offices and shopping centers, are familiar to every fan of the underwater world. Having carefully studied the design of the tank, many fish holders come to the conclusion that they can make an aquarium themselves using glass, the necessary tools and glue. Although stores display a wide range of containers for keeping fish, not every aquarist can choose a model to their liking, and some are confused by the price of artificial reservoirs. In addition, knowing how to glue an aquarium correctly, you can make money by selling homemade containers. There are some rules and nuances that will help you learn how to make an aquarium with your own hands.
Making an aquarium with your own hands: when is it profitable?
Perhaps for novice aquarists just joining the ranks of fans of the underwater depths, the question of how to make an aquarium with your own hands will seem strange. After all, pet stores and Internet sites offer a wide range of models of artificial ponds: giant and small, rectangular and round, with and without lids. However, despite such an abundance of tanks, many experienced aquarists prefer to make a homemade aquarium.
The decision to glue an aquarium at home has many reasons. For example, a fish holder lives in an area remote from the city, and transporting a fragile glass container causes difficulties. Some owners make structures for sale, earning money at the same time. But the main reason why most aquarists decide to make an aquarium with their own hands is the joy of the work done and the desire to save money.
What should you pay attention to if you are interested in a 500 liter aquarium?
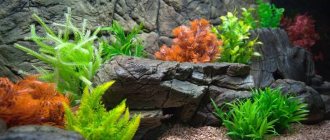
First, the shape for a specific room is selected - the volume will depend on it, as well as the inhabitants of the reservoir. The design is completed with the help of plants, creating a suitable ecosystem, no matter how large the aquarium is - 700 liters, 500 or more. What should you consider when choosing?
The place where the interior object will be placed. In this way, the configuration and dimensions of the future reservoir are determined. Animals and plants – the future composition is created by professional designers who carefully select the landscape according to the customer’s wishes. Equipment necessary for the uninterrupted maintenance of life of the inhabitants.
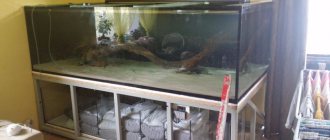
“Underwater World” helps bring bold ideas to life - here you can make a custom-made tank, choosing the shape and volume.
Materials for work
To make an aquarium with your own hands, you first need to stock up on the necessary materials and tools for the job. For construction you will need:
- Silicone glue gun.
- Grindstone.
- A sharp blade or thin knife.
- Paper napkins, sponges and clean cloth.
- Degreaser.
- Ruler or tape measure.
- Glass cutter.
- Masking tape.
In addition to these items, you will need newspapers on which the structure will dry, and glass clamps that will firmly fix the walls of the container until it dries. Having prepared the necessary parts, all that remains is to choose the right glass and glue to create a homemade product.
Glass selection
Successful gluing of an aquarium depends on two things: the correct choice of glass and glue, and the attentiveness and leisure of the owner. Correctly selected glass for assembling the structure already guarantees ½ successful production. The material from which the aquarium is glued must meet the requirements: provide a clear view and withstand the onslaught of liquid. If glass materials are chosen incorrectly, this will lead to structural failure and death of the tank residents.
To select glass for production, you should familiarize yourself with the selection rules:
- To build a pond at home, silicate glass is used, not organic glass. The latter type is considered synthetic, so there is a risk that it will release dangerous chemical elements into the water that will negatively affect the well-being of the fish. In addition, organic glass is inferior to silicate glass in external characteristics: it is scratched and quickly becomes cloudy.
- Having learned that only silicate glass is suitable for construction, you should study the specifics of this type in more detail. Silicate glass is divided into two types: window glass and display glass. The first option for the construction of artificial reservoirs is categorically not suitable, since the window type distorts the view and is too fragile. Therefore, they choose a display case for the construction: shiny, durable and smooth. The cost will be more expensive, but it is better not to be greedy in this matter, because the life of the fish and the reputation of the manufacturer depends on the right choice if the aquarium is put up for sale.
- The grade plays a significant role in the choice of glass. There are eight glasses: from M1 and ending with M8. To make a glass aquarium with your own hands, you need the highest quality - grade M1. If this option is not possible, you can purchase M2, or in the most extreme cases - M3. It is unacceptable to use low varieties, since they will not withstand the weight of water and will simply burst, burying flora, fish and decorations.
- When purchasing premium silicate glass, it is important not to lose vigilance and carefully examine the material. If there are the slightest chips, scratches or cracks, you cannot purchase glass! Even a tiny defect will lead to negative consequences: breakage and destruction.
- Used glass cannot be used for the construction of structures. Like any other material, glass surfaces have a service life and are subject to natural wear and tear, so using used materials will lead to negative results.
In addition to these rules, attention should be paid to the thickness of the glass. If the owner chooses the width, length and height independently, then the thickness of the glass pieces is determined using a special table, where h is the height and l is the length.
If a large aquarium is being built, then stiffening ribs will be required. These are additional components that help the structure withstand fluid pressure, preventing the walls from sagging. The stiffening ribs are installed at right angles, which allows you to increase the strength of the container and install a glass lid for the aquarium.
Separately, it should be noted such a nuance as cutting glass. If the aquarist does not have experience in this matter, it is better to entrust the work to professionals, since inept actions will lead to sad results.
Glue selection
How to glue a glass aquarium is an important question, since the strength and durability of the structure depends on the correct choice of the adhesive mixture. There are many types of glue that can be used to connect glass edges together. But to make the aquarium durable and reliable, the adhesive must meet the following requirements:
- Safety.
- Strength and elasticity.
- Aesthetic appearance.
- Rapid grasping.
- Ease of use.
- Durability.
- High degree of adhesion.
Silicone sealant meets these requirements, thanks to which you can make a durable and reliable tank. Before gluing the aquarium with silicone sealant with your own hands, it is important to pay attention to the composition of the glue. The composition should not contain impurities, and the substance itself should not be antibacterial, otherwise the fish may be harmed.
Silicone sealant is available in three colors:
- White – When using this shade, it is important to note that the design may appear unfinished.
- Unpainted - used to create small tanks with a capacity of up to 100 liters.
- Black – used for gluing bulky structures, it looks elegant and noble.
The following brands of sealants are considered the most popular and reliable:
- Dow Corning 911.
- Tytan.
- Soudal Silirub AQ.
Why should you contact “Underwater World”?
Here you will receive not only full service, but also a guarantee for the purchased product. In addition, many people prefer to order full maintenance and care of the tank - monthly cleaning, adjustment of equipment and care for its inhabitants if necessary. The content or arrangement within it also changes periodically.
Get detailed advice on the website by filling out the form, or by phone. Competent staff will answer all your questions.
How to glue an aquarium
Artificial reservoirs for keeping fish come in different sizes and shapes, but for the first time you should give preference to a rectangular aquarium, the manufacture of which is simple and convenient. There are two ways to glue an aquarium at home:
- The walls are glued to the bottom of the tank.
- The glass is glued around the bottom.
Both methods do not differ from each other in terms of reliability and service life. Having chosen the first method and prepared the necessary materials, you can begin gluing the parts.
How to properly glue an aquarium:
- The first step is to sharpen the edges of the glass so as not to get hurt during assembly. To do this, the glass faces are transferred to a bathtub, the bottom of which is covered with a soft and clean cloth, the container is filled with water and the piece of glass is placed. Having moistened the sharpening stone, they carefully process the edges. The cut must remain intact, otherwise the silicone sealant will not be able to adhere tenaciously.
- Having completed the processing of the edges, carefully remove the glass and wipe it dry with a clean towel. After this, the edges are treated with a disinfectant.
- As preparation is completed, they begin responsible actions - gluing surfaces. The bottom of the future tank is carefully laid on the newspaper, then sealant is applied to the end of the front wall using a gun, and the glass is carefully placed on the bottom of the tank, gently and lightly pressing. If excess glue appears, then there is no need to remove the sealant - a double seam is used for strength.
- The side walls are glued in the same way, except that their vertical ribs are lubricated with sealant. The resulting structure is left to dry for 24 hours, but sometimes it takes more time for the glue to set well.
- After the sealant has dried, clamps are installed to glue the aquarium together if an impressive container is being built. A day later, after all the parts are securely glued, the excess adhesive mixture is eliminated using a sharp knife or blade.
- The assembled aquarium is checked for reliability and leaks. To do this, fill the container with water and carefully inspect the joints. If there is still a leak, you can try to fix it by pressing a little glue into the weak spot. After this, you can begin to launch an artificial reservoir and stock it with fish and shellfish.
When assembling the fish tank, safety precautions should be observed by wearing protective gloves during installation and manufacturing.
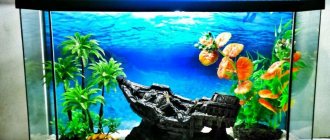
Set of decorations for decoration “Pseudo-sea”
1 Horizontal sandstone 451707 6502 Package of white soil used for the design of the Pseudo-Sea - 3.5 kg each 182504 5003 Natural small corals. 68505 1004 Natural colored corals 49003 6005 Natural large coral 32 5007 5005 Artificial plants 65003 0006 Artificial corals 65003 0007 Blue spectrum lamps used for Pseudo-Sea 29001 800 Total including equipment: 80 800Aquarium cover
The aquarium lid is an element without which the design cannot be completed. The coating provides protection for energetic shellfish and active fish that jump to the surface and fall down to die. The simplest and most economical version of a homemade lid is a thin plastic sheet that is installed on the stiffeners.
If the owner wishes, a protective covering can be constructed from silicate glass or durable plastic by installing lighting. For convenience, a handle is attached to the lid to conveniently open/close the tank. To avoid damage to the top edge of the glass, construct a soft layer of sealant. In addition, it is important to first measure the parameters of the aquarium so that the lid fits in size and looks harmonious.
Making an aquarium at home for the first time may seem daunting, but with patience and detailed instructions, assembling the tank is not difficult. The main thing is to choose high-quality materials so that the structure becomes a reliable refuge for colorful fish, exotic shellfish and underwater flora. Having gotten your hands on making artificial ponds, you can turn this hobby into a profitable business by starting to produce aquariums at home.
What is the difference between a 600 liter aquarium and a 700 liter or larger aquarium?
The main difference is how much flora and fauna you can fit into the pond. Each plant, fish or animal requires a specific displacement. In this case, they will calmly coexist with each other, delighting you with their beauty.
It is necessary to decide in advance who will inhabit the aquarium and provide shelter for living creatures - a place where they would feel safe. For example, a thicket of algae or a reef island.