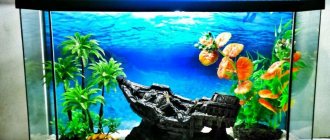
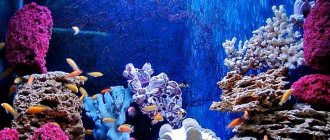
Many aquarists who initially decided to acquire a small tank sooner or later begin to think about a large aquarium. To be honest, this is not such a bad idea, because the larger the aquarium, the more stable it will be and the easier it will be to care for. In addition, a large volume can bring in a lot of interesting fish. Therefore, if an aquarist plans to install a new “jar,” then first you need to decide on the location of its installation. You should also take care of the type of glass from which the new structure will be made. More details about which glass to choose for an aquarium will be discussed in this article.
Which glass to choose for an aquarium?
Do-it-yourself aquarium made of glass: why ventilation and other main structural components are needed
First, we need to note several features of the selected material. The design will be easier when creating an aquarium with your own hands from plexiglass. Various dyes are added to it. It is not difficult to bend such polymer sheets to obtain original shapes. Attracts high resistance to mechanical damage.
But high-quality glass is superior to other analogues in terms of a range of consumer parameters. This material provides good clarity over many years of continuous use. Cleaning it using regular detergents allows you to create a perfect appearance.
An original product can become an interior decoration
The benefits of chemical neutrality should be especially emphasized. Glass does not change the composition of the liquid in any way, so it is not difficult to create an environment in an aquarium that is favorable for the inhabitants. It is not damaged by ultraviolet radiation, high temperature of heating elements, or other external influences.
With a large thickness, the walls are quite strong
The last remark must be supplemented with calculations. In order not to make a mistake with the dimensions of the product, you can take the standard data from this table:
| Length of the largest fish, cm | Volume of water per fish, l | Recommended surface area for 1 fish, sq. cm |
| 1-1,5 | 2-3 | 20-30 |
| 1,5-2 | 4-5 | 60-70 |
| 2-3 | 6-7 | 80-100 |
| 3-4 | 8-9 | 110-130 |
| 4-6 | 10-12 | 140-160 |
It is possible and even necessary to increase the water surface area. This improves the saturation of the liquid with oxygen naturally, without forced aeration. Based on the obtained values, the dimensions of the product are selected. The shape is specified taking into account design requirements.
Ties (1) and stiffening ribs (2) strengthen the structure
You should purchase glass from grades M4 to M7. In products with smaller digital indicators, according to current industry standards, small inclusions of air bubbles and other defects are acceptable. An aquarium requires a uniform wall structure, as significant loads are expected.
For your information! In combination with water and lighting, the smallest errors in appearance are clearly visible.
The exact composition of the product will be clear after studying all the components
Even for a simple design you need to prepare a drawing
Such documentation will be useful for cutting blanks to the marked sizes in a glass workshop. This service is sometimes offered completely free of charge, subject to the purchase of materials from the performers. For transportation, you should prepare corrugated cardboard and other suitable packaging in advance.
Below are the glass thickness data. Positions when creating a simple aquarium are marked in green. Yellow – option with stiffeners. Red - with transverse ties and longitudinal stiffeners. All dimensions are given in mm.
How to glue an aquarium: preparing consumables to ensure the tightness of joints
These connections are created using silicone varieties of sealants. It is advisable to use formulations without additives that can worsen the original characteristics. The disadvantages of some components are given below:
- Butyl - provide a good connection, but they have limited strength.
- Acrylic adhesives are well suited for uneven and porous surfaces. They are destroyed by water.
- Acidic, bitumen, polysulfide - they pollute the liquid with chemical compounds.
Silicone-based sealant is suitable for creating a new structure or repairing a damaged aquarium
It is harmless to fish and plants. Before gluing, the surfaces must be thoroughly cleaned and degreased. To perform these operations, you need to purchase industrial alcohol or acetone.
Video: how to glue an aquarium with your own hands
Written instructions describing the main steps are given below, in a separate section of the article.
How to make a high-quality aquarium lid with your own hands
This element creates a barrier for fish that can jump out and die. It also prevents dust from entering the aquarium. This precaution is useful if there are small children or pets at home.
You can install backlight lamps in the lid of the aquarium with your own hands.
The dimensions and shape of this unit are chosen taking into account the corresponding parameters of the aquarium. The design is removable to simplify maintenance. Lightweight materials that are moisture-resistant decorative coatings are used. Strong and durable plastic cladding panels are quite suitable.
For your information! Silicone-based sealant is used for gluing polymers. Some advice suggests using special additives that prevent the formation of mold and fungi. It must be remembered that such components pose a danger to plants and fish.
Reliable and beautiful cabinet for an aquarium: examples of work and manufacturing features
The requirements for this part of the design are outlined below:
- The main parameter is the ability to withstand the heavy weight of an aquarium filled with water without deformation or damage.
- The aesthetic characteristics of a do-it-yourself aquarium stand must be created in accordance with the overall style of the room.
- Having a sufficient volume will be useful for placing a compressor, power supplies, other components of technical equipment, care products, and feed.
A functional and beautiful do-it-yourself aquarium cabinet, together with the upper part (lid), can be assembled from standard cabinet furniture components
Brick with decorative finishing (artificial stone) will provide reliable support for a heavy structure
Important! In any of the options, pay special attention to the connection between the base and the bottom of the aquarium. A pad made of fabric, foamed polymer, or rubber will help compensate for the smallest unevenness of the supporting surface.
Making an effective aquarium filter with your own hands
The purpose of all products in this category is to remove harmful impurities from water that form in the aquarium during operation. To solve this problem, different technologies are used:
- Mechanical contaminants are removed using meshes, bulk fillers made of polymer threads, and granular backfills.
- Biological technologies are based on the processing of ammonium and other hazardous compounds and substances by bacteria. Colonies of microorganisms are added to porous filter materials.
- Activated carbon and other sorption fills remove turbidity and unpleasant odors.
- Various chemical compounds are also used to impregnate the backfill. They must be used carefully so as not to deteriorate the composition of the water.
DIY kit for creating an external filter for an aquarium
These components are used as follows:
- The working container is created from a suitable pipe (2) and plugs (1).
- Purified river sand is poured into it.
- Through adapter devices (4), which ensure tight connections, two tubes (3) are inserted into the cover. One supplies contaminated liquid to the lower part of the filler. Through the second, from above, clean water is taken.
- The taps are installed so that it is possible to block transport routes to perform routine maintenance (washing sand).
- The movement of water is provided by a standard pump (6) with an electric drive.
To create a phytofilter for an aquarium with your own hands, you need to study the operating principles of the corresponding devices. Specialists in the field know that the most important problem is the timely removal of nitrites and ammonia compounds. The dietary supplements mentioned above decompose harmful substances only to nitrates.
In phytofiltration technologies, useful functions are performed by plants. Their roots extract the compounds listed above from the water. It is only necessary to ensure the supply of liquid to the appropriate area, followed by separation of mechanical impurities and return to the aquarium.
A large tray with plants is placed on top. This will create an additional load, which must be taken into account when calculating the load-bearing frame
Bottom filtration installation
Here, useful functions are performed by the substrate poured into the aquarium.
Important! This solution is not recommended for beginners. Only an experienced aquarist is able to correctly select the composition of the soil, thickness, placement of plants and decorative elements. In case of errors, zones are formed with conditions suitable for the formation of methane and silt deposits.
Filters that are installed inside the aquarium
Such models are mounted outside, fixed to the walls
These products make maintenance easier. Cleaning and replacing filter elements can be done without unnecessary difficulties.
External installation kit
When purchasing such a filter for an aquarium, the price will be higher than the total cost of making a homemade product. Correct application of the information provided in this article will help you create a high-quality, effective cleaning system without extra costs.
Making a compressor for an aquarium with your own hands
Oxygen is needed for the normal functioning of fish. Even with a large surface area, its supply may be insufficient. It should not be forgotten that in the open air the wind performs the corresponding useful functions completely free of charge. At home, forced feeding is used using specialized equipment.
Centrifugal compressor design
In household models, membrane structures are used to equip aquariums. To increase productivity, piston compressors are used. They have a relatively high noise level. They are installed for aeration of aquariums with a volume of more than 250 liters.
Schematic diagram of a membrane pump for an aquarium with your own hands
Implementation of a project using a rubber cuff and an electric motor
The desired result can be obtained using improvised means. First you need to find a container to accumulate air. A ball chamber, an air mattress, or an old tank with a membrane from a reverse osmosis system will do. It is filled with a hand (foot) pump to the desired pressure. To eliminate losses, use a tee with valves. A tube is connected to it. When immersed in an aquarium, aeration will be performed.
To increase the efficiency of the process, it is necessary to make many small holes in the tube
For your information! You can make a good aquarium compressor with your own hands only from high-quality components, which are expensive. Affordable prices for household aeration systems for aquariums allow you to quickly solve the problem without large financial costs. The option with a car camera can be used in emergency situations. But it is hardly suitable for constant use.
Features of creating a siphon for an aquarium with your own hands
Using this device, mechanical impurities that settle on the bottom are removed. The extended part (1) is carried out in the cleaning area. To create primary vacuum, use a hand pump (3), which is connected by a flexible hose (2). The outlet part (4) is lowered lower for subsequent movement of the liquid by gravity.
After reading this description, it is not difficult to understand how to make a siphon for an aquarium with your own hands. It is necessary to select components that will not themselves pollute the water. If you don’t have a pump, you can create a vacuum with a vacuum cleaner or by inhaling a little air through your mouth. For dirty water, you need to prepare a container. After a short period of settling, large particles will accumulate at the bottom. They are removed and the purified liquid is poured back into the aquarium.
Factory product
Gas generators: important recommendations for the production of functional units
Supplying a sufficient amount of CO2 in an aquarium with your own hands is not difficult. Refilling with carbon dioxide is cheap.
In this option, you will have to buy high-quality specialized equipment
The cylinder is designed for high pressure. It can store large quantities of gas. Using a pressure gauge, determine the remaining reserve. The valve precisely regulates the flow.
A diffuser is installed directly in the aquarium
Such preparations saturate the water with carbon dioxide. They are used in accordance with the manufacturer's instructions
This article presents not only ready-made solutions from stores, but also technologies for creating homemade products. To obtain CO2 at home, experienced aquarists and beginners successfully use fermentation processes. This set of ingredients will be useful in practice:
- Sugar in the amount of 20 tbsp. You can use any spoon. There are recommendations about the best parameters of reed varieties, but their feasibility is not justified by significant facts. The main thing is not to reduce the amount of this nutrient so that the yeast effectively produces the desired chemical compound.
- Add starch - 8 tbsp. spoons
- It is necessary to prepare purified water (1 l) so that foreign impurities and organic components do not have a negative impact on the process.
- Soda (6 tablespoons) neutralizes acidic components.
Mix the ingredients and cook for 20-30 minutes. Next, cool slowly, add beer yeast at the rate of 5 tbsp. spoons per liter of liquid. To intensify fermentation, pieces of bread and fish food are used. This composition remains operational for up to 2.5-3 months. Afterwards, the mash is replaced completely, or only by 60-70%.
Schematic diagram of a carbon dioxide generator
The second container serves as an intermediate filter. At the same time, the intensity of the process can be monitored by the bubbles. When creating such a kit, suitable plastic bottles are used. Silicone sealant is suitable for creating airtight connections.
When using this technology, you should remember important limitations:
- Photosynthesis occurs only in the presence of light.
- Rapid plant growth indicates high gas concentrations.
- The above method (mash) is not very productive. If the volume of the aquarium exceeds 150 liters, two similar installations are used.
- In addition to carbon dioxide and light, plants need fertilizers and microelements. For better absorption of nutrients, a low-acid environment is best.
If the fish's health worsens, the supply of carbon dioxide is reduced or stopped completely. To restore normal oxygen content, forced aeration is turned on. The same problem can be solved if you make an oxidizer for an aquarium with your own hands.
Factory products
A functional oxygen generator can be assembled from available materials in a few minutes. Select a suitable container (medicine bottle, glass or plastic cup). A little hydrogen peroxide is poured into it and a piece of shungite is immersed. The hole is plugged with an aquarium diffuser, which should be at the bottom when immersed.
Stages
When making an aquarium yourself, follow the basic rules:
- Selecting proven glass.
- Choosing a safe sealant.
- Don't forget to degrease surfaces.
- Place an unnecessary carpet or something similar in the place where the future tank will be assembled.
- Apply the sealant in an even, even layer.
- Cut off excess glue with a knife.
- Do not touch or rearrange the container for 24 hours after gluing.
- Every other day, glue the stiffeners and ties.
- After complete drying, fill the container with water.
Aquarium shapes
Before design, the shape of the container is selected.
The choice of forms is quite varied:
- Round form.
- Rectangular shape.
- Angular shape.
- Panoramic form.
Each of these forms fits its own interior. These forms are feasible when making an aquarium at home. The only exception is the round shape. To make it yourself, you will need the work of a glass blower.
Glass
Glass is the main material for creating a fish house. It is designated by the letter M with numbers. To create a container, glass of at least M3 is recommended. The best option would be to use M1 - the most durable and reliable. It should not have scratches, chips, or cracks. To make the container, ordinary silicate glass is used. Choosing good glass is the starting point, starting the production of the container.
Glass thickness is the second most important selection criterion. Determine the volume of the future container using the formula:
Volume = Length * Width * Height.
Knowing these characteristics, the thickness of the container is determined.
For greater structural strength, stiffeners and ties are used.
Spectacular decoration: special devices and design elements
You can use any items to fill the aquarium. In any case, it is necessary to ensure safety for fish and plants. This requirement is not limited to the penetration of harmful contaminants. The retail chain offers moving, too bright and other devices “for aquariums”. Some of them provoke stressful situations. Others are not suitable taking into account the behavioral characteristics of certain species of fish.
Decorative elements are created from different materials. They are covered with various protective layers. When choosing, be aware of potential hazards. For example, some natural minerals can significantly change the chemical composition of water when immersed. Calcium and magnesium components increase the level of hardness. Phosphate compounds have a negative effect on the health of fish. Safe are: basalt, granite, pumice, quartz rocks. But artificial stones intended for aquariums definitely do not contain any harmful components.
Creating a DIY aquarium backdrop can be overwhelming
But such designs are distinguished by a high level of realism. Inside you can hide tubes and other technological parts of the structure.
It’s much easier to make decorations for an aquarium with your own hands using printing technologies
On a computer you can create a unique drawing with the desired resolution and certain aesthetic characteristics. To apply it to a suitable base, you can use the services of a specialized service center. The finished picture is glued to the back of the glass, which provides good protection from adverse external influences. At the same time, contamination of the aquarium water is prevented.
For your information! Using appropriate techniques, it is possible to create a three-dimensional image in 3D format.
Choosing the right soil for an aquarium: you can create the optimal composition with your own hands
This is the most important component of the aquarium and performs aesthetic and practical functions. It contains beneficial bacteria. It is the basis for securing the root systems of plants. When danger arises, some aquarium fish create shelters in the ground and dig holes to lay eggs.
Backfills based on sand, crushed minerals, polymers, and glass are used. In the latter option, pieces of material are treated with high temperature to smooth out the protrusions. When creating nutritious soil for an aquarium with your own hands, special ingredients are added to it to solve the following problems:
- normalization of environmental acidity;
- absorption of harmful chemical compounds;
- plant stimulation;
- treatment and prevention of fish diseases.
Specialized stores offer a wide range of aquarium fillings.
When choosing, you need to pay attention to the following information:
- Some natural components have a significant impact on the chemical composition of water.
- It is necessary to create and maintain a porous layer so as not to interfere with metabolic processes.
- Sand grains up to 2 mm in size are raised by water vibrations, which form large fish as they move. Contaminants enter the filtration devices and damage them.
- To eliminate such manifestations, gravel is poured. But you need to understand that it is only suitable for plants with strong roots.
- Dark shades are suitable for tropical aquarium fish.
- Bright colored paints should be used in limited quantities.
- If the colors are too light, the natural color of the fish gradually fades.
For your information! To eliminate potentially harmful components, experienced aquarists personally process soil mixtures from the store. They are thoroughly washed and calcined. Similar actions are performed if river sand and other natural materials are used.
Do-it-yourself potassium supplement for aquarium is used if plants begin to lose leaves. Iron deficiency appears as light spots. In the absence of nitrogen, the protein production mechanism is disrupted. Magnesium, phosphorus, silicon, and other trace elements are required in small quantities.
These tablets are created specifically for feeding aquarium flora.
They are immersed in backfill. The exact amount of drugs and methods of application are described in the manufacturer's instructions. Similar products are also produced in liquid form.
DIY driftwood for an aquarium: a beautiful and durable product
With the help of these elements, not only exclusive compositions are created. They are necessary to create a comfortable environment for certain types of fish. If you plan to make a driftwood for the aquarium with your own hands, pay special attention to its preparation. The selected wood is cleaned of bark and dirt and boiled in water for at least two days. Only a product prepared in this way will be protected from rotting and possible “blooming”.
If you figure out how to make driftwood for an aquarium with your own hands from stained wood, you can saturate the water with tannins and acids of organic origin. This environment is comfortable for carp and some other fish species.
The appearance of artificial driftwood is no different from its natural counterpart, even in small details
Even experienced aquarists prefer these artificial products. They do not contain any hazardous substances.
Aquarium grotto
When creating a grotto for an aquarium with your own hands, you can use the remains of ceramic products
The general rules outlined below will help you choose decorative details without errors:
- Basic materials and coatings of such elements should not contain potentially hazardous substances or soluble compounds.
- Sharp edges and protrusions should be excluded.
- In grottoes and other shelters, 2 or more holes are made with dimensions sufficient for the free movement of the largest fish.
- Massive objects are installed directly on the bottom, or through special damping pads.
Economical and reliable lighting
Previously, halogen and gas-discharge lamps were used to solve such problems. Nowadays, when creating a lamp for an aquarium with your own hands, preference is given to semiconductor devices:
- LEDs are produced in a wide range, so it is not difficult to choose the optimal technical parameters for the project (radiation intensity, spectrum).
- They perform their functions economically, without generating much heat.
- These products are resistant to changes in temperature, humidity, and network voltage.
- They retain their original characteristics for several tens of thousands of hours of continuous operation.
- Low voltage circuits can be used for connection, which increases the level of safety.
For your information! As production expands, the cost of LED devices decreases. They are not damaged under difficult conditions of use and frequent switching on. Such products are well suited for creating modern automated lighting systems for an aquarium with your own hands.
For approximate calculations, three gradations are used (in lumens per 1 liter of aquarium volume):
- From 10 to 30 is the minimum level. This lighting is suitable for shade-loving plants.
- The range of 30-50 is universal.
- More than 50 units are used with caution to avoid discomfort for the fish.
From several LEDs you can assemble a source with an optimal distribution of the spectral range
When setting up the lighting for an aquarium with your own hands, set the correct operating mode. The duration of photosynthesis, taking into account artificial and natural sources, should be at least 8 hours a day. It is not worth increasing the range, as this may provoke excessive algae growth.
This diagram explains the dependence of surface illumination depending on the height of installation of the device
Mini aquarium with built-in phytofilter. Made of glass and silicone.
ARTICLES December 12, 2021 Briefly, the history of my passion for the aquarium is as follows. Like many people, I had an aquarium as a child. My parents introduced me to nature. Apparently they succeeded, since I have generally always had aquariums from time to time, although with significant interruptions. Now, when it was my turn to introduce my boys to the love of living things, for the next New Year I gave the youngest an aquarium. Well, as usual, I got carried away myself. Vaguely remembering the difficulties in maintaining biological balance, a small (according to my standards) amount of living creatures that were not picky about their contents were purchased for a new 54-liter aquarium. These were: three guppies (male and 2 females), three red swordtails, a pair of catfish, five Sumatran barbs and a pair of ampullaria. Vegetation: several Vallisneria bushes, Java moss, hornwort. According to the old Russian tradition, you first plug in the device, get an unexpected result, and then start reading the instructions. So did I. Involving the younger one in righteous labors, and he, it must be said, was very impatient to arrange everything as quickly as possible, he poured water into a jar, planted some greenery, and after waiting a couple of days, began to let in the inhabitants. In general, not even a week had passed since the New Year and the job was done. Next came a period of contemplation. The whole family loved spending time near the magical container and observing its inhabitants. However, the contemplation did not last too long. After 2-3 weeks, the water began to become cloudy and this sad fact prompted me to go online to fill in the gaps in knowledge. Since then I have learned many new words. Thanks to the authors of numerous articles published on aquarium websites. The bacterial outbreak passed, but the fertile guppies and swordtails began to produce offspring with the regularity of a courier train. As per schedule: once a month or a little more often. We urgently needed containers to contain the fry. More precisely, first to raise it, and then to grow it. Of course, it was possible to leave them to their fate - let the strongest survive in a common aquarium! But something did not allow me to do this, and the epic of building various cans began. Why construction and not purchase? Yes, because your hands are itching to do something. There is a breed of people who enjoy working with their hands. I definitely consider myself one of them and I address this article to people like me. First, liter jars were built to raise the fry for the first week or two. Then technological containers for growing brine shrimp, then a vacuum cleaner for periodic cleaning of the aquarium, etc. and so on. I've never tried to glue something out of silicate glass before. But it turned out that this accessible material is very easy to cut, exactly to the given dimensions, sanded and glued. All these technologies are quite easy to master at home for any man with enough hands. But more on that later…
While making our way through the jungle of the Internet, it was difficult not to pay attention to the various filtering options. This topic is very popular among aquarists. Naturally, I began to try to do something, to filter something. I am not a biologist at all, I rely on my own erudition and the logic of the proposed solutions.
From everything I have read and tested, I conclude that there are 3 fundamentally different types of filters:
- Mechanical cleaning filters . Water is purified from a suspension of mechanical particles.
- Biological purification filters . Due to artificially created, favorable conditions for the development of aerobic bacteria, ammonia is effectively processed into nitrites, and then into nitrates, thus removing toxic waste products of aquarium inhabitants from the water.
- Phytofilters . They do everything that biological purification filters do, plus they remove nitrates from the water.
It is difficult to draw a clear boundary between filters. For example, a mechanical filter is often also biological, since the same bacteria live and work in the filter element as in a biological filter. Of course, provided that the filter element is not washed frequently and mercilessly. The phytofilter substrate is also a good “home” for bacteria. And in general: any tube or tray through which oxygenated aquarium water flows is a biofilter. The whole question is its effectiveness.
In practice, I have been using a biofilter for several months, which, for the sake of experimentation, I whipped up from a plastic bottle filled with chopped cocktail straws. The neck of the bottle is docked to the pump inlet, and the bottom is cut off, perforated and put back on with a piece of foam rubber as a mechanical pre-filter. Works great. All maintenance comes down to weekly washing of the prefilter and occasional light washing of the biofilter filler.
I also tried a sand biofilter. As someone put it, he is capable of digesting a sandwich if it happens. However, a sand biofilter with reasonable dimensions tends to throw sand into the jar.
Several articles I read about phytofiltration convinced me that this method most fully accomplishes the task of purifying aquarium water with minimal maintenance and maximum efficiency. A couple of experiments finally convinced me to use phytofiltration. One of them is like this. After the first week or two after spawning, the fry spent in a liter container, I transfer them to an eight-liter container. We are talking about a good hundred fry. Eight-liter container without soil and vegetation. There is only a pump with a filter, 200 l/hour, and aeration. And everything doesn’t seem to be bad... at first. However, the fry grow, and despite cleaning and regular water changes, sooner or later everything ends in the collapse of the biological balance. Need a large capacity. But I didn't have one. It was then that it was decided to quickly make a phytofilter. A small tray on top of the jar, on the tray is a chlorophytum bush in a plastic pot. Expanded clay is used as a substrate. The pump outlet was quickly routed into the pot using a 4 mm silicone tube. It so happened that the next morning I had to leave for a week on a business trip. The youngest remained on the farm, who was ordered to turn the lights on and off and feed the offspring. Basically, I buried the fry. Imagine my surprise when I returned a week later! The water is clear, the smell is normal. And this continued even after a month. At the same time, the fry grew significantly and with difficulty made their way to the feeder through the crowd of fellow tribesmen. In general, there are like sprat in a jar. There is no other way to say it. And everything is normal, at least outwardly.
Another similar experiment prompted me to think about making a small (7...10 liters) aquarium with a built-in phytofilter. It is about its production that I want to talk about. At the same time, I do not claim any novelty of the proposed material. Almost all ideas are gleaned from many different articles and forums on the Internet. Nevertheless, I hope that what I have told will be useful to skilled aquarists.
So: a small, I would say mini aquarium. Why mini? This is one of the trends in aquarium farming. There is an opinion that mini aquariums are built for the sake of one photograph. That is, they do not live long and require a lot of care. Maybe this applies to very mini ones. I chose not a very small volume, but far from large. 7...10 liters, in my opinion, is the golden mean. I don't suffer from gigantomania. A small aquarium with properly selected fish and plants looks no worse than a 300-liter one. At the same time, it can be placed almost anywhere. It can be picked up and carried. And the 300 liter is real estate. However, everything said below can be successfully applied to an aquarium of any size. All you have to do is adjust the size and thickness of the glass!
Requirements
Before you do anything, you need to formulate the requirements that what you do must meet. After some thought, I came up with the following list:
1. The aquarium must have an aesthetic appearance. 2. The phytofilter must be adjustable. 3. The phytofilter must be maintainable. 4. High reliability must be ensured, i.e. low probability of leakage. 5. The aquarium must have a minimum of technical devices inside. 6. The aquarium should be simple and technologically advanced to manufacture.
I will explain each point.
1. Aesthetics. A completely natural requirement. The aquarium is supposed to be installed in the apartment, and it should decorate the home, and not disfigure it. The options that I have seen on the Internet do not always shine with aesthetics. A bunch of thick pipes, trays made of sewer pipes ugly attached to a purchased can, fittings from the water supply sticking out everywhere look pretty pathetic. Although they serve their function and many even like them.
2. Adjustability. The few designs that I saw in articles are a tray filled with substrate and installed on top of the aquarium. Plants are planted directly into the tray and are not separated from it. What is the result? Plants generally grow. The volume of green mass and root system increases. And all this requires nutrients. This effect will sooner or later lead to competition between plants inside the aquarium and in the phytofilter. You need the ability to change the “power” of the phytofilter. That is, the quantity and quality of plants installed in it.
3. Serviceability. The phytofilter, like the aquarium itself, requires care. At a minimum, it is necessary to periodically turn the plant in different directions towards the light source (window, in natural light) so that the crown is formed correctly. Pest control may be needed. Dust settles on the plants and they need to be washed periodically. From all this it follows that it is necessary to make the tray so that it is a tray for pots, and not for substrate. This way serviceability will be ensured. You can turn the pot, remove it, and finally replace one of several without interrupting the operation of the phytofilter.
4. Reliability. Everything is very clear here. Although the aquarium is small, it will provide water procedures in case of a phytofilter leak. If you drown yourself, that's not so bad. But it’s better not to involve your neighbors below in the aquarium business through the ceiling!
5. Minimum technical devices inside. In my opinion, an aquarium is a piece of wildlife at home. Technogenic delights from the inside, and from the outside, are not welcomed by me. For this reason, I consider the external canister biofilter to be a kind of monstrosity. Thermometers, huge pieces of filter sponge, heaters, hoses, etc. clearly do not decorate the aquarium. All this stuff needs to be minimized, removed or hidden. A glance thrown into the aqua should fall on the living creatures or decoration, and not on a half-inch pipe installed obliquely and in the center.
6. Simplicity and manufacturability. Since the aquarium is supposed to be made at home, where there are no conditions of a factory or even a workshop, its production should be quite simple with a reasonable minimum of materials and technologies used. The price also matters. Complicating the design and expanding the list of materials used will inevitably lead to higher prices. As the main material and basic technology, I propose to use silicate glass to the maximum and gluing it with silicone glue - sealant.
Design
Now that the requirements have been formulated, I will move on to the actual description of the design of a mini aquarium with a built-in phytofilter.
In Fig. Figure 1 shows a diagram of water flows in the aquarium and phytofilter. This design is not the design of an aquarium with a phytofilter. Its purpose is to show the principle of operation. The design will be discussed below.
Rice. 1 Diagram of water flows in the aquarium and phytofilter.
I'll start with the water flow drive - the pump. The smallest pump that turned out to be available to me in stores in the city has a capacity of 200 liters (see Fig. 2).
Rice. 2 Pump
For a mini aquarium this is even too much. However, according to the principle of operation, the pump is a centrifugal pump. There are no problems in adjusting its performance by partially blocking the outlet. Even if the outlet of a centrifugal pump is completely blocked, nothing tragic will happen. Current consumption will increase slightly and cooling will deteriorate to some extent. Therefore, I will focus on this pump. It will have to be placed inside the jar, which contradicts the fifth requirement. But I haven't found a reasonable solution to this problem. I tried making homemade pumps. The smallest one I had was made from a mobile phone vibration engine. Moreover, she worked, with, of course, low productivity. But the problem of reliable sealing of the engine remained unresolved and all my pumps died successfully. Making an engine with a wet collector is not a trivial task for home use. Therefore, I settled on a purchased submersible pump and, accordingly, installing it inside the jar.
However, I will return to the diagram in Fig. 1. The pump pumps water from the jar into the phytofilter through a hose. First, water enters the inlet compartment. The input compartment has 2 functions. The first is to make sure that water enters the prefilter from below. This is necessary so that the prefilter compartment does not require a sealed lid. There's a lot of trouble with her. Well, so that the filter element (sponge, for example) can be easily removed and washed by simply picking it up from above with your fingers. Very convenient, as experience has shown. The second function is less obvious and useful. The fact is that when the power to the pump is turned off, the water that accumulates in the lower part of the prefilter, through the hose, according to the principle of communicating vessels, begins to flow back into the aqua. And this water is dirty. The inlet compartment is sealed at the top, and the entrance to the compartment - the pipe does not fall to the bottom of the compartment. As a result, during operation, an air bubble appears in the upper part of the inlet compartment. When the pump stops, this bubble prevents the communicating vessels from working and dirty water remains in the prefilter. In practice this does not always work. For reasons unknown to me, there is a bubble, but it is not there. For now I'm just watching this process.
Next, the water enters the prefilter for preliminary mechanical cleaning. After the prefilter, the water flows by gravity into a small, wide thermostat compartment. I intend to install a flat, homemade heater in it. The design of glass and silicone (of course with the addition of nichrome and other little things) has already been worked out and tested. But we’re not talking about the heater... It’s summer now - it can wait!
The next compartment is the phytofilter itself. Everything is quite simple here. Water, again, flows by gravity through the pots perforated at the bottom and flows back into the jar through the drain hole. The drainage pipe is adjustable in height relative to the bottom of the phytofilter. This allows you to select the optimal water level in the phytofilter.
Since the entire phytofilter is located inside the aquarium, and its partitions are located below the level of the aquarium walls, an emergency drain is automatically obtained, which provides excellent protection against leaks.
In Fig. Figure 3 shows a top view of the phytofilter. This is already a practical design. The inlet compartment has the shape of a triangular prism with an inlet pipe. According to the picture, the lower wall of the inlet compartment does not reach the bottom of the phytofilter by 5 mm. The vertical shaft formed by the left and rear walls of the aquarium and the upper, according to the figure, wall of the inlet compartment is intended for entering tubes and the electrical cable of the pump and compressor. The prefilter compartment has a rectangular shape. The compartment filler should have the same shape. The result is a compact design that frees up as much space as possible for the phytofilter compartment. The drain looks like a triangular hole in the bottom of the phytofilter.
Rice. 3 Phytofilter design, top view.
In Fig. 4 shows a drawing of an aquarium in axonometry. Don't skimp on the quality. Drawn by hand and not to scale. But there are dimensions and the method of connecting the glasses to each other is shown. There is no thermostat compartment in the picture; I designed it later. The size of the effective part of the aquarium (the one where there will be water) is 212 * 186 * 212 (W * H * D). That is 8.4 liters. The shape is close to a cube. In my opinion, this is the optimal shape for a mini aquarium. Unlike a large aquarium, a mini aquarium can be viewed from all sides. A large aquarium is usually installed near a wall or in the corner of a room. This means the main direction of observation is from the front. Therefore, such aquariums are most often made elongated in length and height, as if panoramic. Mini is another matter. It can be placed on a table where the view is open from all sides. In addition, due to the difference in the optical refractive index of air, glass and water, the distance is concealed. Try this experiment. Look at the aquarium from the front, and use your hand on the side of the aquarium to mark the apparent position of the back wall. Now look from the side and you will find that the apparent depth of the aquarium is about a third less than the real one. As a result, the cube turns into a parallellipiped with less depth and looks good from any side.
Rice. 4 Drawing of an aquarium in axonometry.
In Fig. 5 shows some views and sections in full size. As you can see, the lid is almost flat and has a fairly simple design. This is due to the fact that part of the lid is essentially formed by the side walls of the aquarium and the phytofilter. The bottom of the phytofilter is 5 mm. below the edge of the front glass. The water level in the aquarium will be 10 mm. below the edge. Thus, when water flows out of the phytofilter, sound effects (murmuring and gurgling) are completely eliminated. Let me explain the method of attaching the cover. I've been racking my brains for a long time on how to do this beautifully. The task comes down to attaching the lid canopies to the glass. As a result, the following idea was born. We take a stainless steel sheet and cut out a T-shaped canopy with a hole at the end. Next, cut out a small plate from glass. Then we glue a T-shaped canopy between the side glass of the aquarium and the glass plate. Holds up great. I recommend.
Rice. 5 Types and sections.
And finally, from ideas and drawings we move on to detailing. In Fig. 6 shows the glass parts needed to assemble the aquarium. There are 12 of them.
Rice. 6 Detailing.
Manufacturing. How to cut glass?
I won’t discover America here, but to complete the picture I’ll tell you how I cut glass. The first thing you need to cut glass is a tool.
Glass cutter (see Fig. 7) I use a roller oil cutter. Actually, the fact is that I don’t use it in oil. The lubricant poured into the handle of a glass cutter has an unpleasant feature - it leaks out and smells during long-term storage.
Rice. 7 Glass cutter.
In my opinion, there are several basic requirements for a glass cutter. Firstly, the video must be sharpened with high quality. How the roller is sharpened can be clearly seen under a microscope. Secondly, the roller should not wobble. This is checked with a finger. The less play the better. Thirdly, the glass cutter should have a comfortable handle. This allows for good control of the tool when cutting.
I use turpentine as a lubricant (see Fig. 8). I have one complaint about it - it smells strong. Otherwise everything is great.
Rice. 8 Turpentine.
A ruler is no less important than a glass cutter. It should be smooth, thick, and not slip on the glass. The ruler should be thick so that the glass cutter does not jump off when moving. 10 mm. - exactly what is needed. To prevent the ruler from sliding on the glass, you need to cover it with leatherette. I use a wooden ruler - a piece of platband left over after repairs (see Fig. 9).
Rice. 9 Ruler.
Measuring tool. Squares, rulers, calipers, marker - all this will provide invaluable assistance when cutting glass (see Fig. 10). When cutting glass for a window with an accuracy of 5 mm. quite enough. But for an aquarium you need an accuracy of ±0.25...0.5 mm. This is at the limit. Moreover, rectangularity is simply necessary.
Rice. 10 Measuring tool.
A very useful tool I made myself (see Fig. 11). These are modified pliers that do an excellent job of breaking off narrow strips of glass. I manage to break off strips of 5 mm. width and length 200….300 mm.
Rice. 11 Modified pliers.
The design is clear from the figure. The jaws are set in such a way that they converge in parallel when compressing the glass of the thickness used. The sponges are covered with leatherette, which does not allow sliding on the glass and protects it from direct contact with the metal.
In addition to the tool, you need a table. I use a piece of glass covered with graph paper. It is convenient to measure distances and control squareness on graph paper.
The actual cutting process is simple. Let's consider it using the example of cutting a strip 10 mm wide. First, mark the desired width. In this case, you need to take into account the fact that the glass cutter roller is located at some distance from the edge of the head. For my glass cutter this distance is 3 mm. Therefore, we mark 13 mm and attach a ruler (see Fig. 12).
Rice. 12 Cutting, step 1.
To prevent the glass cutter roller from jumping off at the edges of the glass, leaving chips, we use a couple of pieces of glass of the same thickness as the one being cut. Dip a stick with cotton wool in turpentine and pass it over the cutting area.
The next step (see Fig. 13) is to draw a glass cutter along the ruler, starting with the piece of glass placed in front and ending with the piece placed at the back. We select the pressure force so that a noticeable groove remains. There is no need to press hard, but weak pressure is the same. After several attempts everything will start to work out.
Rice. 13 Cutting, step 2.
After this, without wasting time, you need to break off the glass. To do this, hold the glass on one side with your hand and clamp the glass on the other side with pliers. Next, with a quick movement that combines bending and simultaneous tearing, we break off the required strip of glass.
Rice. 14 Cutting, step 3.
That's all. Larger glass is cut in the same way. Only when breaking off, you need to place the glass on the edge of the table and break it off. If the glass is large, then it is more convenient to do this together. One holds the glass on the table, pressing it down with a ruler, and the other, with a quick movement combining bending and tearing, breaks off the glass with his hands.
Manufacturing. How to grind the ends of glass?
What is sold in stores, in the form of 8...12 liter containers, does not shine with the elegance of its manufacture. In my opinion, everything should be beautiful, including the ends of the aquarium glass. If the ends are not processed, then the aquarium looks makeshift and unfinished. Such a trifle as the ends should not distract you from contemplating the insides of the aquarium. They need to be processed. Definitely! What is needed for this? Of course, first of all, it is a tool.
Not many tools. As my experience has shown, it is best to process the ends of the glass with sandpaper on a cloth basis. I use two end finishing tools. The first is a rectangular piece of plexiglass with sandpaper glued on both sides (see Fig. 15). It is convenient for finishing. I glue the skin with Moment glue.
Rice. 15 Sandpaper on plexiglass.
The second is the petal circle (see Fig. 16). Sold in construction stores. The grain size, I would now take it larger than in the picture. The circle is convenient for rough, initial processing.
Rice. 16 Petal circle.
Processing of the ends is reduced to rough - in a circle, and to final - with a block. We assemble the machine (see Fig. 17), consisting of a stool, a vice, a drill and a flap wheel.
Rice. 17 Machine for rough processing of ends.
Without any hesitation, we press the end of the glass to be processed against the rotating circle (see Fig. 18) and move it to the right and to the left until the irregularities at the end are completely removed. The main thing here is to constantly wet the glass in water. Water, evaporating, prevents the glass from overheating and cracking.
Rice. 18 Rough processing of ends.
After rough processing, we give the end a finished look with a block, again regularly wetting the glass in water. During final processing, the block should be moved along the end. After processing with a block, the scratches on the end take one direction. This gives the product a finished look. In Fig. Figure 19 shows the end of the glass before (top) and after (bottom) processing.
Rice. 19 Glass end before and after processing.
Manufacturing. How to glue glass?
The procedure for gluing silicate glass with silicone glue - sealant is described in many articles. I won’t tell you anything new, except, perhaps, for preparing surfaces before gluing.
I glue the glass with the sealant that is available in stores in the city. There are a lot of sealants with different properties. Plasticity, adhesiveness, durability, bond strength, color, etc. may vary. In the case of a mini aquarium, any aquarium sealant will do. Transparent is better. The black seam makes the structure heavier. I use KIM TEC Silicon Aquarium (see Figure 20). Judging by the description, the maximum capacity of the aquarium is 400 liters. This is enough for the head!
Rice. 20 Adhesive - KIM TEC Silicon Aquarium sealant.
Perhaps the most important point when gluing is to properly prepare the surfaces to be glued. And preparation comes down to high-quality degreasing. I use alcohol to degrease. Acetone is also good, but it smells strong. After wiping the surfaces, you need to remove any remaining grease and white residue from alcohol. This can be done efficiently using microfiber (see Fig. 21). Microfiber is a fabric consisting of the finest fibers with capillaries. It is used for wiping optics and is sold in photo stores in the form of napkins. Of course, the bonded surfaces should not be sanded.
Rice. 21 Microfiber.
The actual gluing is simple: prepare the surfaces, apply glue to one side and connect. It is better to apply glue to the end of the glass. The diameter of the glue sausage should be approximately equal to the thickness of the glass. When applying glue you need to use a gun. It is not expensive and is sold in hardware stores.
Masking tape will be needed to protect the glass from glue in places where it should not be and to temporarily fix the parts to be glued.
Rice. 21 Masking tape.
Manufacturing. Assembly.
Now that you have the design, drawings and necessary technologies, you can start making an aquarium.
First, we cut the glass and grind its ends (see Fig. 22). Which ends to grind is shown in Fig. 6. As shown in the picture, it is better not to fold the glass. Small fragments remaining after cutting can scratch the surface. It works especially well when the fragments fall between two glasses lying on top of each other. A slight shift and both need to be redone. So place the glass vertically, for example, along the wall and each one separately. It takes up a lot of space, but it won't last forever.
Rice. 22 Glass preparation.
Some assembly tools are also needed. It is convenient to use office clips to fix the glass (see Fig. 23).
Rice. 23 Stationery clips.
In order to align the glass at a right angle when gluing, I made squares (see Fig. 24). This square is well fixed with office clips on the base. The base is glass with graph paper pasted on.
Rice. 24 Square.
We start the assembly with the phytofilter. Actually everything can be seen from Fig. 25 - 28. The filter assembly is shown in Fig.a on the base. A slight shift and the surface may be scratched after cutting.
Rice. 25 Assembling the phytofilter, step 1.
Rice. 26 Assembling the phytofilter, step 2.
Rice. 27 Assembling the phytofilter, step 3.
Rice. 28 Assembling the phytofilter, step 4.
The assembled phytofilter is shown in Fig. 29. The pipe for connecting the pump is made from a piece of a plastic fountain pen. Although the glue does not adhere to plexiglass, it holds well due to a significant amount of glue. The outer diameter of the pipe is about 10 mm. As it turned out later, this is a lot for a mini aquarium. In the future, I will use a piece of medical pipette as a pipette.
Rice. 29 Phytofilter assembly.
Next, glue the left side wall and the bottom (see Fig. 30).
Rice. 30 Left side wall and bottom.
Then we glue the phytofilter into the corner formed by the left side wall and the bottom (see Fig. 31).
Rice. 31 Glue the phytofilter.
Then glue the bottom (see Fig. 32).
Rice. 32 Glue the bottom.
Then we glue the right side wall and the front glass (see Fig. 33)
Rice. 33 Glue the right side wall and front glass.
The aquarium is almost assembled. Now you need to wait for the glue to dry completely, remove excess silicone from the corners with a blade and stick a decorative self-adhesive film on the outside - for beauty and on the inside - like a lamp reflector (see Fig. 34).
Rice. 34 Almost ready.
Manufacturing. Cover and its fastening.
I made the lid with a built-in lamp quickly and did not photograph its production in all details. Therefore, I will describe it in words.
The cover is made of foil fiberglass. Firstly, this material is quite durable, secondly, it is not afraid of moisture, thirdly, it is easy to process, fourthly, it is well connected by soldering, and fifthly, I had it. After cutting out the lid parts, you need to clean them and tin the soldering areas. Next, the parts are soldered together with dots so that the structure does not move. The lid is attached to the aquarium using canopies (see Fig. 35).
Rice. 35 Fastening the cover.
The outside of the lid is covered with self-adhesive film, and the inside is painted with chrome paint from an aerosol can.
Light is a problem. I was unable to find an aquarium fluorescent lamp with the required spectrum and dimensions. I am beginning to come to the conclusion that the aquarium should be designed from the light source. For a mini aquarium, a good solution should be an LED lamp. Now there is a huge selection of LEDs, there are microcircuits for connecting LEDs to a 220 V network. You need a spectrum analyzer and everything should work out. But I was daydreaming. At this stage, my lamp is made from a 9-watt U-shaped lamp from table lamps and a ballast from a 9-watt lamp with an E-27 socket. Both lamps are “Cosmos”. The ballast is placed in a box made of the same fiberglass. The inside of the box is covered with electrical cardboard. The lid of the box is coated with sealant and closed with an elastic band.
Already discovered shortcomings of the lid with the lamp: the radiation spectrum is not the same, a switch had to be built into the box.
In general, don’t judge strictly: what happened is what happened (see Fig. 36).
Rice. 36 Cover.
Manufacturing. Scenery.
I set two main goals for the decorations: to make it look beautiful and to disguise the pump. The decoration is made of glass in the form of an irregularly shaped container for soil (see Fig. 37). We take a glass cutter, glue and cut it quite randomly and glue it all into a single whole.
Rice. 37 Decorations.
The decoration will be installed in the far left corner of the aquarium (see Fig. 38).
Rice. 38 Decoration installation location.
To give the decoration an aesthetic, close to natural appearance, coat it with silicone glue - sealant and sprinkle with sand. It turns out quite nice (see Fig. 39).
Rice. 39 Final decoration of the scenery.
Result.
Now you can admire the result. In Fig. 40 shows the appearance of a mini aquarium with a built-in phytofilter.
Rice. 40 Appearance of a mini aquarium with a built-in phytofilter.
The plant pot (see Fig. 41) is made from a cable well. Wiring and computer networks are laid in these. The two halves and the bottom are connected to each other with fishing line, that is, sewn. It turns out simple and angry. There are holes drilled in the bottom of the pot to allow water to flow freely.
Rice. 41 Top view.
Fine expanded clay was used as a substrate. Plants include fittonia and ficus. As you can see, the pot can be taken out, unfolded, washed, etc. at any time. I didn’t make more than one pot. The compartment dimensions do not allow. This means that I can regulate the power of the phytofilter only by replacing the pot. For larger aquariums, the idea of adjusting the power will work, but here, alas.
Launch.
At the moment, the aquarium has been standing with water for about a month. First I installed the pump and aeration. Then the scenery and ground. I planted valisneria. Filled it with water. For about 10 days everything stood without living creatures. Next, I decided to launch a couple of guppies - let them supply the Fittonia with food. They acted as scouts for me. According to the law of meanness, just when it was necessary to observe the process, I had to leave for 10 days. My son heroically turned on and off the lights and fed. Out of the kindness of my heart, I fed him well and by my arrival the bottom was strewn with the remains of food and absolutely everything in the aquarium was covered with pale green algae. All this crap was easily removed. But the putrid smell persisted for some time. I don't have enough experience in launching yet. I am not at all sure that it is possible to start an aquarium without some shocks at the initial stage.
After final stabilization, I’m thinking of populating the aquarium something like this: 7…10 neons, one or a couple of catfish, young ampullaria. At the beginning of the article there is a photograph with two aquariums. On the right is my first mini aquarium with a phytofilter. About 5...6 dozen guppies now live in it. This is of course a bit much, but it clearly shows the potential of the phytofilter.
In conclusion, I would like to wish all aquarists success. I hope that you can learn something useful from the article.
- Discuss on the forum
Especially for AQA.ru, A.M. Chirukhin, Taganrog, 2008. Edition No. 1
No entries found.
How to make an aquarium with your own hands: step-by-step instructions with useful comments, video
| Photo | Basic operations, explanations and useful tips |
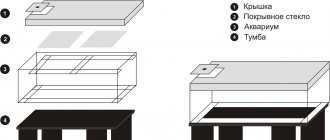
| With the help of these instructions, creating an aquarium for beginners will not be too difficult a task. To connect and hold the walls in the desired position, clamps and four strong metal corners are useful. Soft pads made of cardboard (other material) will prevent damage to the glass. | |
| All blanks are covered in advance with masking paper tape so that there are free gaps to the edge of 3-6 mm. A gap of approximately 10 mm is created between the table and the bottom of the structure using wooden blocks. | |
| Assembly continues according to the above technology, with the upper part secured at the corners. | |
| The screws of the clamps are clamped without excessive force. | |
| A silicone-based sealant without additional components is suitable for filling the seam. | |
| Excess composition is removed. | |
| After removing the mounting tape, a smooth edge remains. This operation must be performed in a timely manner so that the sealant does not have time to harden. |
The other parts are connected in a similar way. After completing the procedures, you need to allow the time necessary for the silicone to dry. Next, remove the clamps and test the tightness of the structure experimentally. Do-it-yourself aquarium repairs can be done using the same technology.
Special additions for aquariums
This section contains information about special equipment. You can create some products yourself. Others are better purchased in the store.
In a specialized trading company, in addition to a good assortment, you can take advantage of official guarantees and free professional advice
UV sterilizer
For disinfection, water is treated with ultraviolet radiation. A lamp (of the appropriate spectrum) is placed in a sealed casing through which a flow of liquid is passed.
After familiarizing yourself with the principles of operation, making such a UV sterilizer with your own hands will not take much time.
Automatic feeder
This device ensures that a portion of feed is dropped when the electric drive is turned on.
The desired result can be obtained by installing the platform at a slight slope and ensuring the movement of bulk substances using vibration. To create such an automatic feeder for an aquarium with your own hands, you will need an old mobile phone. It is attached using rigid fastening. Enabling the “vibrate” call will create the necessary mechanical impacts. Such a device can be controlled remotely.
How to make a sump for an aquarium with your own hands
This term refers to a separate container that is used directly for the correct preparation of the aquatic environment.
Professional design
When creating a sump for an aquarium with your own hands, you need to determine exactly the necessary processing steps. As a rule, several stages of filtration are used. In the last compartment, a heating element with a thermostat is installed to maintain the nominal temperature level.
Aerators and sprayers
To make a simple aquarium sprayer with your own hands, make the required number of small holes in the tube
When looking for the right solution, you need to remember the need to create free passages for air and ease of cleaning. Make sure that the compressor power is sufficient. The weight eliminates unnecessary buoyancy for this part.
These materials are also used when creating an aquarium aerator with your own hands:
- dense polymer sponges;
- sandstone, other porous minerals;
- a branch of rowan or other suitable tree cut at an angle.
aquarium aerator
Specialized aquarium airlift
This device moves water from depth upward. Useful actions are performed using air bubbles. Such designs are used in filtration systems. To create an airlift for an aquarium with your own hands, you need to take a wide tube. Holes are made in the lower part. It is immersed in a sponge, which will prevent the penetration of mechanical impurities. Compressed air is supplied to the middle of the structure through a special pipe by a compressor.
Snail trap
To automate the cleaning of the aquarium, different plastic containers are used.
The main component of the system is cucumber bait
A do-it-yourself snail trap in an aquarium should be equipped with a device that provides freedom of movement only inwards. In this project, such functions are performed by combs made of flexible polymer threads (marked with arrows).
Aquarium refrigerator
To reduce the temperature of the flowing liquid, you can purchase a specialized device
A DIY aquarium refrigerator project is created taking into account personal preferences and capabilities. Air conditioners and other household appliances, water and air cooling circuits are used.
Maintaining optimal temperature conditions using a heater
Schematic diagrams and calculations of do-it-yourself aquarium heaters
Here the temperature of the liquid increases with the passage of electric current. You can obtain the desired resistance by changing the concentration of the saline solution.
Improving fish keeping conditions using a nutrient substrate
Creating a high-quality nutrient substrate for an aquarium with your own hands is a difficult task even for experienced aquarists. When choosing suitable components, it is necessary to ensure the presence of a sufficient amount of organic substances necessary for the harmonious development of plants. At the same time, it is necessary to block dangerous decay processes. The good solubility of useful ingredients is complemented by the absence of “emissions” that pollute the aquatic environment. Manufacturers of specialized products keep their recipes secret. Published methods have poor repeatability.
As a rule, the substrates contain:
- Clay that retains trace elements and other beneficial components.
- Peat – with its help, an optimal level of acidity is created in the area of root systems.
- Fertilizers, microelements.
- Activated carbon, which accumulates the products of decay processes.
- Neutral filler (sand, gravel).
What you need to know to make a skimmer for an aquarium with your own hands
Such devices are used independently or as part of filtration systems. They collect foam along with contaminants in a special container for subsequent removal.
To make a skimmer for an aquarium with your own hands, you can use this circuit diagram
How to make a “sand fall” in an aquarium yourself
This drawing explains the operating principle and design features
The most difficult part of making sandfall in a DIY aquarium is the bed. Not only the relief matters, but also the angle of inclination. Optimal parameters can be selected during testing. The ability to change the pressure by adjusting the pump performance will be useful.
How to buy an inexpensive aquarium in an online store: market overview
| Manufacturer/Model | Volume, l | Dimensions, mm | Glass thickness, mm | price, rub. | Notes |
| Biodesign/Q-Scape | 6,5 | 190 x 190 x 230 | 4 | 890-950 | Backlight is not included as standard. |
| Biodesign Q-Scape | |||||
| Tetra/ Betta Bowl | 1,8 | — | — | 1500-1620 | Miniature model with built-in LED lighting. |
| Tetra Betta Bowl | |||||
| Biodesign/Classic 30 | 27 | 400 x 200 x 340 | 4 | 2200-2580 | The buyer can choose the color design of the plastic parts. |
| Biodesign Classic 30 | |||||
| Aquarius | 60 | 600 x 250 x 46 | 6 | 3480-3930 | A lamp is installed in the cover of the structure. |
| Aquarius Aquarium | |||||
| Aquael/LEDDY 80 | 105 | 750 x 350 x 400 | — | 7200-7650 | The kit includes: filter, lighting, heating element, hole for feeding fish. |
| aquarium Aquael LEDDY 80 | |||||
| Biodesign/ Diarama 150 | 100 | 850 x 600 x 520 | 6 | 12400-13400 | Corner model with cabinet. |
| aquarium Biodesign Diarama 150 | |||||
aquarium Biodesign Diarama 150
For your information! When studying the market, you can find out that the price of a 100 liter aquarium is not excessive. When comparing different models, pay attention to the composition of the set. If necessary, you need to purchase a compressor and other system components.
Selecting glass thickness
It is no secret that the dry weight of the aquarium directly depends on the thickness of the selected glass, so this issue should be approached with all responsibility. Also, thick glasses lose their transparency. This must be taken into account, since a finished aquarium with cloudy glass will not decorate a shelf or cabinet.
Calculation of glass thickness for an aquarium
Note! As the glass thickness increases, it may give off a green tint. This will be very noticeable from the visual side.
Dependence of thickness on height and length
For every 125 mm of the height of the aquarium walls, there is 2 mm of glass thickness. You need to build on this, because as the height of the aquarium increases, the pressure on the walls increases and, therefore, stronger glass is needed. This means that when designing a cubic aquarium with a side height of 50 cm, glass with a thickness of at least 8 mm is required. Therefore, if the owner has decided on the size of the future aquarium, then the thickness of the glass that is suitable for this design will not be difficult to determine.
TOP 11 unpretentious aquarium fish TOP 10 largest aquarium fish TOP 20 beautiful aquarium fish TOP 12 most expensive aquarium fish