Lighting any aquarium looks quite simple, but there are a number of nuances. The overall appearance of the aquarium, as well as the health of the plants, directly depend on the length and type of rays. To achieve optimal balance in the aquatic environment, lamps with an RGB spectrum were created.
Some manufacturers are expanding their range and moving away from the classic red, green and blue, adding, for example, purple spades. Others make it possible to add a controller to the lamp and take control via Wi-Fi or Bluetooth. How to achieve optimal lighting and which lamps are the best for aquarium plants, read below.
How the lighting works
Light consists of a set of light rays of different colors from red to purple. The peculiarity of the aquarium is that the water does not allow the red color to pass even to a shallow depth, while the blue color can reach its bottom.
This feature also applies to plants: red lighting is useful where emergent and creeping vegetation predominates. The blue spectrum is in demand among plants from the bottom of the aquarium and those that prefer shade. In general, for the normal existence of aquarium flora, the entire spectrum of light is needed.
Photosynthesis occurs most successfully in the light range of 400–450 and 650–700 nm.
Assembly
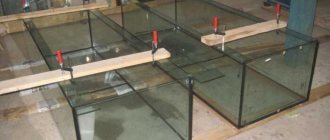
Briefly about the assembly. 3D model in sketchup. The base of the lamp is made of sections of aluminum profile 15mm x 30mm. Aluminum parts are folded in pairs on edge, securely fixed and drilled with a 2.5 mm drill. Moreover, both walls of the upper profile are drilled, and only the adjacent wall of the lower one. In the upper profile, the holes located on the upper edge are drilled to 7mm. Next, the parts need to be separated and an M3 thread must be cut in the lower profile, and a hole must be drilled in the lower wall of the upper profile with a 3mm drill (so that the M3 screw can pass through freely). Thus, a pair of profiles is fastened with M3 screws at 5 points. After connecting the first pair of profiles, we disassemble everything, having previously marked which profile connects with which, remove the top profile, put the next profile down and repeat everything, but with some offset. I tried to depict this in the illustration:
After preparing all the parts, the contacting surfaces must be coated with a thin layer of thermal paste (I used KPT8).
Assemble the parts of the lamp base by tightening them with screws using thread locker. If in your case the LEDs get on the joints of the profiles, then for normal thermal contact between the profile and the LED heat sink you need to carefully sand the entire surface. In the drawings presented here there is no such problem, however, because I assembled my lamp from materials that were at hand, then I was faced with the need for grinding. We select the side to which we plan to attach the LEDs and carefully grind it until the finger no longer feels the transition between adjacent profiles (I sanded first with a grinder with Velcro sandpaper, and then with a vibrating surface grinder Fiolent MPSh 4-28 with 400-grit sandpaper). Next, we attach aluminum corners on both sides. I used 25x15, but it's better to get a larger size. Fastening with M4 screws, into pre-drilled holes, 3.5 mm in diameter with cut M4 threads.
Next, we attach an W-shaped profile on top - it will serve as a radiator. We coat each part with thermal paste and fasten it with M3 or M2.5 screws (M3 heads may not fit between the ribs).
The vertical posts are made of the same profile as the base of the lamp (15x30mm). For installation on the edge of the glass of the aquarium, parts from a U-shaped profile are fixed at the bottom of the racks at the corners.
The U-shaped parts have inserts made of felt and some kind of slippery plastic, which make it easier to move the lamp along the edge of the aquarium glass.
The housing assembly is complete, all that remains is to attach the LEDs. In any drawing program or vector graphics editor, we make a layout of the LEDs and print it on a scale of 1:1 on 2 A4 sheets, followed by gluing it into one template. We glue the model with a glue stick to the base of the lamp and mark the holes for fastening the LEDs. Layout example. Then we drill holes with a 2.5mm drill, cut an M3 thread and use thermal paste to install stars (Star-type radiators) of LEDs on the base. I would especially like to draw your attention to the fact that under the heads of the screws, in order to avoid short circuits, it is necessary to place insulating washers made of fiberglass (I bought them at Chip and Dip)
The LED drivers I used have the greatest efficiency when powered by 24V and connected in series with 6 one-watt LEDs, the circuit will be below. We connect all the LEDs according to the diagram (for installation I used 0.35 sq. mm MGTF wire) and then protect the contacts and all elements of the lamp facing the water with varnish (well, except for the LED lenses, of course). In the end it should look something like this:
What to look for when choosing
- spectral composition;
- color rendering level;
- lamp power;
- plant type.
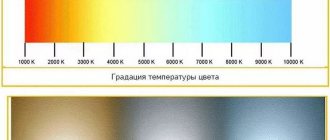
Spectral composition of light
The spectrum is measured in “kelvins” (K), a unit of measurement that represents the number of degrees emitted by a hypothetical black body when heated.
In color terms, the body first becomes red, then turns yellow, green, blue and finally becomes violet.
If the degree Kelvin is low, the color of the spectrum will have a red tint.
The higher it gets, the darker its color. Eg:
- super warm white lighting – 2700 K;
- warm white – 3000 K;
- natural light – 4000 K;
- cold white light – 5000 K;
- full spectrum – 5500 K.
The use of overhead lighting, taking into account the spectral composition of light, is considered the most successful for aquarium plants, since it imitates natural growth conditions.
Color rendition
This parameter shows how natural the conditions in which the plants are located will look when illuminated by the selected lamp.
The value is denoted “Ra”, or called CRI (Color Rendering Index).
The ideal color rendering value is Ra=100. The higher the CRI of the lamp, the better the color rendering.
Based on this, the following CRI standards are determined:
< 51 – weak light transmission;
51 – 80 – average value;
81 – 91 – good;
91 – 100 best color rendition.
Modern aquarium lamps have a CRI value of at least 80. For correct color rendering of the underwater world, professionals recommend using lamps with a maximum CRI value and a color temperature from 5400 to 10000 K.
These parameters can be found on the lamp packaging. For example, /960 means that this is a fluorescent lamp with CRI=90 and CCT=6000 K.
How much light do plants need?
To understand this, let's look at the necessary concepts.
- Lumen - shows how much light a light source produces.
- Lux is the amount of light that hits the surface of something.
The amount of light falling on a certain area of the aquarium is calculated using the following formula:
Lm = S x lux
Where:
- S – bottom area of the aquarium;
- lux is the light needed by the plant.
- Lm is the number of lumens that the light source should produce (indicated on the lamp packaging).
Example:
Bottom area of the aquarium = 0.18 m2. Plants planted in it require 15,000 Lux. Which lamp should you buy?
0.18 x 15000 = 2700 Lm.
You need to purchase a lamp that says 2700 or more lumens.
There is an opinion in educational literature that the ideal value for comfortable plant growth is lighting of 50 - 70 Lm/m. We dare to challenge this fact and here’s why. Fluorescent lamps produce diffused light, which means the rays diverge in all directions and in some places may not even reach the aquarium.
LEDs, on the contrary, shine purposefully in the direction they are turned. If you hang such a lamp over the middle of the aquarium, its sides will be illuminated less than the center. And if you imagine an aquarium with a water column of 50 cm or more, 50 - 7-Lm/m are generally lost at such a depth.
Each aquarium with plants is individual, which means you should not become attached to the values proclaimed by printed publications. Only experience, independent calculations and taking into account individual characteristics will help you choose the ideal lighting.
A household lamp is not able to satisfy the photosynthetic needs of aquarium plants.
Daylight hours
Remember that fish and other inhabitants of your jar are practically not interested in additional lighting.
It is required primarily by plants. For them, the amount of daylight is as important as getting the right nutrition.
This is due to the fact that representatives of the flora undergo different processes day and night.
Japanese aquarist and designer Takashi Amano in his works uses not just the alternation of day and night, but creates for his wards conditions that are as close as possible to natural ones, according to the principle “dawn, zenith, sunset”. Moderate lighting lasts for 6 hours, peak lighting lasts for 3 hours, followed by sunset for 3 hours.
Lighting also depends on the age of the plantings. For example, for a newly formed aquascape, light is first applied for 3-5 hours without simulating zenith. From the second week, you can increase daylight hours to 6 hours on a regular basis, gradually bringing it up to normal.
Most plants need 5-6 hours of intense lighting to fully carry out photosynthesis.
Installing tape in an aquarium
The LED strip is a coil of flexible tape, which is cut every 3-5 centimeters at specially marked places. The length of one coil reaches five meters. To do everything correctly, follow these instructions. So, let's refresh our memory a little. We will need an LED strip with protection class IP65 and IP68, wires with a cross-section of 2 cores of 0.75 m2 each, a soldering iron with solder (you can do without it, with connectors), a power supply and optional diffusers. We leave you a useful link:
Video tutorial - How to solder LED strip.
An unusual and very interesting solution are diffusers. Place an orange, pink or green LED strip in it, and at night turn it on as additional lighting installed on the back wall of the aquarium. The diffuser is a body, it can be used wisely, the choice is yours.
LED strip in the diffuser.
For a 200-liter aquarium, we will need about one meter of tape, maybe a little more (the exact calculation is indicated above, rough - 1 watt of tape power per 2 liters of water, that is, for a 100-liter aquarium, 70 cm of tape gives an average level lighting effect) of white tape , blue and red - maybe a little less.
The simplest and most effective way is to attach an LED strip under the lid of the aquarium. In this case, you don’t need to invent anything, just install three strips for illumination during the main time and one for decoration separately. This is done as follows: remove the lid, wipe it dry and degrease it.
We connect the LED strips to the wires (watch the video above), but not in series, but solder each section separately. Each strip is connected separately, and then one wire is led to the power supply.
Installing LED strips under the cover.
Try to correctly distribute the LEDs relative to the free space under the cover. After all, the more evenly they are laid, the higher the illumination indicator will be. Feel free to experiment with the design of your homemade pendant lights. The main thing is to calculate the amount of light you need and go for it. As an example, let’s look at another option for attaching the tape under the lid with a different configuration.
An option for uniformly mounting the LED strip on both sides.
Advantages of LED lighting
- Strong and uniform light.
- Low power consumption.
- Low heat transfer makes it possible to avoid installing cooling equipment.
- Spectral peaks do not shift during operation.
- The lamp lasts for 5 or more years of continuous operation.
- Possibility of adjusting the light flux.
- Installing a controller allows you to diversify the life of the aquarium with natural phenomena and regulate daylight hours.
Is it worth ordering lamps from Aliexpress?
The Chinese site attracts with low prices. When purchasing any goods, we are used to looking here to check if the thing we need is cheaper here. Of course, you can purchase a universal model on Aliexpress. But here's why you shouldn't order professional lighting from China:
- The wavelength and range often differ from the stated parameters. This is not critical for white light, but in full-spectrum lamps it can disrupt such vital processes in plants as nutrition, growth, flowering, and reproduction.
- Chinese LEDs burn out quickly. Most often their work lasts for a year. In this regard, it is better to use them not at full capacity in order to extend their service life.
- Lamps from Aliexpress get very hot during operation, which leads to degradation of the diodes.
- The technical parameters of the light power of the diodes and the performance characteristics of the controllers are significantly overestimated. Not everyone has a lux meter or wattmeter at home, which means the cause of problems at the bank may well be a new device from China.
- Incorrectly stated light intensity specifications can lead to an outbreak of filamentous growth or plant death.
Any lighting system for aquarium plants is located in a humid environment and close to water, which entails the need for a competent approach to choosing a lamp. Not only the safety of the owner depends on this, but also the formation of a healthy microclimate in the aquarium.
Portuguese aquarist Filipe Oliveira said: “Three months of planning an aquascape is much better than three months of headaches if it doesn’t work out.” Take the time to read the necessary literature and do the calculations on your characteristics before equipping your aquarium in order to choose the right lighting for your plants.
Why are LEDs better than halogen, fluorescent and incandescent lamps?
Before the advent of new generation lamps, lighting was done on:
- Fluorescent lamps;
- halogen lamps;
- incandescent lamps.
Now everything has shifted towards lighting the aquarium with LED lamps, why is that? Incandescent and halogen lamps emit a lot of heat, which causes additional heating of the water, sometimes excessively, which requires heat removal. Heat was removed using forced air cooling, i.e. cooler (fan). This caused additional noise and costs.
Lighting an aquarium with LED strip produces less heat and produces more light. This is especially true for plants that require strong lighting: from 6,000 to 10,000 or more Lux of illumination. An incandescent lamp produces from 9 to 20 Lumens for every Watt of its power.
Let's compare classic and LED aquarium lighting, using the simplest calculations of power and illumination as an example.
Comparison of lamp types
1 Lux = 1 Lumen/m2. That is, to provide a classically shaped aquarium (depth less than its length) with a minimum illumination of 6000 Lux, you need about 400 W of incandescent lamp light. When its efficiency is less than 10%, it turns out to be a rather powerful heater, not a lamp.
Halogen lamps have a higher luminous flux, fluorescent lamps have an even higher luminous flux, and the heating of water from them is less. But the latter contain mercury vapor, which, if the lamp is damaged, can bury all living creatures in the water.
However, LED aquarium lighting, as of the day this article was written (end of 2021), is the most effective. LEDs provide 80-140 lm for every W of their power, which is 5-10 times more efficient than competitors.
Lighting is more important for flora. LED lamps in the aquarium will provide the necessary illumination for plants and save money. Think for yourself how much it will cost to operate an incandescent lamp with a total power of 0.5 kW, which operates for 5-12 hours a day. Even the use of automation will not allow you to achieve significant savings. Light from LEDs consumes from 50 to 150 watts, depending on the size of the aquarium.
LED lighting in an aquarium can be used both as decorative lighting and as functional lighting. Spotlights and ribbons can be placed in the lower layers of water, both for illumination and to provide light to plants located at the bottom of the container.