A compressor is an air pump that enriches aquarium water with oxygen and regulates the amount of nitrogen in the aquatic environment. No home aquarium can do without this device, since an aquarium is an artificial reservoir of a closed type. Under natural conditions, the function of water aeration occurs through the constant movement of liquid in a reservoir.
From evening to morning, plants stop producing oxygen and begin releasing carbon dioxide. Sometimes, planted plants cannot cope with high nitrogen levels. In this case, their assistant is the aerat.
The air duct is equipped with tubes to saturate the water with O2. Special taps allow you to control the process of oxygen release. Sprayers made of abrasive or white stone are attached to the tubes. It is recommended to attach the sprayers themselves to the bottom, creating columns of air bubbles with their work.
Such “air columns” appeal to some types of fish: Poecilia reticulata (guppies), Danio rerio (danios), Pterophyllum (angelfish), Poecilia sphenops (mollies).
The intensity of oxygen saturation of the liquid depends on the size of the released bubbles: the smaller they are, the better. For high-quality work, you need to choose a more powerful compressor. Too small bubbles contribute to increased pressure. The air rises to the surface and destroys film-like bacterial formations. In addition, the water layers are mixed, due to which the temperature throughout the entire area of the aquarium remains uniform.
What you need to make a pump
To make an aquarium pump with your own hands you will need the following components:
- 20 cc syringe;
- Silicone tube, with a diameter approximately slightly smaller than the diameter of the syringe;
- Electric motor 3 or 5 volts;
- Some other materials. In particular, you will need caps from 1.5 liter PET bottles (3 pieces), a piece of thin plastic, you can take from a CD box.
As for the tools for making a homemade aquarium pump, you will definitely need a hot glue gun, a cordless screwdriver and a small drill. You will also need a sharp knife and scissors to cut all materials. So, let's go.
What is it needed for
The purpose of the device is to dissolve oxygen in water and allow fish to breathe. Most fish require aeration. A tank without an aerator is only suitable for labyrinth fish. An alternative to a compressor is an aquarium pump. It supplies oxygen and filters water, and you can also make it yourself.
DIY aquarium pump
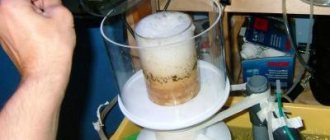
First of all, you will need to prepare a syringe. Take a sharp knife and cut off the part of the syringe where the needle is inserted. The hole should be adjusted as tightly as possible to the size of the silicone tube, so the main thing here is not to overdo it.
After this, take a small piece of silicone tube (10 centimeters) and insert it into the prepared hole. To prevent leaks, generously cover the gap around the tube with a hot glue gun.
Next comes the turn of making a homemade pump turbine for the aquarium. For this purpose, you need to take 2 caps from PET bottles, and then connect them together, again, using a heat gun.
In one of the plugs you will need to make a hole for the tube, and in the other a slightly larger hole for installing the motor. Another hole will be needed from the end part of the plugs glued together; half of the syringe with a tube will be attached to it.
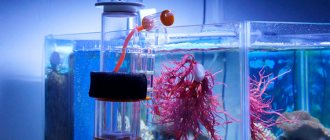
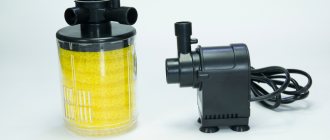
DIY aquarium filter based on a Chinese pump/pump 15 w
Greetings to aquarists and interested parties. I suggest you read the review of an aquarium pump (pump) and an aquarium filter (made on the basis of this very pump). With description and photographs of the assembly process. At the beginning of September 2021, the pump worked for more than one month. I immediately apologize for the not very good photos, I took the best photos I could.
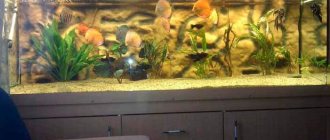
We have a 60-liter aquarium with cichlids living in it. They ate everyone else, and they eat each other from time to time. They lived in very poor conditions, since the wife took care of the aquarium according to her free time and energy. There was no lighting and there was the simplest internal AQUAEL filter, which simply did not cope with the overcrowded aquarium and constantly stopped. He also carried out aeration, and when it stopped, the fish became rather ill.
It was decided to improve filtration and lighting, and the search began for options that would satisfy both financially and technically. I came across various designs of homemade external filters; in the end, the option with a body made of a sewer pipe, with a pump installed in the upper part, was chosen.
According to the pump in question.
I took a power of 15 W for growth, since in this aquarium and filter its power, both in terms of pressure (pillar height) and consumption, is excessive. Even taking into account the fact that in a month the filter collected a lot of debris, since the soil was not siphoned for a long time. Dimensions: exactly mine 15 W - 5.5 * 6.5 * 7.5 cm, that's right. I took it in such a way that the pump would fit into the filter with the flow regulator removed. Included: the pump itself, two hose fittings 16 mm and 10 mm. They are threaded and screwed into the pressure pipe on the pump (in the photo below, one of the fittings is screwed into the pump), an adapter for a Euro plug (it was immediately cut off), and 4 suction cups. The water flow regulator is in the form of a damper, which creates additional resistance, thereby reducing the amount of water pumped (I removed it and did not use it in the filter, since it did not fit in dimensions, and I did not plan to regulate anything). Stainless steel shaft. Packed in a cardboard box, arrived in a month.
To understand the pressure performance, the height of the water column in the pressure pipe was checked. I put a 16 mm tube on the supplied fitting and raised the hose vertically to fix the water level without spouting. The water was at a height of 1.35 cm from the pump level. I did not measure the flow rate (the amount of pumped water), since it was urgent to install and start the filter. In fact, the flow and pressure are excessive. The filter stands 50 cm below the water level in the aquarium, while powerful jets of water flow from the flute. In order to reduce the noise of the spout, the flute was turned towards the wall of the aquarium, while strong bubbling and movement of water is observed, which is sufficient for aeration of the aquarium.
Now let's move on to why the pump was purchased. There are many options for making an external filter on the Internet: from sewer pipes of different diameters, flasks from water filters, plastic canisters, jars, bottles... I chose a body made from a polypropylene sewer pipe 110 mm in diameter, firstly they were in stock, secondly they were cheap, and thirdly they were very reliable and hygienic.
Making an external filter for an aquarium
In the design I tried to avoid installing metal parts, everything was made as much as possible and without the use of sealants or adhesives. Since polypropylene is such a material that sealant or glue does not stick to it, then only soldering or threads with gaskets. To seal the threaded connections, fum tape and rubber gaskets were used. Fittings and quick-release connections were used from the irrigation system, bought at Leroy Merlin (or at any hardware store, they are very inexpensive). The most difficult thing in the filter design is the “head”, the top cover in which the pump, air remover and pressure pipe are installed.
The photo will be below, with explanations. Three holes were made in a sewer plug with a diameter of 110 mm: for installing a pressure pipe, an air extractor, and a cable outlet. The plug was fitted with a standard sewer pipe clamp - it was secured with two stainless screws. The pressure pipe is fitted with a piece of reinforced hose, into which a fitting from the pump is inserted and tightened with a tie. In fact, the pump hangs on this hose in the water without touching the walls of the filter.
Top view of the lid. You can see the pressure pipe (through which water flows into the aquarium), a manual air remover, and a fitting with a seal for the power cable outlet (I don’t know what it’s called, I had it in stock). You can also see another small fastening clip on the mount; it is needed to attach the hose from the aquarium along the pump body; further on in the photo you will see what it looks like. Everything is assembled on fittings for irrigation; this system is unified and has standard 1/2 and 3/4 inch threads.
The large mount on the “head” of the filter is installed specifically, since external filters are installed below the level of the aquarium and if the pump turns off, the entire column of water will press into the filter, creating excess pressure. As a result, the “head” or pipes may be squeezed out, despite the sealing gaskets. Therefore, the pipes and the bottom plug were soldered together with a torch, and only the top cover is removable.
In the photo (before painting) you can see that there is a second fastener, which is later tightened with pins, pulling the lid to the container itself. You can also see how the pipe with water from the aquarium (dirty) is supplied.
An important point is the tightness of the filter housing. Since during operation, the pump evacuates the filter. And if there is a leak, air will be drawn into the filter. When the pump turns off, water will flow out through the leaks in the housing. I checked by dipping the filter into the pool and pumping air. Where there were cracks there were air bubbles. I have plumbing experience, so the second time it was assembled completely hermetically. Therefore, when purchasing pipes, you need to check the condition of the rubber gasket in each part.
In the lower part, at the water inlet, there is an empty chamber. The diameter of the bottom part of a one and a half liter plastic Coca Cola bottle was perfect for this. There were a bunch of holes made in it (like a sieve). and the filler was already laid on it in layers, through plastic gratings from fruit boxes.
Filling the filter from bottom to top:
- cut electric corrugation;
- foam;
- bio balls;
- padding polyester;
I run the filter using the following algorithm:
starting the filter and filling with water
- I fill the filter completely with water with the air vent open;
- I put the intake hose from the aquarium on the filter;
- I suck in water from the intake tube with my mouth and while water flows through the hose, I put it on the filter. Water fills the filter volume, air first comes out of the air vent, then I close it. Water begins to rise through the return tube and the system is completely filled with water;
- Then all that remains is to turn on the pump and pump the filter a little so that all the air comes out. The pump pumps out all the remaining air and then everything works without human presence.
One month of use has passed, the biobalance in the aquarium has improved, the water does not smell, and is crystal clear. I assumed that the water pressure would drop, but so far there is no visual decrease noticeable. The pump operates quietly, vibration is very insignificant, perhaps this is the movement of water inside the filter. There is no noise at all, but you need to understand that the pump is completely hidden in a sealed container filled with water.
As for the pump itself, I have nothing to add, it’s quiet, efficient, no vibration.
Final photo of the working filter
Thank you for your attention.
Photo of an aqua, new lighting, so the fish hid... Even here, “the horizon is blocked” 
Yes, the photos are bad, not the photographer.
How to make a pump impeller
The manufacture of the pump impeller for the aquarium deserves special attention. Here you will need to take a plastic plug of slightly smaller diameter than the glued ones, and then make four cuts in it along the edges to install the plastic blades.
The edges of the blades should protrude slightly beyond the edges of the plug; this is an important condition for the effective operation of a homemade pump. Then a hole is made strictly in the center of the plug for the engine shaft. After which everything is glued together using glue and a heat gun.
Thus, after spending just a few hours, you can make an aquarium pump with your own hands. Of course, it will also be possible to modernize it. For example, install a fourth piece of plug with a piece of cotton wool on the water suction pipe. This can make a good filter system for an aquarium.
Types of compressors
There are several types of aeration pumps:
- Membrane. Better to use during the day. To muffle the noise, it is recommended to place a foam pad under the bottom. Consumes a small amount of electricity but creates a lot of noise. 1 such unit is enough for several tanks. Consumption is approximately 12 volts.
- Piston. It can be turned on at night as it makes little noise.
- Silent, battery-powered aquarium compressor.
- Pump-action.
Finding an absolutely silent compressor is unrealistic. The operation of the air duct is based on vibration.
Homemade aquarium pump: pros and cons
The main advantages of a homemade device: saving money; if you know how to work with your hands, assembling a pump from available materials will not take much time; the device can be modified according to your wishes and needs of the inhabitants of the aquarium; If desired, the device can be given an aesthetic appearance that matches the decor of the container. The downside can be considered possible errors in work, for example, insufficiently strong sealant or inaccuracy in calculations.
Features of choosing and using pumps for a marine aquarium
Saltwater aquariums usually contain corals and various sponge species as natural water purifiers. Both of them, as well as fish in their natural habitat, are dependent on the current. All life cycles, the availability of food, and the change of seasons for marine inhabitants are associated with the current. Taking this important factor into account, current pumps are installed on tanks containing seawater inhabitants, which also perform the function of cleaning and aeration. The following nuances need to be taken into account: For ten to twelve hours, the pump must be turned off, simulating calm. The volume of pumped water per hour should be approximately fifteen times the volume of the tank. The water flow is directed to the bottom stones. For large containers, it is recommended to purchase two devices.
Assembling a device for your silent pets yourself is not difficult and does not take long, especially for those who know at least a little about the operation of such devices. If you don’t have the skills, you can look for a budget option, but in any case, this device is vital for aquatic life.
Air compressor made from refrigerator and fire extinguisher parts
This unit operates almost silently. Let's look at the diagram of the future design and make a list of the necessary components and parts.
1 — tube for filling oil; 2 - starting relay; 3 - compressor; 4 - copper tubes; 5 — hoses; 6 — diesel filter; 7 — gasoline filter; 8 — air inlet; 9 — pressure switch; 10 — crosspiece; 11 - safety valve; 12 - tee; 13 — receiver from a fire extinguisher; 14 — pressure reducer with pressure gauge; 15 — moisture-oil trap; 16 — pneumatic socket
Necessary parts, materials and tools
The main elements taken are: a motor-compressor from a refrigerator (preferably made in the USSR) and a fire extinguisher cylinder, which will be used as a receiver. If they are not available, then you can look for a compressor from a non-working refrigerator at repair shops or at metal collection points. A fire extinguisher can be purchased on the secondary market or you can involve friends in the search, who at work may have written off fire extinguisher, fire extinguisher, fire extinguisher for 10 liters. The fire extinguisher cylinder must be emptied safely.
In addition you will need:
- pressure gauge (as for a pump, water heater);
- diesel filter;
- filter for a gasoline engine;
- pressure switch;
- electric toggle switch;
- pressure regulator (reducer) with pressure gauge;
- reinforced hose;
- water pipes, tees, adapters, fittings + clamps, hardware;
- materials for creating a frame - metal or wood + furniture wheels;
- safety valve (to relieve excess pressure);
- self-closing air inlet (for connection, for example, to an airbrush).
In addition, you will need tools: a hacksaw, a wrench, a syringe, as well as FUM-leta, anti-rust, synthetic motor oil, paint or enamel for metal.
Assembly steps
Before starting assembly, you need to prepare the motor-compressor and fire extinguisher cylinder.
Preparing the motor-compressor
Three tubes come out of the motor-compressor, two of which are open (air inlet and outlet), and the third, with a sealed end, is for changing the oil. To find the air inlet and outlet, you need to briefly apply current to the compressor and put the appropriate marks on the tubes.
Next, you need to carefully file or cut off the sealed end, making sure that no copper filings get inside the tube. Then drain the oil inside and use a syringe to fill in motor, synthetic or semi-synthetic. You can seal the tube by selecting a screw of a suitable diameter, which must be wrapped with FUM tape and screwed into the hole. Sealant can be applied over the joint. If necessary, paint the surface with enamel.
Preparing the receiver
You need to remove the shut-off valve (SPV) from the empty fire extinguisher cylinder. Clean the outside of the container from rust and dirt, and pour “anti-rust” inside and hold it for as long as indicated on the product label. Let it dry and screw on the lid with the hole from the ZPK. We screw the adapter into the hole (if necessary) and attach the cross.
We attach a pressure switch to the upper branch pipe, on one side we screw in a tee and connect a pressure gauge, on the other we mount a safety valve or a valve for bleeding air manually (optional). Where required, we use adapters. If necessary, we paint the balloon.
Circuit assembly
On an assembled frame (for example, a strong board on wheels or a structure made of strong corners or pipes) we attach the cylinder, and on it or next to it - a motor-compressor, laying a rubber gasket. We connect first a gasoline and then a diesel filter to the incoming air pipe of the compressor. This must be done if the compressor is designed to operate an airbrush, in order to eliminate the slightest air contamination. And since the diesel filter is thinner, it is installed after the gasoline one. If copper tubes have lost their shape during dismantling, they need to be flared.
The power supply is connected through a toggle switch, a pressure switch and a start relay. We protect all connections with electrical tape or heat shrink. It is important to install the starting relay in the correct position - according to the arrow on its cover, otherwise the device will not work correctly.
1 - toggle switch; 2 - pressure switch; 3 — compressor start relay; 4 — relay position arrow; 5 — connection of the relay to the compressor windings; 6 - compressor
We connect the output air tube from the compressor through an adapter to the inlet of the receiver. After the pressure gauge, we install a gearbox with a remote moisture-oil trap, and behind it a hose with a self-locking air outlet.
The end result, with due diligence, works well and looks aesthetically pleasing.
Air compressor made from auto parts
The air compressor has a fundamentally different design, which is assembled on the basis of a ZIL compressor and a separate engine. This is more powerful equipment that can also be used to connect pneumatic tools. Very noisy unit.
Layout drawing of the compressor unit: 1 - compressor from ZIL-130; 2 — frame from a corner; 3 - safety valve; 4 - standard pressure gauge; 5 — transfer case; 6 - three-phase electric motor (1 kW, 1380 rpm); 7 — start box (from the washing machine); 8 - capacitor bank (working capacity - 25–30 μF, starting capacity - 70–100 μF); 9 — receiver (from an oxygen cylinder or KrAZ muffler); 10 — V-belt transmission (reduction 1:3); 11 — “Stop” button; 12 — “Engine start” button; 13 - button for short-term activation of the starting capacitor battery; 14 — fitting of the flow (outlet) valve; 15 — aluminum tubes Ø 6 mm; 16 — exhaust valves; 17 — intake valves; 18 — wheels (4 pcs.); 19 — transverse stiffener; 20 — tie rod (M10 — 4 pcs.); 21 - drain hole with plug
Connecting a three-phase motor to a single-phase network: a - “triangle”; b - “star”
You can see an example of self-assembly of an air compress from new parts and components in the video.
Mr. Tail recommends: the main types of professional compressors
According to the principle of operation, the compressor can be membrane or piston. In the first version, air comes from a chamber connected to a membrane. The reason for the movement is the pressure difference provoked by vibrations of the magnet (not the solenoid) acting on the membrane. This design does not require large amounts of energy during operation, rarely fails and is easily repaired. Diaphragm compressors (vibration) are cheap, but they are not recommended for use in aquariums larger than 150 liters.
In piston engines, air flows are pushed out due to the work of the piston - the rotational movements of the shaft are converted into vibrations. This device is designed for tanks with a volume of about 200 liters. It has greater productivity than the previously mentioned type, and durability is approximately at the same level. Even powerful piston compressors can be chosen for use in rest rooms, as they are almost silent. The disadvantages include increased electricity consumption and high cost.
Aquarium pump
Separately, it is worth highlighting the pump - a type of circulation pump that also performs the functions of a filter. It is capable of working both to purify liquid (air filter) and as a means of saturating it with oxygen. The design includes:
- filter compartment;
- motor (rotor with impeller and stator);
- aerator.
Dirt removal is carried out thanks to a multi-layer flow filter. The pump equally successfully creates air flows in aquariums of different sizes.
There is almost no noise during operation, glass damage is excluded due to the immersion of the structure in the tank.
Mini compressors
Separately, you can provide a description of water mini-compressors. They are designed for small aquariums in situations of temporary power outage. Using batteries, stand-alone devices operate loudly enough for no more than six hours, after which they need to be turned off.
Sequencing
An aquarium compressor is made in several different ways. Let's look at the simplest and most common ones. To create a compressor you need to do the following:
- Take a small electric motor and connect it to power. It is recommended to use a motor with a voltage of no more than 12 volts, so that in the event of a long power outage, it is still possible to power it from the car battery.
- Next, an eccentric is fixed to the surface of the electric motor, thanks to which a small pump is driven.
The considered option will be most appropriate in the situation where it is necessary to make a silent compressor for an aquarium. If the presence of noise is not the main criterion for you, then you can use another method to create a compressor:
- As additional equipment, you need to find an electromagnet. For example, you can use a small magnetic starter operating at a frequency of 50 Hz from a voltage of 220 volts.
- Then you need to connect a small pump to the electromagnet, the membrane of which will begin to move from side to side with a similar frequency of 50 Hz. It is thanks to this movement that the pump pumps air and thus aerates the water. Excessive noise interference is created due to the operation of the electromagnet and for this reason this method is less common.
A self-made compressor will not only be cheaper than ready-made analogues, but can also be much more efficient than other devices, and will also be easier to repair.
Making a carbon filter for water
To filter water, special industrial products are used. Their operating principle is identical. H2O is passed through special fillers, on which solid fractions, chemical and other compounds settle. The units are easy to use, aesthetically pleasing, and the final product is harmless to the body. The disadvantages are associated with the small volume of pumped liquid and the rapid failure of filters.
The way out of the situation is often associated with the independent production of filter devices.
The best option is to use carbon cleaners. Charcoal and activated carbon are used. In the first case, repeated cleaning of the absorbent is required (until the final removal of dust and small particles). Advantages:
- Effective retention of toxic substances.
- Removing unpleasant odor and taste from water.
- Creating a barrier to organic substances, including pathogenic bacteria and viruses.
- Hydrocleaned to a natural, clear appearance.
- Environmentally friendly.
- Long service life.
- No need for reagent washing.
Step-by-step instruction
Filter mechanisms operate on the same principle and are similar in design. A typical and common device is a 5 liter plastic bottle. Instead, it is possible to use a container made of another material.
Work order:
- The bottom is cut out in the container. This process is necessary for the convenience of pouring water. Other adaptations are acceptable. For metal products with small holes, pipe bends and funnels are used.
- Several holes are made in the bottle cap.
- The improvised body of the product is ready. It is mounted with the lid down in a stable position. The filtration process takes 3 hours. Therefore, the bottle is tied to a tree, chair, drainpipe, or attached to a stationary object. Under the filter there is a container for receiving clean water. If the action takes place in the field, then a bucket with a lid is used as such. A hole is drilled in it to insert the lid of a plastic container. Water is protected from dirt, dust, and foreign objects.
- Activated carbon is poured into the bottom of the product body. For a five-liter container, the layer thickness is 7 cm. If activated or charcoal is fractional, small particles are laid first, and larger fractions are placed on top.
- The coal is covered with sand. The thickness is 1-2 cm more than the coal layer.
- The created filter layer is covered with a five-centimeter layer of small, thoroughly washed pebbles.
- Water is passed through the filter to remove unrefined components.
The filter is ready for use. The volume of the container is selected depending on the purpose of the cleaning device. In offices, a liter bottle is sufficient. In private homes, 20-50 liter products are used to prepare drinking water.
Attention! If desired, the filtration layers are reinforced with gauze and special fabrics. To speed up the filtration process, layers of pebbles, sand, and coal are reduced
This method is used for rough water purification. Subsequently, it goes into industrial devices (cartridge consumption is reduced)
To speed up the filtration process, the layers of pebbles, sand, and coal are reduced. This method is used for rough water purification. Subsequently, it goes into industrial devices (cartridge consumption is reduced).
Basic selection rules
When choosing a pump, you should take into account the power of the device and the volume of the aquarium - you can see a good selection of pumps for an aquarium here. To service a small one, a low-power model is enough. Especially if it will only be used to supply water. For containers with a volume of more than 250 liters, you will need a more powerful option.
It is also necessary to take into account the height of the water rise (this indicator depends on the volume of the tank). The larger the capacity, the more powerful the pump is needed. The one that pumps from 3 to 5 volumes per hour is considered effective.
Another important point when purchasing a pump is the type of aquarium (sea or freshwater). For each variety you need to select the appropriate model
Loading…
Design and principle of operation of an air compressor
The main component of such equipment is a supercharger, consisting of an electric motor and pistons. However, it is worth immediately noting that compressors can be intended for different purposes. For example, a car device designed to inflate tires is also called a compressor, but it cannot be used to supply air to a spray gun. The thing is that with such a device the air is supplied unevenly, which is unacceptable when painting surfaces. For uniform supply to the spray gun, the device is equipped with a special reservoir - receiver.
By itself, such a compressor is not suitable for airbrushing or painting PHOTO: drive2.ru
Use in everyday life
Why might a device that can create a vacuum be useful at home? Using a vacuum at home, you can solve various problems. Thus, by pumping air out of plastic bags containing clothes, bedding, pillows and other things, you can significantly reduce the size of such packaging, saving space in the closet or dressing room. In addition, being in vacuum packaging, things and linen made from various materials are reliably protected from moths and mold.
Battery handheld vacuum sealer used for food packaging
Household vacuum pumps are used to pump out air and organize food storage. Placed in plastic bags from which the air is pumped out, food products do not spoil for a long time and can be stored for some time even without freezing, at room temperature.
Many home craftsmen use air vacuum pumps to laminate furniture elements with PVC film, as well as products for any other purpose made from various materials.
Using a vacuum-type compressor, you can pump out gases, steam and liquid media, restore the tightness of various household appliances, air conditioning and refrigeration systems, and elements of technical equipment of vehicles.
Household vacuum pump for pumping oil out of the engine