GD Star Rating loading…
Modern trends in the development of aquarium husbandry suggest increasingly non-standard ways of solving certain problems, which several decades ago would have seemed simply absurd.
More than once, when communicating with aquarium gurus, I heard that using ordinary soil “from the garden” is not applicable for the substrate in an aquarium.
But years have passed and you can find more than one publication on the global network about the successful use of such a substance for aquariums.
Having studied everything that has been written by colleagues, and adding my own personal experience, the following can be recommended to an aquarist who wants to try to apply this experience in his aquarium. But! First of all, let me briefly explain why this is needed.
Well, firstly, exclusively for experimental purposes; aquarists, in their essence, are always innovators. However, they also always strive for positive results. Manufacturers of branded products, as we already know, have long been producing nutrient soils and nutrient substrates that have been very popular with most aquarists for many years, these are ADA soils and sulfur and JBL substrates.
However, despite the positive results that the substrates give, there are a number of negative factors. The first of them can be called the price of such substrates. Frankly speaking, aquarists are not stingy people, and if you need to achieve a good result, it’s hard to scare them off at a high price, however. As practice has shown, if on the same JBL substrates (if we take the average price category of products), the average service life varies about 3 years, then in fact this period reaches a maximum of 1.5 years. After this, the substrate is depleted due to the fact that the aquarist needs to siphon the top layer of soil from time to time, and those remnants of the substrate that remain in the deeper layers of the soil usually turn sour and serve as an excellent environment for the development of unnecessary bacteria. Aquarists who use such substrates have probably noticed that if you stir the soil after a while, gas bubbles will come out from under it, as a result of the activity of these same bacteria. That is why aquarists began to look for a cheaper way to obtain a nutrient substrate for the soil of their aquariums.
Ordinary soil became such a substrate. I would like to make a reservation right away that there is very little experience in using such land among aquarists, so a single algorithm has not yet been developed; opinions sometimes differ almost diametrically opposite. It’s probably worth dividing my article again into a question/answer method of presentation, in order to make it easier to understand all the nuances.
Introduction
Before starting to organize an aquarium on the ground, I re-read almost all the material that I could find on the Internet on this issue. Articles on aquarium websites, forums, reports from aquarists. For myself, I highlighted the main points of organizing an aquarium using land. And also that supporters and opponents of this method of starting an aquarium are divided approximately 50 to 50. For some, even the most demanding plants develop well in aquariums, fish and other inhabitants feel great. At the same time, some aquariums on the ground have equipment that does not always only include a heater to maintain the required temperature. And the lighting is ordinary energy-saving lamps and (or) incandescent lamps. Not to mention external filters, CO 2 systems, etc., without which ground aquariums exist just fine. Someone on the other hand has constant problems with algae. Plants are not growing as expected. And the whole idea of an earthen aquarium ends quite disastrously.
The idea of creating a home pond as close to natural as possible is very tempting. Based on the experience of aquarists. It turns out that a successful aquarium on earth exists virtually autonomously. Plants from soil rich in substances receive sufficient nutrition for their development. Carbon dioxide is also obtained from the soil layer during the decomposition of organic matter. Aerobic and anaerobic bacteria settle in a sufficiently thick layer of soil, making it possible to do without powerful filtration. Fish also, during their life processes, release nutrients necessary for plants, as well as carbon dioxide during respiration.
Changes in such aquariums with soil, unlike the usual 25-30%, are made once a week, much less often. More often than not, it all comes down to simply adding water to replace what has evaporated. I came across information that a properly organized aquarium on the ground can exist for years without requiring intervention in the form of a restart. In general, this is all very interesting and tempting. You urgently need to try it yourself! For my part, I give my word to honestly and in as much detail as possible to describe the entire process of setting up the aquarium and the results. If everything works out it will be just great! If not. I hope with your help I can figure out the mistakes I made.
Rating of the best manufacturers
With a large number of offers, you have to pay attention to the manufacturer’s brand.
Experts highlight the best of them: Aqva (Ukraine), German JBL, Tetra, Sera and Deponit (DeponitMix), Japanese ADA.
Power Sand Special M
A high-quality nutrient substrate consisting of peat, mineral fertilizers, beneficial microorganisms and porous elements.
Works well for biological purification and serves as a growth stimulator for aquarium flora. Suitable for equipping shrimp tanks.
Seachem Flourite
A complex herbal additive for freshwater household ponds. Enriched with microelements and nutrients, contains calcium, iron, magnesium.
ADA Aquasoil Amazonia
Granular soil, created by analogy with the Amazon biotope. It affects water parameters, reducing acidity and hardness to the values necessary for plants.
Retains its beneficial properties for a long time. Recommended for keeping fish that prefer soft water.
Deposit
Deponit contains trace elements and nutrients that provide bright coloring to plants, including iron.
Safe for invertebrate aquarium inhabitants. Has a long-term effect.
Aqva Basis Plus
Clay-based substrate with a full set of elements necessary for aquatic plants.
JBL nutrient soil serves as a long-term warehouse of useful components that support enhanced development and strengthening of the root part of plants.
Placed in an aquarium, it remains effective for 3 years.
Aqua Medic Terralit
Primer based on natural zeolite. Designed for long-term plant nutrition.
All nutrients are absorbed only by the root system and do not enter the water. Accelerates the development of underwater flora.
Florapol
Fertilizer concentrate from JBL containing iron, minerals and other microelements for plant nutrition.
It is recommended to mix with gravel (grain size 2–3 mm). One bookmark is enough for 3 years.
Fluval
Nutritious soil with a porous structure. Provides rapid colonization of beneficial bacteria that stimulate plant growth and improve water quality. Brings acidity levels to moderate levels.
AqvaYer
Ready-made living soil with all useful components. Thanks to the rapid colonization of bacteria, it makes it easier for plants to obtain nutrients and protects their roots from pathogenic organisms. The composition is as close as possible to the natural environment.
Tetra Plant Complete Substrate
Ready-made soil for an aquarium with peat, sand, minerals and humic acids. To enhance its beneficial properties, it can be mixed with fine gravel.
Tetra Active Substrate
It has a natural base in the form of clay granules with a porous structure. Ideal for the growth of beneficial bacteria and helps purify water. Not subject to compaction, does not cause root rot.
JBL Proscape Shrimp Soil Brown
Nutritious soil is brown in color with an optimal grain size that facilitates the circulation of oxygen.
Reduces the acidity of water, completely provides plants with essential microelements and minerals. No pre-rinsing is required.
Sera Professional Floral Ground
High-quality substrate with good aeration and filtration. Thanks to its porous structure, it does not create stagnant areas and protects roots from rotting. A gravel or sand coating is required for long service life.
Coral chips
Attracts the attention of aquarium owners with its high decorative properties. Coral chips are painted in light colors, which not everyone likes. It fits easily to the bottom and has no sharp edges.
Increases water hardness, which is not suitable for all aquarium inhabitants. The crumb is prone to darkening and requires regular cleaning.
Choosing land for an aquarium
The most important point, as I learned from materials on the Internet, is to choose the right land . Since in St. Petersburg the water is quite soft. land a minimum peat content. It's not as simple as it turned out. One of the best options is ordinary soil from garden beds. But since the summer season was already closed at the time of setting up the aquarium , I had to look for land in flower shops. There is such a moment here. Almost all land sold in stores contains peat in one quantity or another. Even the purchased package of soil for testing, according to the seller’s assurances: “clean soil without peat,” in fact contained peat mixed with manure.
Ultimately, this land was chosen.
Choosing land for an aquarium
“Garden of Miracles” costs 30 rubles. "Rose" soil is nutritious. Completely ready. Neutral contains vermicompost. For growing ornamental plants.
Origin: the product is obtained as a result of the processing of organic substrates by earthworms with the addition of natural structuring components of macro and microelements. To improve air and moisture exchange, perlite (inert white granules) was added to the soil; the following characteristics of the soil were indicated on the packaging.
The content of the main elements is not less than:
Nitrogen (NH4+NO3) – 200 mg/liter
Phosphorus (P2O5) – 300 mg/liter
Potassium (K2O) – 350 mg/liter
When choosing land, the seller, noticing that I was closely studying the composition on the bag of soil, made the following comment: “What are you reading all that about?! All the same, the specified composition does not correspond to the contents! In general, I didn’t explain to him why it took me so long to re-read the contents of the packages; probably in his eyes I looked like a slightly touched flower grower. Having opened the packages at home, it turned out that the base of the soil was peat, fine sand and perlite.
I manually removed large peat fibers - I definitely didn’t like this mixture
Large peat fibers
The next day I decided to visit another garden-themed store and look for whatever it was...
In the evening, while walking the dog, I noticed that in the neighboring yard construction workers were landscaping the lawns and were just accepting trucks with soil. The land was brought in basically as I was trying to find. That is, it is land with a small clay content, and not peat as purchased. Another question is where it was brought from, but let's hope for the best.
There is no peat here
I collected two bags of soil brought for lawns. I chose stones and some roots came across such lumps of clay, I simply crushed them with my hands.
But you come across clay
I mixed it with purchased soil from the store. The result was a mixture like this, in the photo below you can see the difference: the dark layer of purchased soil on the top was taken from the future lawn.
Mixing soil from the lawn with purchased soil
We also bought charcoal – a package of 30 rubles.
Charcoal
I found a bag of stove ash I had saved from the summer. In my main 360 liter aquarium, I sometimes feed Echinodorus and Cryptocoryne with blue clay. I was thinking of mixing clay with ash. Now it will come in handy.
Ash from the stove
Add charcoal to the mixed soil, which I crushed a little beforehand.
I mix coal with soil
Added ash.
Plus ash
It is also recommended to add additives to the soil in the form of lime, chalk, sandstones, etc., that is, carbonates to alkalize the water and prevent it from acidifying. There was information that even ordinary eggshells are suitable. That's what I used in this case. I boiled it a little to remove the film-like residue, crumbled it and added it to the earthen mixture.
Eggshell with soil
Again, everything was thoroughly mixed; the soil was ready to be placed in the aquarium; it was pre-heated; I did not soak it.
Aquarium preparation
Now a little about the aquarium itself. For experiments with the ground, a container with a volume of about 60 liters was allocated. It is located in the center of the bedside table, under the main 360 liter aquarium. Due to the peculiarities of the location, some problems arose with lighting; the fact is that standard aquarium lamps were not suitable in size and power.
Cabinet and place for a future aquarium
I decided to assemble the lighting myself using regular E-14 sockets and energy-saving lamps. I used regular clamps for plumbing pipes as holders for the cartridges. I attached all this to a metal corner, and it, in turn, secured it to the wall of the bedside table. A few photos for clarity.
Cartridges for lighting an aquarium with ground Cartridges for lighting an aquarium with ground general view
In the future I will make reflectors or cover the lamps with a panel. Only a 100W heater will be used as equipment for a ground aquarium. By the way, the company produces good aquarium equipment; at least I haven’t had a single failure in 3 years. The heating pads, pump and Atman DF-1000 filter work properly. I also installed an internal Aquael Fan micro filter with a capacity of about 250 liters/hour. As a filter, it certainly doesn’t work. I just don’t understand what colonies of bacteria that provide filtration should settle on a sponge the size of a matchbox. Yes, we don’t need this, so the fan took out the sponge and the task of the fan was simply to slowly mix the water in the aquarium. There are no plans to use any more equipment.
Internal filter Aquael Fan micro
The back wall was covered with regular black self-adhesive film.
Background self-adhesive film
The last fitting for the location of the aquarium in the bedside table.
Aquarium in its place
We come up with a design and place decorative elements
Decoration, driftwood in the aquarium.
You can come up with the decor yourself or copy it. Its main elements, which are found in almost all aquariums, are stones and driftwood. You can buy stones or find beautiful natural ones. They are first checked with vinegar. If a reaction occurs, they are no good. They can only be used with plants and fish that like hard water. Disinfection is carried out by boiling in water.
The second element of aquarium decor is driftwood. They are found in every natural body of water. If placed in an artificial one, it creates a natural environment that is beneficial to the inhabitants.
You can buy driftwood, including from exotic trees. Can also be found in nature. Any type of tree is suitable, except conifers. The most durable ones are made from willow and oak.
The snag needs to be prepared. The bark is removed from it, the rot is removed, and then it must be boiled. This operation destroys all spores, bacteria, insects and other unwanted inhabitants. The cooking process removes various substances from wood.
The operation is also necessary to ensure that the snag does not float up. To do this, boil it in water with salt: 300 g per 1 liter. Cook for up to 10 hours, adding water. If a snag is found under water, there is no need to add salt - it will already sink. Wooden decor from the store is also boiled in water without salt for 6 hours.
The boiled driftwood is placed in cold water and observed to see if it becomes colored. If it's a little, that's okay. When tannins are released abundantly, the wood is soaked.
The snag is placed so that it does not rest against the opposite walls. The tree will swell, expand in size, and may squeeze out the glass.
Keep in mind that some fish like to hide in secluded places. They are given this opportunity by dropping some suitable thing to the bottom. It should not be made of plastic, rubber, or have sharp edges.
Background for an aquarium.
Aqua designers believe that the best background is a black or dark blue film on the back wall. They highlight the beauty of fish and plants, the picture is constantly changing. The photo background looks unnatural and boring.
For some reason, most people try to fix the background from the inside, whereas you can do it from the outside and not be afraid that it will fall off. In the same way, instead of film, you can stretch dark fabric to fit the size of the back wall.
For modern decor, you should take a closer look at 3D backgrounds that look voluminous and deep. You may come across the opinion that the fish do not like it and it disorients them. Then there is another option - a volumetric background 3-20 cm thick made of foam or silicone. It imitates the relief of the underwater world.
Laying the soil and starting the aquarium
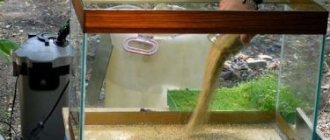
I placed the soil in the aquarium with a slight indentation from the front glass so that the layer of soil would not be noticeable through the glass from the front. They recommend a layer of soil of at least 2-3 centimeters; I got more.
About 7 centimeters at the back wall and about 5 cm at the front. Here, as it turned out later, I made a mistake. The soil needed to be slightly moistened and lightly compacted. On top of the ground I laid a layer of coarse sifted and washed sand from the shore of the Gulf of Finland. Anyone interested in how the soil was prepared can read here.
Soil selection
Before starting the aquarium for the first time, you need to fill it with soil for planting aquatic plants. His choice depends on 2 factors - the type of flora and who will live in the reservoir. Thus, small stones will be the best option for tetras, neons and other small fish. But for larger individuals (cichlids, goldfish) you will need soil of a larger fraction. If we talk about the type of filler itself, first choose one that does not affect the acidity and hardness of water - for example, granite, quartz, basalt or silicon.
In any case, the first start of the aquarium involves thoroughly washing the soil under a strong stream of water. If we are talking about sand, it is calcined in a frying pan. The soil is placed in a container with a layer of 3 to 7 cm. To “plant” artificial plants, it is enough to cover the bottom.
Planting plants in an aquarium with soil
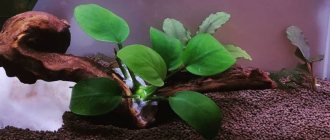
In order for the soil in the aquarium to “work” correctly, it is necessary to plant a large number of plants at once. Moreover, both long-stemmed plants (elodea, hornwort, etc. are excellent especially at the first stage of aquarium maturation) and plants with a powerful root system. Here is a photo of what I prepared for planting in this aquarium.
aquarium plants with soil
Planting.
I planted it in the ground before pouring water, but then I realized that it was a little wrong, I should have poured a little water. During the planting process, the plants were sprayed with a spray bottle.
To be honest, I didn’t prepare enough plants. At first, you will have to compensate for the lack of plants with hornwort and water cabbage fern, since these plants grow very quickly and accordingly will consume the amount of nutrients that is excessive at first.
pour water into the aquarium with soil
After planting. To prevent the soil from being washed away, I covered it with paper. The water was filled from the existing upper aquarium with approximately 70% and 30% fresh water.
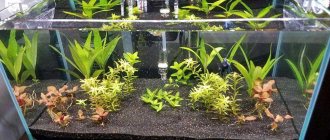
Filled aquarium with soil
Plants close up
General view of two aquariums.
Aquarium complex for two aquariums
Question: Water filtration?
Answer: Water filtration is carried out using conventional filters. Whether internal or external, however, you need to make sure that the filter does not take the earthen layer into the filter elements, otherwise it will sour there and instead of benefit, such a filter will only do harm. It is advisable to turn on the filter only a few days after starting the aquarium. Even if fractions of the earth appear through the layer of soil with which the earth is covered, the earth must be carefully siphoned off.
If the water turns yellow, it is advisable to put it in a filter for several months. Filler with activated carbon, which will remove yellowness. All other additives such as zeolite, etc. are used exclusively individually.
Tests
On the second day I took tests.
The indicators are as follows: Nitrate NO 3 - 40; Nitrite NO 2 - 0.4
For two days the water was slightly cloudy; on the third day the cloudiness disappeared, but foam appeared on the surface of the water.
The foam went away within 24 hours. The aquarium was illuminated for 4 hours with two lamps of 20 W warm light. Starting from the third day, I increased the lighting by one hour every day. A week has passed since the aquarium was set up; small growth of plants is observed only in Schisandra compacta and Lagarosiphon.
Stage 9 - pruning plants as the completion of aquadesign
Many long-stemmed plants grow denser after pruning, so pruning is important. The first “haircut” is carried out 1-2 weeks after the start. You can purchase special curved scissors for these purposes, or use sharpened regular scissors.
After pruning, add 12 drops of Ada Green Gain fertilizer to the water - this will help the plants adapt after cutting, and new leaves will begin to grow faster.
When the plants have taken root and started to grow faster, the CO2 supply is set to “3 bubbles per second.”
To enhance the red color of the leaves, you need to add fertilizers containing iron, such as Ada ECA.
If you find filamentous algae on plants, remove it immediately.
The first pruning of long-stemmed aquarium plants is done at the very bottom, about 10 cm from the ground. The next one is done higher, according to the cuttings that have grown after the previous haircut. The next haircut is even higher. This ensures maximum plant growth.
Trimmings are done regularly, every 1-2 weeks.
in 6 weeks