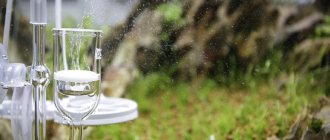
Home/DIY/CO2 for an aquarium with your own hands: photo, video, description
If an aquarium with fish contains living green plants, then, in addition to oxygen, it periodically needs a supply of carbon dioxide. Not everyone knows this, although these are the elementary laws of aquarium farming. Green plants in water need carbon dioxide. It is necessary for photosynthesis.
There are special installations for supplying CO2 to the aquarium. You can assemble a CO2 device for an aquarium with your own hands. But you should understand in more detail what kind of gas it is and why CO2 is needed in an aquarium with fish.
DIY CO2 System Basics
Adding CO2 to a herbal aquarium can be done in different ways.
There are many commercial products available, such as tablets from Bioplast and other manufacturers, or metabolic products such as Seachem Excel. But these tablets, as a source of carbon for plants, cannot supply the aquarium with carbon dioxide for a long time. One of the best methods involves supplying gas from a compressed CO2 cylinder. Using a system of valves and gearboxes, the required, constant supply volume is adjusted. This is the best method available, but it is also very expensive.
What remains is a homemade “walker”.
The first step in creating a CO2 generator is finding a renewable source of carbon dioxide. There are many ways to generate carbon dioxide gas, but the easiest and one of the safest methods is a yeast generator. Its essence comes down to the fact that yeast feeds on sugar and releases CO2.
Yeast depends on the environment where it is placed along with sugar. The most common medium is an aqueous solution. This process is known as fermentation. Next, all you have to do is collect the resulting CO2 and deliver it to the aquarium water. To do this, an aqueous solution of yeast and sugar is placed in an airtight container that has a fitting in a tube. The gas escapes through the tube in some way into the water.
This is the easiest way to extract and dissolve CO2 in water. Water atomization, passive contact, and forced diffusion can be used to dissolve gas in water. We will look at all these methods below.
The essential elements of a homemade CO2 system are the following: CO2 generator, tube and reactor.
Permissible concentration levels
For all processes to occur correctly, a certain minimum amount of carbon dioxide molecules in water is needed. Despite the fact that the inhabitants of the aquarium also emit this gas during their life, its amount is absolutely insufficient for photosynthesis to occur.
Therefore, it is worth knowing how high the gas concentration should be so as not to oversaturate the water with it. This will not lead to anything good, since at night oxygen starvation may occur in living beings.
The indicator depends on the volume of the aquarium, but at the same time it obeys a law under which its average value can be derived. It is equal to 2-10 milligrams per liter. For standing reservoirs, values of 30 may be normal, but everything is too individual.
First of all, you need to know in what conditions the plants that were planted lived. If their usual state is a mild or almost absent flow, then you can add more carbon dioxide and not be afraid of overconsumption. If they appear only in water areas with a noticeable current, then you can reduce the dose and nothing bad will happen.
It is necessary to monitor the level of CO2, since oversaturation can lead to oxygen starvation of aquarium fish.
System Design Examples
Someone can develop a very complex system, this will increase its cost and does not guarantee efficiency at all. Basically, all the developments of these systems are similar to the one offered to you, and were created with thoughts about maximum cost savings and system efficiency. Since the yeast generator produces a limited amount of CO2, the system design focuses on an efficient way to collect and deliver the resulting CO2 to the aquarium and dissolve it in the water.
The figure below shows the basic diagram of a well-organized homemade CO2 fermenter.
Yeast Generator
Perhaps the cheapest and still the best vessel you can use for your yeast generator is a two-liter mineral water bottle. There are several reasons that make a mineral water bottle the best choice.
Firstly, these bottles were created for highly carbonated water and are designed to withstand some pressure. It is important. The pressure that yeast creates can be significant. This, of course, is not fatal, but it is not very pleasant to collect splattered sugar and yeast throughout the house.
The bottle cap, or rather the method of attaching the tube to it, causes a lot of discussion. Almost all mineral water bottle caps are made of polyethylene. Polyethylene is not the best material for bonding to anything, so gluing the tube to the cap is not advisable.
Leaks will constantly occur, especially at the junction. Moreover, since we are dealing with gases, the connection between the tube and the cap must be sealed. The best solution is a mechanical fitting.
Silicone tubes
The next stage of discussion is the supply of gas from the generator to the aquarium. The choice of tube depends on several factors. The main one is the ability to hold pressure, or even maintain shape under pressure. Since the tube will be under pressure, it should not increase its diameter as it increases. Also, the tube must remain inert, that is, it should not crumble or break from prolonged interaction with carbon dioxide from the inside and water from the outside. These factors significantly narrow the choice of materials and do not allow the use of standard hoses from air systems to blow air through the aquarium.
The next requirement is elasticity. Silicone tubing is a good choice. They are inert to CO2, hold pressure well and have satisfactory flexibility characteristics. There are also special tubes for supplying CO2 gas; if possible, it is better to buy them. But more often, in order to save money, silicone tubes have recently been used for homemade CO2 systems.
It is also important to ensure that in your system, if the gas pressure decreases, water does not flow back through the tube from the aquarium to the generator. The non-return valve will provide you with a restful sleep. When choosing a check valve for a homemade CO2 system, you should pay attention to the following points: Avoid metal valves. The corrosive nature of carbon dioxide and water vapor, which are always present in carbon dioxide, will lead to valve failure. Choose a plastic valve or a valve specifically designed for CO2. Avoid metal components of the CO2 system.
Dissolving gas in water
There are many methods described on how to best dissolve CO2 in aquarium water. This is the critical point of all DIY CO2 systems and the main reason for not using these DIY systems. Since the amount of CO2 produced from a yeast generator is biologically limited, the efficiency of the system is directly dependent on the efficiency of the chosen method of dissolving carbon dioxide.
The easiest way is to use a spray bottle. This is an extremely ineffective method; most of the gas will simply escape into the atmosphere.
You can apply gas near the filter outlet and allow the impeller to capture the gas. This is quite effective for air due to constant pressure, but completely ineffective for CO2 bubbles for several reasons. Firstly, CO2 bubbles cause cavitation in the impeller, creating vibration, noise and can damage the mechanism. Secondly, some impeller components have rubber fittings/gaskets that will be damaged by contact with CO2 and carbonic acid produced.
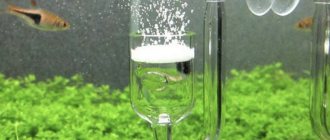
The best but slowest method used is called a CO2 bell. Simply place the vessel in the shape of an inverted hemisphere and let the CO2 fill it from the inside. As the gas-water contact area increases, gas diffusion will increase. If the capacity of the hemisphere is insufficient, or the rate of gas diffusion into water is low, the bell will fill with gas, and all new CO2 bubbles will escape into the atmosphere. This method has been successfully used by aquarists for many years. It is very easy to make. Many people use an inverted, cut-off liter plastic mineral water bottle, Patri cups, or spherical objects for this purpose. I would recommend using objects with a transparent surface so that you can observe the process.
Other methods use diffusers. There are two versions of diffusers. One of them will simply increase the time the bubble is in contact with water. Typically the bubble is launched along a long spiral path.
The next type of diffuser is the glass diffuser. This device increases the area of contact of CO2 with water, significantly reducing the size of bubbles. This is a proven method. The picture on the left shows this type of diffuser in the ADA version, a company created by the legendary Takashi Amano. The gas enters the tube from the back, is directed down to the bottom and is forced through the glass plate of the diffuser. This plate has thousands of pores through which gas is forced, and the bubbles at the exit are very small. These glass plates are the best of their kind, and very expensive because they are handmade in Japan, but there are similar products from other manufacturers. There is only one drawback to this method: these plates are made of tempered glass, they can become clogged and are difficult to clean. This method has no other significant disadvantages.
The disadvantage of the last two methods is their mechanical sophistication, which does not allow making such a device at home. If you have the opportunity to purchase such devices, they may be the best choice.
The next method is to use a boosted reactor. A boost reactor uses a flow of water against a flow of gas. Previous methods were passive. The circulation of water around the reactor in these methods was insignificant. In this method, water tends to meet the gas, the gas dissolves faster in the water and this mixture spreads throughout the entire aquarium.
In general, a boosted reactor consists of a pump and a reactor chamber. As water passes through the reactor chamber, it is constantly mixed with gas, increasing the time the bubbles are in contact with the water before exiting. A similar design can be used for homemade systems.
The image shows an example of a boosted CO2 reactor. It includes a pump with prefilter, sponge and sprayer.
Additional devices
Since the generator contains solids, liquids and gases, it makes sense to consider additional system components to improve the safety and reliability of the system. Valves to relieve excess pressure and devices to prevent poisoning of the aquarium would be very appropriate.
Control and measurement equipment
To effectively saturate water with carbon dioxide, you must know its current level. Having this data, it is very easy to adjust the gas level and bring it back to normal. Among such devices are:
- Dropchecker. This is a container, one part of which is filled with a standard solution for measuring carbonate hardness, and the second with the same substance, but for determining pH. There is always a layer of air between them, which prevents mixing.
- Bubble counter. It is a transparent flask containing water. On both sides it is embedded in a tube through which carbon dioxide flows. The feed rate actually depends on the interval at which neighboring bubbles in the water enter the counter. This is the most obvious example of how you can observe the degree of saturation.
In addition, you can separately measure all the indicators that the drop checker shows and use a table that shows the relationship between the two values and the CO2 concentration. There are also online calculators that do all the calculations automatically. The only thing to consider is the time period for which the calculation is performed.
There is another method, but it is intended for very experienced people who maintain their aquariums in good condition. This is a definition “by eye”, but the specialist takes into account such factors as the illumination of the water column and the rate of bubble release. You also need to know at least approximately the gas concentration in the aquarium at the time of measurement.
Then, from one observation of how quickly bubbles are released, a specialist can tell how much the carbon dioxide content will change over any time period. The danger of such a calculation is that it is impossible to know how much biomass is in the tank, since reproduction is constantly going on in it. As a result, you can greatly miscalculate, especially if you do not know the approximate gas production of each type of flora.
Previous AquariumHow to soften water: different ways to remove the hardness of tap fluid at home Next AquariumRules for caring for an aquarium: how to keep it clean every day, proper weekly cleaning
Blend Guide
Yeast is the main component of your homemade CO2 generator. Regular baker's yeast is sufficient for CO2 generators. But the effectiveness of different varieties of yeast on different nutritional bases may differ.
It is important to understand that yeast, sugar and water mixtures are not an exact science. You must experiment to find the best formulations for your conditions.
Simple mixture formula
For a two-liter bottle:
- 2 cups water
- 2 cups cane sugar
- teaspoon dry yeast
- a cup of not very warm water (ideally around 40 °C)
First, the yeast is dissolved in a cup of warm water, then the whole mixture is mixed in a reactor.
This is the simplest mixture that can work for up to 16 days.
Improved mixture formula
- 1 cup water
- 2 cups sugar
- teaspoon wine yeast
This is a more expensive mixture. Liquid live yeast is used here. There is no need to dissolve them. This yeast is more tolerant of the alcohol level in the mixture and can last 22 days or more.
Notes on mixtures
You should experiment with your mixtures. Everyone's water is different, with its own unique chemistry. This significantly affects the performance of the mixture. Try changing the yeast/sugar/water ratios slightly until you find the one that works the longest.
It has been proven that a yeast mixture will work longer if you reduce the amount of yeast. Less yeast means you'll get less CO2 per minute, but it will be produced longer and more uniformly. More yeast means more CO2 production initially with a gradual decrease in productivity.
The aerobic phase does not produce alcohol. It would be possible to extend this phase, but to do this it would be necessary to introduce air into the generator chamber, blowing through the mixture. In this case, instead of CO2, its mixture with air would begin to flow into the aquarium, and CO2 in this case is much less soluble, which makes the aerobic system meaningless.
Carbon dioxide is the most important condition for the development of aquatic plants
Life on Earth is carbon-based - the main component of most organic substances is carbon compounds. If animals consume everything necessary for the construction of body tissues with food, then most plants synthesize the “building material” on their own.
The process by which plants produce the simplest carbohydrate (glucose) is called photosynthesis. His main reaction:
6CO2 + 6H2O = C6H12O6 + 6O2
Synthesis occurs with the absorption of energy; the formation of each glucose molecule requires about 674 cal. Plants obtain it through absorption by molecules of chlorophyll and other pigments (chromophylls).
Subsequently, the simplest carbohydrates under the action of enzymes are converted into;
- more complex sugars;
- amino acids, proteins, fats, the synthesis of which requires macro- (nitrogen, phosphorus, potassium) and microelements.
This ensures plant growth, development of the root system, accumulation of leaf mass, etc.
Thus, several factors are necessary for the development of a plant:
- Availability of water (irrelevant for aquatic plants, since water is their native habitat).
- The source of carbon, for most, is CO2.
- Energy (read lighting).
- Macro- and microelements.
Aquarium plants practically do not experience problems with light energy and nutrients. For most of them, natural daylight and substances stored in the soil are sufficient. For the more demanding ones, it is easy to organize artificial lighting and fertilization. There are certain problems with the main building element (carbon).
System Performance
A good CO2 system produces enough gas to dissolve in water to a level of 15 ppm (parts per million). Typically, a two-liter bottle will produce enough CO2 to saturate a 120-liter aquarium if the gas is dissolved in a sufficiently efficient manner.
It is important to remember that using a CO2 system in the herbal tank lowers the pH of the aquarium water. Some CO2 dissolved in water forms carbonic acid, which lowers the pH. To prevent acidity surges, a buffer capacity of water should be provided. This leads us to the definition of carbonate hardness of water (kH). A good kH for an herbalist is approximately 6kH. At this level of carbonate hardness, adding CO2 to the aquarium will not lead to a jump in kH that is dangerous for the fish.
You can use the relationship between carbonate hardness and pH to determine the CO2 level in your aquarium. If you have pH and kH tests, you can use the graph to determine the CO2 level in your aquarium water.
Necessary Precautions
When planning to install a system for supplying and monitoring carbon dioxide levels in an aquarium, it is important to understand that the glass tank will now require more attention. It is necessary to regularly monitor the gas level using a special drop checker or tests, as well as monitor the acidity pH level
In addition, you will have to carefully select fertilizers for plants and adjust the lighting system to control the process of photosynthesis.
Lack of control over the influence of light and an excess of CO2 can lead to a global deterioration of the environment inside the aquarium, which in turn will lead to diseases of its inhabitants. The greatest danger is posed by homemade structures for supplying CO2, especially if they are not made according to all the rules. Therefore, it is advisable to purchase purchased products from pet stores.
Creating a design
Generator
Since using two-liter mineral water bottles is not a new idea, the most basic pitfall in this process is already known. This is strengthening the connector for the tube in the lid. Basically, the caps for these bottles are made of polyethylene. It is used because it does not wear out, is resistant to bacterial contamination and is resistant to acids. It also withstands high blood pressure well. In addition to being good for twisting soda, polyethylene stoppers are also well suited for our purposes. However, polyethylene does not stick well.
Basic instructions for using mineral water bottles for a generator recommend drilling a small hole and gluing an air hose in there. This is not quite suitable for our generator. Poor sealing of the lid leads to constant gas leaks and loss of system performance. It would be more correct to use a mechanical seal using a plastic fitting to connect the hose. This is the best engineering solution.
It is designed to be used with the same type of silicone straw used in our CO2 system. It is tightly screwed into the hole in the cap of a two-liter bottle, provides a good mechanical connection between the cap and the hose and allows you to disconnect the hose from the cap when replacing the mixture.
DIY CO2 generator
To make a working gas generator with adjustable supply, a little more materials and labor will be required.
The principle of operation of the installation is to gradually supply citric acid from one vessel to another, where baking soda is located. The acid is mixed with soda, and the CO2 released as a result of the chemical reaction enters the aquarium tank. Let's look at the manufacturing process step by step.
Creation of the device
Take two identical liter plastic bottles. In the lids, you must carefully drill 2 holes with a wood drill for the subsequent installation of tubes (hoses). One tube with a check valve connects container No. 1 to container No. 2.
A tee tube is inserted into the second holes of the caps, one branch of which also has a check valve. Hoses with check valves should be inserted into container No. 2, and a small tap should be installed on the central branch of the tee to regulate the flow.
Necessary reagents
Bottle No. 1 is filled with an aqueous solution of soda (60 g of soda per 100 g of water), and bottle No. 2 is filled with a solution of citric acid (50 g of acid per 100 g of water). Caps with tubes must be screwed tightly onto the bottles.
All joints and openings must be securely sealed with resin or silicone to prevent gas leakage. The ends of the first hose must be lowered into the solutions, and the left and right tubes of the tee must be installed above the level of the solutions - CO2 will pass through them.
Beginning of work
To start the gas generation process, you need to press on bottle No. 2 (with citric acid). The acid enters the soda solution through the first hose, and a reaction occurs, releasing carbon dioxide. The non-return valve of the pipe does not allow the soda solution under pressure to enter container No. 2.
The released gas passes in two directions:
- into a bottle with citric acid, creating pressure for continuous generation,
- into the central pipe of the tee, through which CO2 enters the aquarium.
Using the tap you can regulate the gas flow. If instead of a homemade tee you use hoses from a medical dropper, then an additional gas bubble counter will appear, which is very convenient for creating an accurate concentration of CO2 in aquarium water.
Some owners of ornamental fish use an adapter to connect the outlet hose to the outlet of the internal filter. In this case, carbon dioxide diffuses, and it is better absorbed by plants.
Bleeding excess pressure in the system
Yeast generators have a common disadvantage: the tubes become clogged with clumps of stuck together yeast. Sometimes yeast gets into the tube and pressure begins to dangerously build up there. Usually either the cap comes off or the tube breaks and the bottle with the generator falls. What happens is usually accompanied by a smell; a sticky yeast solution is smeared on the walls around at a great distance.
There is a simple solution - a 'high pressure relief valve'. Essentially, these are special plugs that should fly out at a certain excess pressure.
It consists of a nylon tee with a soft rubber or plastic cap. The part of the E-shaped connector that is located under the cap must be sanded until smooth. Careful cleaning is necessary in order to avoid gas leakage during normal operation of the system and to ensure that the cap can fly off when the pressure in the system increases.
This is all calculated by trial and error. To simulate high pressure, you can pinch the hose after the tee, shake the reactor and see at what pressure the cap comes off. If the cap does not come off or comes off very early, you need to take a new tee and make a new valve. Such adjustment of equipment requires time, perseverance and accuracy, but this valve will save you from big troubles in the future. The valve must be located after the gas separator.
Fermentation generator
Drexel bottle
The oldest method of producing carbon dioxide in the aquarium hobby is the fermentation method, based on the reaction of sugar and yeast. The principle is known and understood by everyone: yeast in an aqueous solution eats sugar, turning it into alcohol and carbon dioxide. If the process is carried out in a sealed container, then the resulting CO2 can be fed into the aquarium through a tube. The advantages of the yeast method are clear - “cheap and cheerful”: sugar and yeast cost pennies, everyone can knead the brew, and, it would seem, there are no costs. But it's not that simple!
Firstly, yeast eats sugar quite quickly, and CO2 is released normally only in the first couple of days. Then the solution runs out of sugar, and the yeast itself is poisoned by the resulting alcohol and dies. In order to slow down the process, aquarists have come up with many different tricks: from the banal “mix, but do not stir” (so that the sugar dissolves gradually) to the addition of soda and various thickeners (gelatin, agar, starch), which make it difficult for yeast cells to get to the coveted sugar . But even the most advanced fermentation device “bubbles” CO2 for no more than two or three weeks, after which it still needs to be disassembled, drained of the foul-smelling contents and refilled.
Secondly, during the period of intense fermentation, organic foam is formed in the reactor, which can, once it gets into the aquarium, cause a “biochemical catastrophe” in it, so carbon dioxide from such a device must be passed through a “Drexel bottle” so that foam, drops, etc. stayed in it and did not reach the aquarium. It is best to pour a little baking soda solution into the bottom of such a bottle so that CO2 gurgles through it, clearing not only foam, but also alcohol vapor, acetic and other acids formed during fermentation.
Thirdly, if you skip the end of fermentation, the excess gas pressure in the reactor may be replaced by insufficient pressure, and instead of supplying gas to the aquarium, water from the aquarium may begin to flow into the reactor. This means that a check valve is needed to shut off the tube in such a situation.
Finally, fourthly, the rate of gas release during fermentation is very unstable, depending on the ambient temperature, the type and quality of yeast and many other factors, and it will have to be constantly monitored using a bubble counter, at the beginning of the process limiting the flow of gas into the aquarium, and at the end - opening to the fullest.
To be fair, it should be said that since there are quite a few fans of the “fermentation” method among aquarists, which is considered environmentally friendly and natural, some well-known manufacturers of aquarium equipment, following their beliefs, produce industrial kits for producing CO2 by fermentation. As a rule, these kits include a replaceable bottle with “biogel” (a solution of sugar and a special thickener) and special “slow” yeast, as well as all the necessary accessories. The contents of the bottle usually work for about a month, after which you will have to buy a new bottle.
An example of such a set:
- CO2 system for aquarium Dennerle BIO 120
- CO2 system for aquarium Dennerle BIO 60
- CO2 system Dennerle Einweg 160 Primus
- CO2 system JBL ProFlora bio80 eco 2 with refillable cylinder for aquariums from 12 to 80 l
- CO2 system JBL ProFlora bio80 eco 2 with refillable cylinder and mini CO2 reactor for aquariums from 12 to 80 l
- CO2 supply unit Dennerle Nano Bio
Replacement bottle:
Spare Dennerle gel bottle
In general, the simplicity and cheapness of the “mash” turns out to be apparent, but it requires constant care. What other options are there?
Preventing mash from entering the aquarium
The next device to use to prevent yeast from entering your aquarium is a mechanical gas separator. This is a water bottle with two fittings. The idea is to separate the gas from its solid or liquid components using gravity.
The diagram shows an example of a separator made from a 0.5 liter mineral water bottle. This bottle is attached with nylon ties to the two liter bottle of the generator. Two fittings are built into the plug. A tube long to the bottom of the bottle is attached to one fitting inside the bottle. This is the entrance to the separator.
The bottle is filled two-thirds with water. The concept of the separator is as follows: a mixture of gas, liquids and solid particles falls through a long inlet tube to the bottom of a bottle filled with water. Liquids and solids remain in the water, and gas rises through the water and goes towards the reactor. For best efficiency, the separator should be placed as close to the generator as possible so that the gas lines between the two vessels do not become clogged and stop your system.
Using these two devices will make your homemade system safe, reliable and highly efficient, and you will be free from problems associated with clogged gas pipes, this common problem with all homemade CO2 generation systems.
How to make CO2 for an aquarium from citric acid and soda
The CO2 generation system based on citric acid and soda is one of the most common homemade ones. The action is based on the process of gas release during a chemical reaction.
To assemble a simple system you need:
- 2 plastic bottles (from 0.5 l);
- covers with two holes for tubes in each;
- aquarium silicone tubes;
- adapter valve with shut-off valve;
- bubble counter (purchased or homemade);
- diffuser (you can use available materials, for example, a sprig of rowan);
- water (approximately 250-300 ml for each bottle);
- soda (2 tablespoons);
- citric acid (2 tablespoons).
Plants such as coryfolia, Pogostemon Helfera, Pogostemon erectus, Lomariopsis, Hemianthus Cuba, Echinodorus, Pogostemon octopus, Sagittaria, Marsilia, Java moss, Aquascape, Cryptocoryne and Hornwort in the aquarium play an important role in the life of its inhabitants.
- Soda is poured into one bottle, citric acid into the second.
- The above amount of water is poured into each of them.
- A tube is inserted into the cap of the bottle with citric acid, which will reach the bottom of the bottle. On the other side is a tube connecting to the cap of a soda bottle.
- The bottles are tightly closed, the contents are shaken to dissolve the components in the water.
- At the cap of the acid bottle, a tube is installed at the outlet hole, which leads to a bubble counter.
- A bubble counter is fixed in the aquarium and a diffuser is also installed through a piece of tube.
- By pressing the bottle with citric acid, the liquid is sent through the tube into the bottle with soda.
- After the reaction starts in the second bottle, the gas will return through the tube to the first and go to the outlet tube.
- The shut-off valve opens and gas flows through the system into the water.
- The CO2 supply level is adjusted using a bubble counter.
Video: recipe for citric acid and soda for a CO2 reactor The above design is the simplest; if possible, additional components can be installed in it, such as a gearbox, timer, etc. To clean the aquarium, they also use filters, Sidex anti-algae agent, Malachite Green conditioner, Methylene Blue antiseptic and natural zeolite stone.
You should ensure that all connections are tight: use gaskets and silicone glue to eliminate leaks.
No matter how CO2 is supplied to the aquarium, it is always worth remembering that too much of it is just as bad as too little
Therefore, any of the methods requires configuration, analysis of its operation and compliance with precautions
Alternative settings
There are also ways to supply CO2 from special gas cylinders or using fire extinguishers. Some craftsmen implement such methods.
However, all actions with pressure cylinders are considered a dangerous type of work, and it is not recommended to carry them out at home without certain qualifications.
Feeding aquatic flora with carbon dioxide is the key to their normal growth and life. To ensure this process at home, a minimum of available material, a little perseverance and very small financial costs are enough.
Video on the topic: creating a CO2 reactor for an aquarium with your own hands.