Home › Aquarium equipment ›
( 2 ratings, average: 5.00 out of 5)
How to properly install a new aquarium? Where to start? Do you have all the necessary equipment? Answers to all questions can be found in this article.
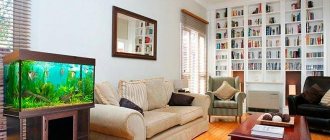
Before you start installing an aquarium, it is important to choose the right place to place it. You need a flat surface that can support the weight of an aquarium filled with water and decorations. A crooked floor can cause the aquarium glass to tilt and become damaged.
A flat, hard and resilient surface is ideal. Large and heavy aquariums require special cabinets to accommodate them. For small (up to 130 liters) aquariums, any durable furniture with a flat surface will do.
The selected location must have sockets for connecting the necessary equipment: lighting, filters, heaters. If there is no access to power, it should be possible to install and hide portable sockets. The fewer wires connected to the aquarium, the better.
Water and electricity do not mix well, so sockets must be reliably protected from water getting into them.
Below is a list of equipment needed to install and run an aquarium. You may not have any of the items listed yet.
Equipment required for installation
| Equipment | Recommendations |
| Aquarium | Beginners are recommended to start with an aquarium with a water volume of 70 to 120 liters. The larger the aquarium, the more stable it is - this is the main rule. |
| Priming | The soil must be shallow enough and well drained to stimulate the growth of nitrifying bacteria. Coarse sand, quartz, and rounded river pebbles are excellent choices. It is necessary to exclude gravel consisting of calcium or limestone. |
| Aquarium filter | The aquarium filter should be designed to pump 3-5 volumes of water in the aquarium within an hour. In stores this is often indicated: a filter for an aquarium 30 liters, 50, 100 and so on. What type of filter it will be (internal, external, waterfall, etc.) is not so important, although ideally this equipment should perform all types of filtration (mechanical, biological, chemical). The reliability of this device is important. First study the characteristics of the filters and read the reviews. |
| Filter materials for filter | For the first time, there should be a supply of filter materials or filter cartridges. It is these materials that will keep the water in the aquarium clean and free of debris, and will most likely need to be replaced in the early stages of starting the aquarium. |
| Water heater for aquarium | A heater is important, especially when keeping many types of tropical fish. Its power is also indicated by the volume of the aquarium. When choosing this equipment, it is very important to choose a high-quality and reliable device with thermoregulation. |
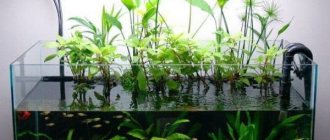
| Scenery | Live plants, stones, driftwood, artificial plants and other decorations. Artificial decorations should not affect the water by releasing harmful impurities. Stones, like soil, should not affect water parameters. The driftwood must be prepared in advance. |
| Water conditioner or dechlorinator | Conditioners with dechlorinating properties are recommended to be used both when starting up an aquarium and during its further maintenance. This drug neutralizes chlorine in water, turning it into low-toxic substances. |
| Water tests | Testing the water is especially important during the first time after installation and launch. This will help to notice the appearance of toxic elements in the water in the early stages and will save the inhabitants of the aquarium. You need to choose high-quality tests. First of all, they check the pH of the water and the content of ammonia, nitrites and nitrates. |
| Fish food | Choose quality fish food. Thanks to them, the fish will be healthy, brightly colored and active. It's best to purchase several options of dry cereal and frozen foods to ensure a varied diet. But you shouldn’t buy too much food - it quickly loses its value, the products need to be renewed every 3-6 months. |
| Siphon for aquarium | This is the most important equipment for maintaining an aquarium. Using a siphon, you not only drain water from the aquarium, but also “vacuum” the soil, removing feces, food debris and other debris. This will help reduce the content of nitrates and phosphates in the water. |
| Fish net | A net is needed not only for catching and moving fish, but also for removing food residues, debris, and dead plant particles from the aquarium. |
| Windscreen wipers | Few aquarists manage to cope with the regular growth of algae on the walls of the aquarium. And if you don’t fight this scourge regularly, then soon you won’t be able to see what’s in the aquarium behind the algae-covered glass. |
| 10 liter bucket | A new and clean bucket that has not been filled with detergents or any chemicals. |
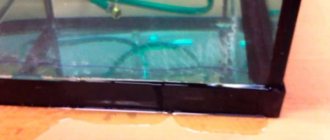
How to choose glass
In addition to glue, the user must choose quality glass. What should it be like?
- providing a worthwhile review;
- resistance to water pressure;
Reference! It should be silicate glass, not organic.
- when choosing glass, you should pay attention that it is silicate and display glass; window glass is too fragile and is not suitable for making an aquarium;
- glass type must be M1;
- Also, you cannot use used materials with defects and chips.
With the right choice of glass, the aquarium will last a really long time, and the owners will not have to worry about the safety of the fish.
Installing an aquarium step by step
- Rinse the soil
Once the location for the aquarium has been chosen, it is time to install it. The prepared soil for the aquarium should be poured into a bucket. Even new store-bought soil needs to be washed to remove debris and dust. Many beginners do not know about this and do not know how to wash it correctly. If the soil is not washed, the water in a new aquarium may become cloudy for several weeks.
So, the soil is poured into a new, clean bucket and a stream of warm water is directed onto it from a hose or from a tap. Once the bucket is full of water, wash the gravel by mixing it with your hands in a circular motion. So the soil is washed for several minutes. Then the dirty water is drained, holding the soil in a bucket. This procedure is repeated 4-5 times until the drained water becomes noticeably clearer. If there is more soil than one bucket can hold, it is washed in several parts.
Do not use detergents or cleaning agents to wash the soil.
Some substrates make the water cloudy even after several washes. There is no need to worry about this - if it is good muddy gravel, the turbidity from it will settle naturally in the aquarium over time.
- Place soil in the aquarium
The washed gravel is carefully laid out on the bottom of the aquarium - this will help avoid damage to the bottom glass of the aquarium and the appearance of small scratches. You can use a small scoop or small bucket for filling.
The filled soil is leveled by hand, creating a flat surface. The thickness of the soil in the aquarium should be from 1 cm to 10 cm, depending on the type of aquarium. It is recommended to form a slight slope from the back wall to the front - this creates a good perspective and a feeling of greater depth in the aquarium. But you don't have to follow this recommendation.
- Fill the aquarium with water
Tap water is poured into a large aquarium from a tap using a hose. Place a saucer or plate at the bottom so that the stream of water does not erode the soil, and direct the water towards it. If the aquarium is small, you can add water using a bucket.
Even when starting an aquarium, it is better to use dechlorinating water solutions. Although there are no fish yet, chlorine and chloramine can build up in the water over time. Use high quality conditioners such as API, Seachem Prime, Tetra Aqua Safe and Kent Detox - these are the most popular and proven options that do the job perfectly.
When starting an aquarium, you can add conditioner directly to the aquarium, or first dilute it in a bucket of water. The required quantity is indicated in the instructions.
- Planting
If the aquarium contains live plants, then usually the container is filled with water 50%, and then planting begins. If ground cover plants are planted, then pour water to a level of up to 10 cm from the ground and begin planting. Make sure the water is warm enough for the plants first.
Plants are placed in their places. Some need to be fixed on driftwood or stones, trellises (ferns, mosses, bucephalandra), others are immersed in the ground so that only a leaf rosette remains above the surface. Ground cover plants are placed evenly in bunches over the entire surface of the soil.
Plants floating in water can be placed in the aquarium after it is 100% filled with water.
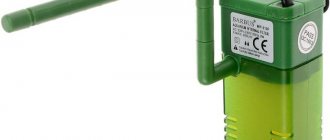
- Filter and decorations
All decorative items (stones, jewelry) should also be rinsed with clean water under the tap - if they were on display in a store, they may be covered with a layer of dust and debris.
Filter media for canister filters are also washed and placed back into the filter. Make sure to close the filter cap tightly to avoid leakage.
The internal filter is mounted on the wall of the aquarium. If there is spongy material in it, it will take time to get wet.
Some filters need to be filled with filter material yourself.
In all types of filters at this stage the water flow rate is set to maximum.
Turn on the filter - it will work constantly, around the clock without turning off.
- Water heater
In a small aquarium you can use one water heater; in larger aquariums it is recommended to install two. A conventional heater with a thermostat can be easily mounted on the wall of the aquarium. It is believed that heaters with higher power are better - they have less load on the heater and better efficiency.
The heater is attached to the glass of the aquarium where the best water movement is, usually near the installed filter. Set the heater control to between 23 and 27 degrees Celsius. Turn on the heater. If the indicator light is orange, it means the device is active and working. The heater is very useful during the startup phase.
Important! The aquarium water heater can only be turned on when it is immersed in water!
Place the thermometer as far as possible from the heater and carefully monitor the water temperature for the first few days.
- Lighting
Choose the right lighting fixtures for your aquarium. The lighting device is placed above a container of water. During the startup phase, the lighting is turned on for no more than 8 hours per day.
At this point, the installation of the aquarium is completed and the process of creating and growing beneficial bacteria for the normal life of fish and other animals has begun.
Storage tank
The first thing a beginner who decides to get into aquarium farming needs is to buy a tank. There is no need to immediately start with large containers of 300-400 liters. It will be easier for beginners to care for small reservoirs with a volume of 20-100 liters.
It is better to buy a tank made of glass. Glass does not distort reality, does not scratch, and is easy to care for.
The shape of the tank depends on the inhabitants. The most popular are rectangular or square containers. Beginner aquarists should avoid round containers: they are more difficult to care for, and the fish do not feel comfortable enough in it.
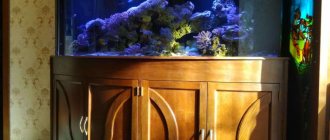
After the purchase, you need to think about the location of the future reservoir. It should not be exposed to direct sunlight. Because of this, the water will constantly bloom, the temperature rises, and algae appear. It is better to install the tank on a flat, durable surface in a bright corner. Sunlight can fall on a body of water, but indirectly. Pet stores have special cabinets for ponds. They look beautiful and are easy to install even in the corner of the room.
Models built into the wall
Devices that embody a picture on the wall are an unusual and very attractive design structure. To install them, a reliable steel support is mounted into the partition, on which a heavy glass cube filled with water is mounted.
Such a device looks very interesting when decorated in a pop art style. Hang a bright piece of art, poster or painting next to it. You will be amazed by the results! Surrounded by such modern art elements, the aquarium unit will look aesthetically pleasing and impressive.
In most cases, they are not installed in solid partitions, but walls between different rooms and spaces. Another unique option for installing an aquarium would be to use it as an independent dividing element. In this case, it will not only refresh the decoration, but also fill the room with a soft and muted magnetic glow.
Bright living room design in pop art style
The protruding cantilever block looks great against a brick wall
Original stylization of the television display
Successful decoration of the mantelpiece - elegant and impressive
Filter
Everyone understands that this device must certainly be in the aquarium, because without it it will not be possible to maintain cleanliness and order. There are four types of filters:
- bottom;
- external;
- interior;
- canister
The bottom apparatus is placed under the soil, which is used as a filter element.
At the same time, the soil does not sour, which is important. But the complexity of installation and further maintenance is its big drawback. It is not particularly suitable for a home aquarium. An external filter, as you already understood, is installed outside the water. And this is very convenient, since there will be no problem taking it out to wash it. Check out the top 10 best aquarium plants.
Such elements allow you to clean your water with three types of filtration. The most budget option is an internal filter. True, it is relatively small, so you will have to place the filter media in it often. It is this option that is most often found in home aquariums. A canister filter is essentially another type of external filter. Only in comparison with the latter, its filter media are located vertically. You can place it directly in the aquarium cabinet or on the floor. Includes all of the above methods of water filtration. Which filter to choose is a matter of taste. Go with what is more convenient for you. And, of course, pay attention to the quality of the device.