Some aquarists mistakenly believe that soil for plants only plays the role of decoration. But in fact it is extremely important, and not only for the herbalist, but also for the fish. Nutrient soil has a significant impact on the entire aquarium ecosystem. You can make it yourself or purchase it in a store. In order for the soil to ideally suit the aquarium, it is important to carefully study all the recommendations for use and selection of a nutrient substrate indicated in the article.
Purpose of nutrient soils
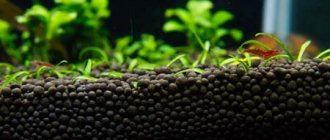
Nutrient soils are used in aquariums that contain plants with root systems. This type of foundation ensures their supply with useful substances and supports their vital functions. This soil also has a number of other properties: • Changes water parameters (reduces its hardness and increases acidity), makes them more stable; • Serves as a breeding ground for beneficial bacteria, which clean the aquarium of ammonia, nitrites and phosphates; • Is a place where some fish store eggs; • Contains a large amount of iron and calcium, which inhibits the growth of blackbeard and other algae. All these properties can clearly be attributed to the advantages of nutritious soils. However, even they have drawbacks. The most important: limited time of use (1 - 2 years). The fact is that bacteria living in the soil and the plants themselves slowly eat up the soil. This happens unnoticed by the eye, but after a year its amount decreases significantly. Also, to some extent, the quality of the soil deteriorates over time, and its beneficial properties decrease. Therefore, a reasonable solution would be to replace 1/3 of its volume once a year.
What is it needed for?
It is necessary for plants that have a root system.
For them it is like some kind of medicine that the doctor prescribed. Iron-containing soil is very beneficial for red leaves. Also various other plants need micro and macro elements.
Nutritious soil reduces water hardness and also increases its acidity . In addition, bacteria and protozoa actively grow in such soils. Young shrimp like to feed on this pleasant set.
And fish also really need it, because... there they spawn and look for something useful.
The difference between nutrient soil and substrate
There are two ways to supply plants with useful substances: through nutrient soil and through a nutrient substrate. These species are the basis for an aquarium, performing the same functions, but differing from each other in appearance. 1. The nutrient substrate is used as one of the components of the general soil. It is placed on the bottom of the aquarium in a small layer (up to 5 cm), and the main soil is poured on top of it. 2. Nutrient soil is complete and whole soil. It already consists of beneficial bacteria and substances.
How to prepare glass
The back glass of the aquarium must be thoroughly cleaned of dirt. Even the slightest speck cannot be removed later, but it can worsen the quality of the film’s adhesion to the glass.
The wall is cleaned with glass cleaner. It is best to wipe the glass surface with a cloth that does not leave marks or microfibers, such as microfiber.
If the aquarium is already in use, preparation is carried out as follows:
- the fish are transplanted into a separate container;
- the water is drained from the aquarium, all decorative elements and soil are removed;
- the glass container is washed in the usual way;
- the outer side of the wall is wiped with window cleaner or any detergent that gently removes dust, dirt, and greasy stains);
- The surface is wiped well with a paper towel, then you can immediately begin gluing.
Calculation of the required amount of base for an aquarium
There is no universal amount of soil (in kg) that will suit all aquariums. It is calculated taking into account the overall dimensions of the reservoir and plant species. So, for flora with a large and developed root system, on average, a layer thickness of 5-7 cm will be required, and for a small one - 2-3 cm. To facilitate calculations and purchase a sufficient amount of soil, it is recommended to use the following formula: Aquarium length (cm) * width aquarium (cm) * required layer of soil (cm) /1000 = required volume of soil (kg)
How to glue a background to an aquarium with glycerin
There are several ways to attach film to the back wall at home. Experience shows that ordinary medical glycerin copes best with the task. It is absolutely colorless and non-toxic. Unlike soap solution, it does not leave annoying streaks.
Required material and tools
To glue the film to the aquarium, you need to prepare the following material and tools:
- a bottle of glycerin;
- background film;
- 5-10 napkins;
- stationery knife;
- silicone spatula.
On a note! The spatula successfully replaces an out-of-use plastic card. If you have a hard piece of cardboard at home, you can use that.
Stages of work
Before gluing the background to the back wall of the aquarium, you need to free it from aquatic inhabitants, drain the water, wash, clean and dry. The size of the film must be adjusted to the dimensions of the rear window minus 3-5 mm. If the edges of the film protrude, this will affect not only the aesthetics, the film will quickly peel off. The excess must be cut off immediately, before the film is glued. It will not be possible to do this exactly on the spot.
Making your own nutritional support
Today there are a large number of combinations that can serve as a useful nutritional support. Some of them are intended for a narrow range of plants, and some are more universal. To make a nutrient substrate, the following are used:
- Peat. It is a good source of micro and macroelements, as well as beneficial acids. Capable of creating a slightly acidic environment, which allows plants to more easily absorb most elements. It is better to choose lowland or high-moor peat rather than neutral. But you can also buy compressed granular ones.
- Activated charcoal or coconut charcoal. It is used as a strong adsorbent to neutralize the breakdown of organic substances and is used to purify water from many harmful elements. This substance also contains a large amount of carbon.
- Vermicompost. It is a fertilizer obtained by processing organic residues in the soil. It is the most valuable and main source of micro- and macroelements. When purchasing it, it is important to pay attention to the absence of various impurities in the composition, which are additional fertilizers. Vermicompost must be clean. It is recommended to purchase a concentration of 30%. But for an aquarium with a dense population of plants, 50% is suitable.
- Sorbent. Granulated vermiculite is often used for this purpose. It allows nutrients to stay in the soil longer.
- Zeolite. Regulates the salt content in the soil.
- Clay. Gray or white varieties would be a good option for an aquarium. It is not recommended to purchase red, as it contains a high concentration of iron. Clay should be taken cosmetic, not natural, because in most cases it is the source of many infections.
- Pebbles, basalt, quartz, granite chips. They are a neutral layer that separates the substrate from the main aquarium environment.
- Fallen leaves or coconut fiber. Serve as sources of organic elements. It is preferable to choose maple leaves. It is strictly not recommended to use aspen or oak leaves because they release large amounts of tannins into the water.
Rules for layering. Option 1:
- Vermicompost.
- Peat.
- Activated carbon.
- Sorbent.
- Zeolite.
- Organic (leaves or coconut fiber).
- Clay.
- Pebbles (or any other neutral layer).
There is also another simplified, but no less common, option for compiling a nutrient substrate in layers:
- Clay mixed with vermicompost.
- Peat.
- Activated carbon.
- Sorbent.
- Organic elements.
- Pebbles (or any other neutral gravel).
There are a large number of combinations of all layers, so each aquarist can create his own version of the nutrient substrate based on his own preferences. But it is important to remember that nutritious soil must contain a source of nutrients, organic matter, activated carbon and sorbent.
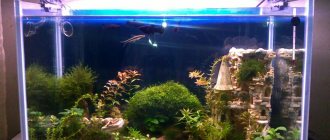
Why do you need a background?
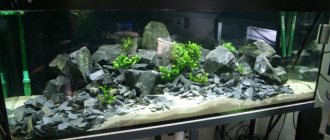
The background for the aquarium will hide the unsightly wall, all kinds of wires and pieces of equipment from view. The background will create the impression of deeper space in the body of water. It will remove the reflections of light, give it a natural look, the fish will feel more comfortable, almost like in their natural environment. This is especially true for home ponds that are not located near the wall.
The background for the aquarium is a beautiful decorative element, which is also inexpensive and available in almost every pet store. This simple element can transform a piece of the aquatic world, especially if it is chosen correctly and looks harmonious with the rest of the aquarium environment. The background serves a decorative function.
Rules for using nutrient soil
To ensure that the soil does not lose its properties, does not harm the aquarium ecosystem and lasts as long as possible, you need to follow a number of important rules:
- You can't siphon. This procedure is useless, since bacteria living in the soil themselves process all the accumulated sludge.
- Cannot be washed.
- You can't overdry it. Drying out the soil leads to the disappearance of most beneficial microorganisms in it. But the main problem is that in this case, the soil granules begin to lose all their properties and disintegrate.
- Do not allow a powerful stream of water to enter the ground. This will lead to the formation of strong turbidity in the aquarium.
- Use only in an aquarium with a large number of plants. Otherwise, not all substances from the soil will be absorbed by the flora, which will lead to an excess of microelements, which will provoke the appearance of algae.
- Do not use at low or no hardness. Since most types of nutrient soil reduce the hardness of water in the aquarium, the use of such soil in a reservoir with a previously low hardness will lead to a drop in acidity to a critical minimum. Such a sudden change in the state of the environment will negatively affect all inhabitants of the aquarium.
It is not for nothing that nutritious soil has earned wide recognition among aquarists. If chosen and used correctly, it will ensure a healthy and long life not only for plants and herbalists, but also for other inhabitants of the aquarium.
Advantages of background film
There are several background options that can be mounted inside or outside the aquarium. Sometimes these two types are combined with each other. The background that is installed inside has some limitations. It should be chemically neutral to the aquatic environment, its reliefs should not take up the lion's share of space from the fish.
The most affordable way for beginner aquarists is a background film. It belongs to the external variety of aquarium backgrounds and does not come into contact with water. Its advantages are as follows:
- Low price, which does not in any way affect the stunning effect of this decor option.
- A huge selection of pictures that can be found in the store.
- Installation is quick and easy, without assistants, without the use of special tools.
- The film on the back wall saves space in a small aquarium, which cannot be cluttered with decor and plants.
- This interior solution is easy to change from time to time. In this way, the water landscape will also change.
- The film material glued on the reverse side does not come into contact with the aquatic environment. Does not harm fish and is a durable material.
It is easier to glue a film background onto a small aquarium. Even if there are a few unsmoothed bubbles left, they will not be noticeable. When you decide to use this type of decor for large containers, you need to be especially careful. Otherwise, all efforts to arrange the internal space of the home for aquatic inhabitants can be reduced to zero.
The film can be sold in three versions:
- With an adhesive solution applied on the reverse side under a protective layer. At first glance, it seems that gluing self-adhesive film is the easiest way. However, not everyone can do this smoothly and accurately the first time.
- Regular film, with a smooth, clean surface on both sides. To attach it to the back wall of a glass tank, you must use adhesive solutions or attach it with tape.
- A film with a paper base on the reverse side. Experienced aquarists advise to immediately separate the paper, otherwise it will not be possible to align the background with the glass surface.
Most often you have to deal with ordinary film, which is glued using means that ensure adhesion to glass.
Cover functions
Closing the aquarium is necessary, and in some cases vital.
Functions of aquarium cover:
- Slowing down evaporation processes. A sharp decrease in the volume of water (especially in hot weather) contributes to the thickening of the liquid - an increase in the content of organic substances. This is explained by the composition of water - it has the form of a solution, which becomes more concentrated as it evaporates.
- Protection from dust, dirt, falling objects.
- Effectively maintaining the correct temperature.
- Protecting fish from jumping out, threatening death from falling or suffocation without water.
- Fastening for devices - a lamp is especially often mounted in the upper part. It remains hidden from view, which improves the overall appearance and provides soft diffused light, which is most favorable for the inhabitants of the aquarium.
Therefore, it is imperative to close the tank. You need to use only solid materials - mesh will not work.
For which fish is it required?
The risk group includes jumping fish and species that breathe atmospheric air - they often jump to the surface and can accidentally fall out if the water level in the container is not set correctly.
Types of fish that can be harmed in an open aquarium:
- Malpulutta Kretsena;
- black macropod;
- zebrafish;
- barbs;
- high-finned (flag) platie;
- Neon Aplocheilichthys;
- tetra-congo;
- neons;
- betta fish (Siamese betta);
- mechensotsy.
Fish may try to escape from the tank not only because of natural instincts (jumping high above the surface). There are many reasons why fish jump out. The most common include stress, poor water quality, trying to escape a predatory neighbor, improper lighting, or running the filter or aerator too hard.
What types of background are there?
The most common types of back wall decoration are film and relief.
Film
The most convenient option for beginner aquarists, it has a number of advantages:
- The cheapest decor option.
- Wide variety of pictures. If you don’t find a suitable image in the store, you can print the one you like from the Internet.
- Easy installation and quick replacement.
- Suitable for small aquariums.
The main subtlety in using such a backdrop is to carefully stick the film onto the aquarium so that everything is smooth, without wrinkles, bubbles and protruding corners. A film backdrop is not suitable for large aquariums, where it will look unsightly. Moreover, gluing film to a large aquarium is much more difficult.
Raised
Embossed backgrounds are visually more attractive and are usually attached to the back wall of the aquarium. A volumetric background for an aquarium looks more impressive. However, it has a number of disadvantages, or better yet, features:
- Not suitable for non-standard aquarium sizes.
- It is necessary to regularly clean the algae that grows on it.
- Quite a high cost.
- Difficult to replace.
- Slightly reduces the amount of usable space.
The relief background is attached to the back wall of the aquarium from the inside using special silicone glue, which is included in the kit. This backdrop can also be secured by pressing it with soil. The first method is preferable because it is more reliable.
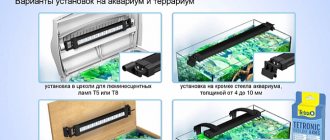
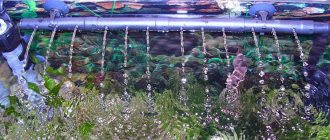
How to make a backlight
To illuminate aquariums, it is recommended to use LEDs or fluorescent lamps. They can be combined to create soft natural light. If you use diffuse LEDs, you can create a muted moonlight effect.
The lamps must be located at least six centimeters above the water level.
The level of light depends greatly on the inhabitants of the tank, especially plants. For example, two lamps are enough for Riccia and its cichlid neighbors. Light-loving species require a minimum of four lamps.
You can determine the lighting temperature yourself by adjusting the number and type of lamps. If you don’t want to experiment, you can buy ready-made lamps of a certain spectrum and light temperature.
How to attach a lamp
When working with the cover, it is recommended to attach the ballast and lamp mounts immediately after assembling the product. All components must be glued to the ceiling, then each lamp must be connected to its ballast. The LEDs are installed in mounts and attached using tape or hot-melt adhesive.
The LEDs must be connected according to the diagram, output in a single line through the power supply. The line voltage is 12 Volts. After installation, you need to connect the system to the control unit or switch, making a long cord - “with reserve”. Under no circumstances should the wires be subjected to strong tension.
Selecting a finished lid
Most popular in Russia. The range of products is very wide, but there are no models of complex shapes. The color range of components is rich; you can even purchase lids with imitation of natural wood (alder, oak, cherry, walnut and other species). Prices start from 1900 rubles.
Panoramic covers are manufactured by the Aquael brand. The price for the cheapest lid size 50×30 already starts at 2300 rubles. Naturally, in this case, a homemade aquarium lid will cost several times less.
Criteria
To choose a reliable aquarium accessory, you need to evaluate a number of parameters.
The most important of them:
- ergonomics;
- effectiveness of protection;
- ease of use;
- the volume at the top to accommodate all the equipment;
- appearance;
- price.
Having comprehensively assessed all these criteria, you definitely won’t go wrong with your choice.
Manufacturing process
First you need to measure the dimensions of the tank to determine the size of the product. If you have the makings of an engineer, you can even make a simple drawing. It is necessary to consider the convenience of the design, the possibility of its easy removal for cleaning the fish house and installing new decorations.
Required Tools
You need to prepare everything you need in advance so as not to be distracted while working.
You will need:
- For notes – pencil or marker, ruler, square.
- Cutting tools – knife, scissors, jigsaw, glass cutter, cutter.
- Screwdriver or drill.
- Substances for adhesion - glue, a sealant gun, the sealant itself, solder for glass.
It is equally important to find a perfectly flat surface to work on (this is especially true for plexiglass).
Selection of materials
From the above materials it is easy to choose the most suitable one.
Important selection criteria:
- tank size;
- quantity of equipment;
- the height of the lid - for some fish it must be significant in order to maintain a large layer of air;
- work skill and ease of manufacture;
- availability and price of material;
- ease of use;
- aesthetics.
Most experienced aquarists prefer to use PVC lids, wall panels, laminate, varnished plywood and chipboard for the manufacturing process.
For a panoramic aquarium
The main difficulty in this case is the curved front wall. There are two options to get around this problem - make a curved frame or a frame with convex platforms. Let's consider production in both cases.
Product with a bent frame - step-by-step instructions:
- The material you can use is plywood, lining, plastic or laminate.
- It is necessary to cut out the main parts: the top convex, back and sides.
- Bend the front part by heating the plastic or plexiglass with a hairdryer. For wood, you need to make transverse cuts with a grinder, with a depth of at least half the thickness of the workpiece. The greater the curvature, the smaller the gaps between cuts should be.
- Glue the strip and sides to the lid, having previously degreased it. Secure the corners and support bolts at a distance of three centimeters above the bottom edge.
- Make a hatch for feeding, process the edges.
- Cover the black material with foil or other reflective covering.
- Install lamps, aerator and other equipment.
The manufacturing process is not simple and is unlikely to be suitable for a novice aquarist. Let's consider the following, easier option.
Cover with platforms:
- Any material can be used.
- Cut out rectangular blanks, which will serve as the base.
- Secure the sides with glue or screws.
- Attach pre-cut platforms of the desired curvature.
- Make holes for feeding and wires.
- Mark and hang lamps and equipment.
- Paint or tape the lid.
Remember that you need to connect the equipment only when the product is completely ready.
For round tank
In this case, there are also two options: double-layer lids and with a side.
Rules for making a two-layer variation:
- Any materials can be used.
- Measure the hole of the flask, cut out two circles - the first is the same diameter, the second is 3-4 centimeters larger.
- Glue both parts, attach the handle, cut holes for the ventilation wires and wires.
The second option will require skill in working with plastic. Sometimes you can't do without an assistant.
Lid with side - step-by-step instructions:
- Cut a circle 1-2 centimeters larger than the aquarium flask, cut holes in it and attach a handle.
- Make a rectangular strip equal to the circumference. The most difficult thing in this case is to bend the material, giving it a perfectly round shape.
- Glue all the received parts, decorate the lid and install the equipment.
The first option is easier to manufacture, the second is more aesthetically pleasing and looks “expensive”, just like a purchased product.
How to make a lid with a filter
Sometimes the filter needs to be installed not on the side, but on the top. This arrangement should be taken into account when manufacturing the protective cover.
Sequence of actions:
- Cut out the lid parts and assemble the structure.
- Drill a hole in the lid for a special size mount for a specific filter. Place the filter on a special platform, which can be made from a small square sheet.
- Check if the device is installed correctly. If the tank is large, it is necessary to make a separate hatch for cleaning the filter.
It is advisable to provide for the installation of the filter before purchasing it.
Price issue
The cost depends greatly on the type of material.
Here are rough estimates for a panoramic container with dimensions of 60x30 cm and a lid height of 10 cm:
- PVC - 1500-2000 rubles per sheet, 100 rubles for glue, paint and film for gluing. Total – 2000-2200 rubles.
- Plastic panels. Four parts 10 by 300 centimeters, glue and decor - a total of about 600 rubles.
- Laminate - three boards of 130 cm - 600 rubles. The same amount is needed for sealant and liquid nails. The result is at least 1200 rubles.
- Lining. A sheet along with wood varnish, liquid nails and sealant will cost 1000 rubles.
- Plywood will cost a little more - 1200-1300 rubles.
- Plexiglas and glue are inexpensive. This “pleasure” will cost only 500 rubles.
- Glass (one sheet) and glue cost about 600 rubles.
For a round aquarium with a diameter of 30 centimeters, everything will cost the same. For a panoramic tank with dimensions of 80x53 cm, the above cost must be multiplied by a coefficient equal to 1.5-1.6.
Store representatives of “fish houses”
Aquarium grotto in the shape of a ship. This design will add personality to the aquarium. Almost all ship shapes are stylized as pirate wrecks.
Additional decor will add zest to the overall design.
This house disguises the pipes from the air compressor, and in specially made niches fish can easily hide from prying eyes.
Artificial grotto "Castle". It is also extremely popular among aquarists. Such a grotto creates the feeling of a fairy tale under water. And there is real freedom for the fish there.
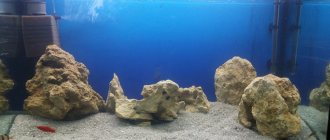
Underwater grotto in the form of a rock. Thanks to its unique shape, such a grotto provides visualization of natural formations. If you add several types of algae to this solution, the effect will be more naturalistic.
The skull is another design choice. This form can be played out in an unusual way. Place several yellow metal coins nearby, for example (the coins must first be varnished so that time and water do not spoil the “treasures”).