It's a rare person who lives in one place all his life. Sometimes you have to move, and with all your acquired property and pets. If everything is more or less clear with furry, feathered and similar pets, then with the inhabitants of aquariums the situation is much more complicated.
All fish undergo at least two transportations during their lives: the first from the breeder to the store, the second from the store to the new owner. And every move is stressful for them.
And the owner’s duty is to make sure that this process is as painless as possible and without losses. But not everyone knows how to do it correctly.
The most frequently asked questions are:
- what containers are best to transport fish in?
- what to pay special attention to,
- what to do if there are a lot of pets or you need to travel far, etc.
In this article we will try to most fully cover these and other issues that in one way or another relate to the transportation of fish.
General transportation requirements
For any occasions and types of moves, there are general universal requirements that help reduce injuries and stress among fish. Here they are:
First rule. All fish must be young, strong and healthy. And this is understandable, because sick or old individuals may simply not survive the journey. The health of a fish can be judged by the naturalness of its color, straightened fins and smooth movement.
Second rule . The most suitable for transportation are fish with a body length of 1.5 to 4 cm. The larger the individuals, the lower the stocking rate (that is, fewer fish need to be placed in one container). An approximate calculation is as follows: 1 liter of water is allowed for 5-7 two-centimeter fish. Adults and fry cannot be placed together.
Third rule . It is strictly forbidden to feed the fish on the road. Moreover, they are advised to go on a hunger strike a day before the planned trip.
Fourth rule . Two to three hours before departure, the fish should be placed in clean and cool water, the temperature of which is two or three degrees lower than usual, which will enhance the intestinal motility of the aquarium inhabitants and speed up bowel movements. This and the previous measures will minimize water pollution during the trip and avoid the death of fish.
Fifth rule . Fish are placed in transportation containers immediately before travel. The water is taken from the permanent aquarium in which they lived. Two thirds of the container should be oxygen.
Sixth rule . If the container is transparent, then it needs to be darkened. This will make the fish less afraid.
What to feed
In order for the cockerel to feel good, not get sick and to be distinguished by the beauty of its color, it is important to pay special attention to its nutrition.
This doesn't mean it costs a lot to feed your fish. Against. In the wild, where bettas live, they are almost always in search of food. This need disappears in an aquarium environment, and the fish spends much less energy. That’s why you shouldn’t overfeed your pet, although in its feeding habits a cockerel resembles a cat or a dog – it will never refuse a tasty supplement. Overfeeding the fish is one of the causes of illness and lethargy, and in the worst case, the betta dies. A small but not very natural tubercle that swells on the pet’s abdomen indicates that the fish is often overfed.
“When buying food, you need to consider the size of the granules or flakes, it should not be very large.”
The betta is an omnivorous species. Fish eat both plant and animal foods with pleasure. However, this does not mean that it can be kept on a plant-based diet. The presence of protein in the diet is mandatory, although vegetation is an equally important element for maintaining the health of the handsome Siamese.
What should you do to choose a balanced diet for your fish? Many dry foods sold in pet stores are designed specifically for Betta splendens; they can be identified by the photo of this breed of fish on the packaging. Such food is created to maintain health and bright color. They are available in the form of granules and flakes.
Live food is also suitable for fish, as it is rich in protein. Cockerels eat it with pleasure, since they usually eat insects and crustaceans where they live in nature. It can be bought dry, frozen or fresh. Bloodworms, tubifex, brine shrimp, daphnia and worms seem to be the most attractive to bettas.
Advice: Preference should be given to frozen food, as it is disinfected, but at the same time retains most of its beneficial properties.
All you need to do to have plant food in the aquarium is to plant several plants in it, and the betta will regulate its vitamin intake. Although from time to time you can try feeding him with chopped lettuce.
Experts disagree on whether dry food alone is sufficient, or whether live food is also necessary. Why is it worth acting according to the situation? Because the best answer to this question is the pet’s appearance.
If it was decided to feed all types of food, it is worth giving them separately.
It is very important to pay attention to how much food to give at one time. It is recommended to break the food into several meals that the fish can eat at one time. The older the fish, the less often you need to feed it. The total amount of food should not exceed 5% of the pet's body weight.
Another recommendation is to give each type of food separately, at different meals. It would also be a good idea to remove uneaten food from the aquarium.
Vitamin complexes won't hurt, although you shouldn't overdo it with them either.
Types of transportation
The classification below was not found in any sources. We compiled it ourselves after studying and analyzing all the material on this topic. If you, dear readers, would like to add to it or argue, then please, we are waiting for your comments in the comments. So what happened:
Depending on the time spent on the trip.
Short-term . Can last from 1 to 3 hours. The preferred containers for such transportation are transparent containers without sharp corners: jars, canisters, cans, thermoses, etc. They must be shaded. In this case, the fish consume less oxygen, as their metabolism decreases.
No more than 8-10 fish with a body length of 1.5-2 cm are placed per liter of water. We explain the increase in stocking density for this type of transportation (compared to the general requirements) precisely by its short duration. The water temperature is selected for specific fish and individually for each case.
Long lasting. The optimal container is a multilayer polyethylene bag placed in a foam box. Particular attention is paid to oxygen content. Small fish endure such transfers more easily than large fish; the latter can suffer not only physically, but also mentally. We will talk more about long-term transportation later, so we will not dwell on this issue here.
Depending on the time of year.
In warm weather . It is better to transport warm water fish. To reduce the temperature, you can take additional containers with cold water for changes. If it is frozen, then you can add pieces of ice. To enrich the water with oxygen, you can use battery-powered microcompressors or a hand-held blower with a sprayer at the end.
In cold weather (winter), it is better to transport cold-water fish. To maintain the water temperature, the container can be wrapped in newspaper, felt, thick fabric, placed in a foam cover, etc.
Depending on the transport used.
- By car.
- By train.
- In airplane. Containers for such transportation must be spacious and loosely inflated with oxygen (so as not to burst due to pressure changes).
If you plan to export fish abroad, you will need veterinary documents.
You can find out which ones and how to get them from the veterinary inspection authority or sanitary and epidemiological services. Naturally, this needs to be done in advance.
Depending on the individual characteristics of the fish.
- if the fish have cutaneous or pulmonary respiration, then they are transported in a humid environment with a small amount of water (wet grass, etc.);
- if the fish have labyrinthine breathing, then they are transported in a 3:1 mixture of oxygen and water;
- if the fish have sharp spines, then they are placed in three-layer bags lined with parchment paper.
Now let’s look in more detail at the most common cases of transportation.
How to transport fish from the store?
After purchase, the fish must be transported home. As a rule, such a journey takes no more than three hours. But even in this case, aquarists, especially beginners, do not know or do not think about how to do this with the least stress for the fish. What is suitable for transportation?
Regular bank . Purchased fish can be transported from the store to home in a glass jar. This is very convenient for the fish, but not so much for the person transporting it. You need to take care of the container so that it does not break. This method is suitable if the journey takes no more than 40 minutes.
Fill the jar two-thirds with water. If it is not very cold outside, then just wrap the jar in a thick towel and place it in a bag. This guarantees stable water temperature for 20 minutes. If it is quite cold, then a small jar can be placed in the inner pocket of your clothes. If it is larger and this cannot be done, then it must be wrapped in woolen cloth and placed in a bag, suitcase or box with a heating pad.
Plastic bag . Most often, transportation from the store is carried out in a plastic bag. But ordinary bags are not suitable, as they tear easily, leak and have corners where fish can get stuck and get hurt. There are special durable bags with rounded corners that you can buy at a pet store. No more than a quarter of the water is poured into them. The upper edges are compressed and air is pumped in with a compressor. Just tie the top of the bag with an elastic band.
How to release purchased fish into an aquarium?
Under no circumstances should you do this right away! Experienced fish farmers advise placing the tied bag in a quarantine aquarium so that the water temperature in both places gradually equalizes. After this, the bag is untied and a portion of water from the aquarium is poured into it.
This procedure is repeated several times, carefully monitoring the condition of the fish. If they feel unwell, the procedure should be stopped. If all is well, then as soon as the aquarium water in the bag is more than half, the fish can be released.
If you catch it, it is better to use your hand rather than a net (less risk of damage). Or you can turn the bag so that the fish swims out of it.
It is better to keep new pets in quarantine for two weeks and then transplant them into a community aquarium. During this period, it is undesirable to turn on the light and make unnecessary movements around the aquarium.
What's next?
Once the fish has been delivered, it must be quarantined. Do not rush to let new residents into the aquarium. Don't forget that the fish have been under a lot of stress. In order not to aggravate the situation, it is necessary to immerse the container or bag in the aquarium for half an hour. This way the water from the containers will increase the temperature of the aquarium. Then you need to add water from the quarantine tank in small doses. This is how adaptation to new conditions of detention will occur. And only then can the prepared water be poured into the quarantine tank. Water is poured into the general aquarium after two weeks of separate keeping, provided that the individuals have not become ill with anything.
Transportation is an important process in fish farming. The continued existence of aquarium pets will depend on this.
How to transport an aquarium with fish?
Sometimes you need to move the aquarium to another room or even move it to another apartment. And the larger the aquarium, the more complicated the process. You can find step-by-step instructions on how to organize your aquarium transportation online. A general plan of action might look like this. You need to prepare:
- net for catching fish;
- bags or plastic buckets with tight-fitting lids (the choice of container depends on the size and number of fish);
- separate containers for transporting water, soil, plants;
- packaging materials for the aquarium itself;
- settled water.
It is impossible to transport all the water from the aquarium.
They often do this: 70-80 percent of the water is settled at the new place of residence, and 20-30 is taken from the previous aquarium, siphoned and brought with them.
In addition, it is important to draw up a clear action plan, for example:
- Check if everything you need is prepared.
- Siphon the soil. Drain the cloudy water. Take 20-30 percent clean and pour into containers.
- Remove plants, decorations, equipment.
- Catch fish. If they will be in containers for transportation for 30 minutes or more, then it is advisable to organize aeration there.
- Get soil and stones. Do not rinse them! Otherwise, in the absence of organic matter, bioequilibrium will not be established in the new aquarium. You can transport all this in a bucket. It is not advisable to leave it in the aquarium, since the weight of the soil is quite large, and the bottom of the aquarium may not withstand this weight.
- Wash the aquarium (without using chemicals) and pack it to prevent damage and chips. Pay special attention to the corners and front glass. If your home pond is small, you can protect the walls with cardboard + tape, place it in a box of the appropriate size and additionally fill the inside with paper. If the volume is large (for example, office aquariums), then it is preferable to order the service from a special service. There they will pack it correctly and transport it on special transport. Of course, it is advisable for the aquarium owner to control this.
- Make the move as quickly as possible. The less time it takes, the better.
- Install the aquarium in a new location.
All of the above applies to a greater extent to transporting the aquarium to another apartment. Within the same room, it is not always necessary to completely empty the container. If there is a cabinet under it, then if you have strong hands, you can simply move the aquarium to a new place. If there is no support, then this method is not suitable - the bottom will break. In this case, they look at the situation: you can simply remove some of the water, thus reducing the weight, and move it.
How to transport fish over long distances?
Sometimes it happens that you need to transport the fish to another city. This is even more difficult, and this means we need to approach this issue more responsibly. What should you pay attention to?
Hard containers are undesirable for long-term transportation, as passengers may be injured as a result of shaking. It is better to opt for multilayer plastic bags, which are installed in foam boxes, thermal bags, etc.
If you couldn’t buy the bags, you can make them yourself by inserting one into the other and tightening the lower corners with rubber bands or electrical tape at a distance of about 2 cm from the corner.
Fill the bag with water to about one quarter. But here you need to look at the situation (the water level should be three times the height of the fish). Next, place the pets, lower the hose from the compressor or blower into the water, squeeze the air out of the bag and fill it with oxygen, squeezing it at the top.
Then the hose is carefully removed, the bag is twisted and secured with an elastic band, a clip, or the like. After several bags are ready, they are wrapped in multi-layer newspaper and placed in a box, interspersed with heating pads or ice. It depends on the time of year and the type of fish.
There should be no free space between the bags, otherwise they will roll around.
You can fill it again with crumpled newspaper or bags inflated with air. The temperature must be stable. The ideal option is to use special plastic thermal containers.
The ratio of water to oxygen in the bags should be 1 to 1 for most fish. For labyrinths 1 to 3.
Sometimes it is recommended to add zeolite in small quantities to water. It helps neutralize the ammonia that fish produce. As well as trypaflavin (5 mg per 1 l) or monomycin (1000 units per 1 l) for disinfection.
Planting density must not be neglected!
The sources provide the following recommendations:
- If you have to travel 10-35 hours, then there should be no more than 300 g of live weight of fish per 1 liter of water.
- If the travel time is 35-70 hours, then the norm is no more than 150.
- If 70 or more hours are spent, additional water and oxygen will be required to recharge on the road.
- There is also a formula: the longer the trip, the lower the stocking density. And also, the larger the fish, the lower its density.
Some breeders say that 1 fish per bag is ideal. If she dies and begins to decompose, it will not affect the others.
Transportation must be carried out as carefully as possible, avoiding strong rolling and sudden impacts of the box.
It is advisable to periodically check the condition of the fish. If they are gasping for air at the surface, then in this case it is good to have a battery-powered compressor or at least a basic blower with a hose and a sprayer. These simple aeration devices will allow you to pump air into the bags.
Sometimes during long-term transportation, anesthesia is used, that is, the fish are euthanized. This allows for increased planting density. But the risk of fish death and sterilization increases.
Main diseases and treatment
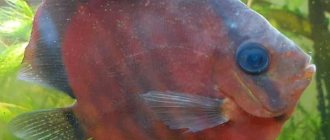
The cockerel, like other creatures, sometimes gets sick. The causes of diseases are different, as are their symptoms. The main indicator of health is the appearance of the rooster fish. If the color of the fish has faded and the betta lies on the bottom almost all the time, you should be concerned about finding out the reasons and treatment.
The beautiful fins of fish are susceptible to rot, which can be caused by bacteria entering the aquarium. Fin rot can be noticed in the first stages - it affects the fins and tail of the cockerel. This disease is fraught with loss of fins and tails, damage to muscles and blood vessels, and death. In the early stages, treatment consists of completely cleaning the aquarium, increasing the water temperature to spawning temperature, and changing the water more frequently. If simple measures are not enough, you should resort to special means with which you need to carry out baths. After completing the treatment, you should more carefully monitor the cleanliness of the aquarium, disinfect it and all decor with boiling water or a disinfectant solution.
Dropsy is another common disease of aquarium fish. If the cockerel often “lies” on the bottom, is lethargic, is a little bloated, eats little, and has sagging fins and slightly protruding scales, most likely he has developed dropsy. It can be triggered by stress: moving or eating disorder. Treatment of dropsy is exclusively medicinal and requires hand protection to prevent infection from getting into wounds and scratches.
Fish are also susceptible to fungal skin infections. There are several types of them, but they are all noticeable visually. For fungal diseases, malachite green oxalate, methylene blue, saline baths, and modern specialized drugs are usually used.
Oodiniosis and ichthyophthyriosis can also cause the death of a pet. These two diseases are side by side, since in the initial stages the symptoms are similar. Oodiniosis can be distinguished by the presence of so-called “golden” dust; the antibiotic bicillin-5 is recommended for its treatment. Ichthyophthiriasis is characterized by the presence of dermoid tubercles and strange behavior of fish, as if they are trying to scratch themselves. This disease is treated with salt, removal of pathogenic cysts and malachite greens.
Why does it lie at the bottom?
The fish lies on the bottom for several reasons: it is resting, the water temperature is not high enough and it is in “semi-hibernation”, it is sick.
Don't panic ahead of time. Siamese water inhabitants rest quite often.
It is worth checking the water parameters as well. Changes in its characteristics, pollution and especially a decrease in temperature greatly affect the behavior of the betta.
Lethargy is also the most common symptom of disease, so the fish should be carefully examined and appropriate treatment initiated if defects in the fins, scales, bloating of the abdomen and body lesions are discovered.
Why does the gills swell?
As in the case of lying on the bottom, the cockerel inflates its gills not only if it is sick.
This way the cockerel can tune in to the battle and show its power to the opponent. Inflating his gills, he shows off in front of the females so that they choose him to play the role of father.
If other symptoms become noticeable: lethargy, decreased appetite, damage to the scales, fins and tail, you should delve into the study of symptoms and begin treatment.
Jumped out of an aquarium, what should I do?
A betta jumping out of an aquarium is not uncommon. This happens due to the active nature of the fish, which may not have liked the quality of the water, the aquarium is too small, or it was afraid of one of the more aggressive neighbors. This can also happen due to diseases that provoke the fish to scratch itself and it jumps up.
If the fish jumps out and is alive, you need to immediately place it back into the aquarium with a damp cloth.
If the betta has spent a lot of time without water and is slightly damaged, then it is worth adding stress coat to the aquarium water, which restores damaged tissue.
It is necessary to lower the water level, take care of the lid and begin treatment if this situation was caused by illness, so that the fish does not jump out again.
How to transport fish in winter?
In general, the transportation procedure is the same. The main difficulty is to prevent hypothermia and maintain the optimal temperature of the water in the containers for as long as possible. In what ways can this be done:
- Cover the bag or jar under clothing on your body. Not always suitable for obvious reasons.
- Wrap the containers with several layers of fabric or newspapers.
- Place bottles or heating pads with hot water in the box (the fish should not have direct contact with this container). You can line them with cloth or paper. If the water in bottles or heating pads is additionally salted, then heat transfer will take longer.
- If transportation is carried out by car, then the container can be placed on the seat and covered with a blanket or jacket.
- Use a thermal bag. This is the best option.
Transportation of Achatina snails, turtles and other aquarium inhabitants
It is important to understand that Achatina snails are tropical creatures. That is, transporting them at temperatures below twenty degrees is dangerous for their lives.
The situation is exactly the same with turtles. What to do in winter?
What you will need
To transport such heat-loving pets we will need:
- Plastic container;
- Holes in the container for air intake;
- Soil (moss), other greenery;
- Newspapers;
- Hot water bottle;
- Foam sheets;
- Thermal bag;
- Thermometer;
- Towels (for the turtle).
How to pack/assemble
How to transport Achatina in winter? Let's look at the step-by-step instructions:
- We place our snail in a container, having previously made holes for air.
- Place the container in a thermal bag.
- Place a bottle of hot water next to it.
- Using a thermometer, we periodically check the temperature.
- We take polystyrene foam and put it in a box, insulating it.
- We put our container with Achatina in it.
- Don't forget to feed the snail during a long trip.
Since transporting Achatina in winter is quite risky, you need to follow all the steps correctly.
How to transport an aquatic turtle in winter?
- We take a container and make holes in it.
- Close the container tightly with the lid.
- We soak the towels in hot water (we try to maintain their temperature throughout the trip so that the turtle does not catch a cold).
- Cover the turtle with wet, warm towels on all sides.
Adaptation after transportation
We have dealt with the question of how to transport Achatina snails and turtles in winter. If you create the most comfortable conditions for your pets during the trip, they will not experience any stress.
How to transport aquarium plants?
The main thing in this matter is to prevent them from drying out, overheating or freezing. And also remember that plants will not survive more than two days without light. That is why they should never be sent by parcels.
Plants are packaged as follows:
- you need to place them in a damp plastic bag;
- there is no need to fill it completely with water, just a small amount is enough;
- bushes can be wrapped in wet newspaper;
- There is no need to pump in air either;
- tie the bag tightly, place it in another one;
- Fill the last bag with air and tie it too.
Aquarium plants are better preserved when transported in a cool place, but not below +12 degrees. If this happens in winter, then it is safer to transport them in water, which will serve as a buffer against a rapid drop in temperature.
Overheating should not be allowed, as this will destroy the plants. In summer, do not allow the temperature to rise above 30 degrees and do not leave it in the open sun.
Once the plants arrive, they should not be immediately placed into the aquarium. They must adapt. To do this, let them sit at room temperature without opening the packaging.