Who had this? Somehow it’s even scary to keep an aquarium at home, but I really want to)) A small one of 70-80 liters. But I heard that an aquarium can burst and flood everyone around... Or are these quite rare cases and there is no need to worry? Please tell me))
join the discussion
Share with your friends
The aquarium is a small, but surprisingly fascinating world. However, in order to maintain both the aquarium and the inhabitants inside it in order, it is necessary to expend some effort, as well as adhere to some rules for caring for them. One of the common problems with aquariums is cracks or leaks. Read about why an aquarium may burst, how to fix the problem, and what needs to be taken into account in this article.
Why do aquariums burst?
As a rule, there are only two main reasons that a glass aquarium bursts, breaks or leaks - either the technology for manufacturing the container was incorrect, or the aquarium was simply not used correctly.
Since the pressure exerted by water even in relatively small-volume tanks is quite high, glass of a certain thickness is required for their manufacture.
If glass of a thinner thickness than required by the rules and regulations was used, then over time it may “accumulate fatigue” at certain points and crack.
Also, the aquarium may leak during operation if poor quality glass, for example, overheated glass, was used in its manufacture.
If the container is placed on an uneven surface, then most likely the result will also be a crack. In this case, even a grain of sand stuck under the bottom, not to mention uneven stands, can cause a crack.
Causes and types of defects
The first step before starting repairs is to find out why the aquarium cracked or burst. This may be due to improper operation, poor quality materials and non-compliance with production technology. The presence of a manufacturing defect becomes noticeable already at the beginning of use, and other defects appear after months and years of operation of the tank.
The main types of damage to glass aquariums:
- Spontaneous rupture of the wall. Sometimes it is completely unclear why the aquarium burst. To make the vessel stronger, stiffening ribs are glued into its upper part. To reduce the cost of production and the final cost of the product, the thickness of the glass is reduced, reinforcing the structure with additional plates. The working tank can stand for a long time, but tension accumulates in it, resulting in broken glass.
- Depressurization of seams. This happens when the aquarium is installed at an angle or in a place where it is exposed to direct sunlight. If the installation is uneven, the water presses harder in one corner, and over time the seam cannot withstand it and comes apart. When heated under the sun, the joint between the glasses dries out and a leak occurs along the seam. Destruction of the sealant can also cause this type of defect, because even high-quality materials gradually lose their properties.
- Chips. A small section of the glass surface may break off during handling, transportation, or installation. Operation of a damaged vessel becomes dangerous, as the integrity of the structure is compromised. If there is an external flaw, then replacing the glass is questionable. But with internal chips, the fish can be injured on the glass, so the element must be replaced.
- Cracks. This type of malfunction occurs due to impact. If the glass is cracked but there is no leak, many hobbyists continue to use the tank. This decision is wrong: sooner or later the crack will increase, and then the problem will become global. The glass container will simply burst and all its inhabitants will die. You can't do without repairs.
Regardless of how the defect appeared, you must immediately return the aquarium to working condition. Sometimes water leaks a little, but no obvious crack is visible. To eliminate a leak, it is necessary to determine the location of the rupture and carefully prepare for work.
What to glue with?
You should immediately understand that you cannot use regular glue to glue an aquarium that has cracked or leaked.
Pet stores or other specialty sales outlets have an adhesive called aquarium sealant. This is what you should use if the aquarium bursts.
It is a thick, but at the same time fluid substance, which hardens very quickly in the air - after half an hour the glue already becomes hard. Not to be confused with the time for complete drying - this will take about 24 hours. The main component of the adhesive, due to which this property is acquired, is silicon. This type of glue can also be used to “repair” the interior of the aquarium (houses, caves and other various toys and housing for fish).
This glue also has another name - silicone sealant.
It is worth remembering that you only need to purchase a product that has the inscription “for aquariums” on its packaging.
When using the usual composition, the toxic substances released by it can send the inhabitants of the aquarium to the next world. Compositions that have received positive reviews are “Moment Germent” and “Titan”. Their main property remains resistance to sea water.
Video
Aquarium cracked | Aquarium burst | Why did the aquarium leak | The aquarium crashed (#55)
Repairing an aquarium with a broken bottom - repairability. All about aquariums. Aquariums.
The aquarium burst! What to do? The story of how my aquarium burst.
DO NOT INCREASE THE TEMPERATURE IN THE AQUARIUM UNTIL YOU WATCH THIS VIDEO!!!
Advice from professionals
First of all, you need to remember that even to eliminate minor damage, it is necessary to completely empty the aquarium of both the living creatures themselves and all other contents.
If excess glue gets on the glass, you can remove it by wiping the surface with a rag soaked in a vinegar solution.
Of course, it makes much more sense to prevent cracks and other possible problems with the aquarium than to fix them as an emergency. A good solution in this sense are stiffening ribs and ties. The first are long and narrow glass plates that are glued to the long edges of the aquarium. They are glued to the top part, and later stiffeners are attached to them.
Features of reproduction
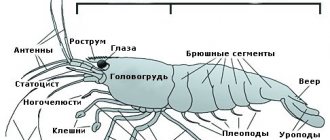
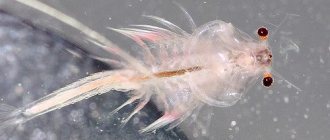
The structure of an aquarium shrimp.
The unusual appearance of shrimp is closely related to their reproductive characteristics. The body of crustaceans is segmented, and each segment has limbs: three pairs of jaws belong to the oral apparatus, and the remaining five pairs of limbs perform a direct function - moving the individual. On the body of females there are pleopods - abdominal legs on which they carry eggs; in males, the pleopods are transformed into a reproductive organ. It is easy to recognize crustaceans by sexual differences externally: females are larger than males (on average 3-5 cm), wider in the chest area, and their color is usually more saturated.
Shrimp are prone to a phenomenon called hermaphroditism, and with the onset of unfavorable conditions for reproduction, they are able to change sex!
When choosing shrimp for breeding, it is necessary to take into account the possibility of their interspecific crossing: unsystematic mating of expensive breeding species leads to “degeneration” of the breed - the fry are born inconspicuous, although in this case the reproduction of shrimp does not affect the number of offspring.
Aquarium shrimp compatibility chart.
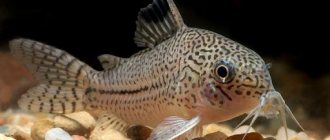
Beginners should pay attention to species such as neocardina and cherry shrimp - the most unpretentious aquarium shrimp, the reproduction of which is quite simple. But, for example, Amano require sea water to reproduce offspring: although these shrimp are freshwater, under natural conditions they migrate to a salty reservoir to hatch fry.
Being in comfortable conditions, crustaceans begin to reproduce quite quickly: the female becomes sexually mature by about two months; her readiness for reproduction can be determined when the eggs are clearly visible in the ovary, which is often called the “saddle” (at the junction of the cephalothorax and abdomen). The color of the eggs depends on the type of female and can vary from white to bright red.
Shrimp saddle.
By the time the eggs are ripe, the female will shed its chitin, releasing pheromones into the water that attract males. The lucky one who first discovers a partner gets the proud title of father. After fertilization, the female transfers the eggs to the under-tail region, where they adhere to the pleopods. It can take up to 2 weeks from mating to egg laying. The development of eggs takes, on average, one lunar cycle (the exact period is affected by both water temperature and the species of shrimp). The mother takes special care of her future offspring, providing them with access to oxygen by constant movements of her pleopod limbs and cleaning the masonry from dirt.
The fertility of a female is determined by her age and species. “Firstborns” carry only a dozen to two eggs, and the norm for an adult female is considered to be 1.5 to 2 times more eggs.
Can an aquarium burst or crack, and why?
A cracked aquarium is an unpleasant problem that any aquarist can face. Especially if we are talking about a budget model made from cheap materials. A crack in itself is already dangerous due to the possibility of water leakage, and in addition, because of it, the aquarium can burst, spilling tens (or even hundreds) of liters of water throughout the room.
A crack in an aquarium will not necessarily lead to a leak, but it is a possibility (especially with long horizontal cracks)
The causes of cracks in an aquarium can be:
- Poor quality or too thin glass.
- Lack of ties or stiffeners (or their low quality).
- Overloading the aquarium with heavy decorations (a heavy stone presses on the side wall of the aquarium).
- An uneven or skewed stand (it may have been like this initially, or it may be some old furniture that has been “warped” by dampness or time).
- Compressor vibration.
- A heavy object falling from above (if there are any shelves hanging above the aquarium).
- Damage to the glass (for example: a playing child threw something heavy at the glass of the aquarium).
Launch of a renovated aquarium
After making sure that the defect is securely sealed, test water is drained from the repaired aquarium and the piping is removed. To completely remove toxic substances, the vessel is washed with water in this way: fill it in the morning, and change the water in the evening, and so on for a week.
A tank that has passed the test can be started:
- Rinse and boil the soil.
- Pour soil onto the bottom.
- Plant the plants and secure them securely.
- Lay out decorations, stones, driftwood.
- Install life support equipment (compressor, aerator, filter).
- Fill the vessel with pre-prepared, settled water.
- A joyful event is the placement of pets in renovated housing.
An aquarium is a device that can be taken apart and put back together. This is what professional aquarists do when it comes time to replace the sealant. However, there are a lot of nuances and difficulties in repairing aquariums with your own hands, and a beginner may need the help of a professional during the first repairs.
If you liked the article, leave comments and share a link to it on social networks.
Source
What to do if the aquarium bursts: eliminating the consequences
You need to eliminate the consequences of a leak from the aquarium as quickly as possible. You can ruin the floors in your own home, and even your neighbors' repairs.
We eliminate the consequences according to this plan:
- we turn off all the equipment in the house, or even better, we completely turn off the power to the room to avoid electric shock through the water;
- if possible, we collect the fish (if they are still alive) and move them into jars of water;
- We wear shoes with thick soles (so as not to damage our feet when walking on shards of glass);
- we put more rags on the floor to absorb water and warn the neighbors below about the possible seepage of water through the floor along the riser;
- We constantly unscrew the rags or take rags filled with water to the bathtub and bring new ones in order to collect water from the floor as quickly as possible;
- if the issue of water collection is acute (you have expensive floors or your neighbors downstairs have expensive repairs) - feel free to throw warm blankets, large towels or thick sweaters on the floor (in general, everything that absorbs as much water as possible in one “approach”) .
Comfortable conditions for aquarium shrimp
Breeding shrimp in an aquarium is not difficult. These little crustaceans cannot be called picky: they are practically omnivores - they happily feast on special food and fish food, and will not refuse boiled vegetables.
Shrimp have gained fame as aquarium nurses: they “remove” dead fish and dead plants, thereby regulating the cleanliness and growth of aquarium flora.
You can make excellent aquarium shrimp houses yourself by simply joining together a few scraps of tubing.
You need to feed crustaceans no more often than once every 2-3 days, otherwise they begin to be “lazy”, ignoring their function as filter feeders. And decomposing, uneaten food takes away oxygen from the inhabitants of the aquarium.
In order to create good conditions for shrimp to live and reproduce, several requirements must be met:
- the aquarium should always have clean water, the temperature of which does not go beyond 150 C - 300 C (in colder water, reproductive functions stop, and in hotter water, shrimp die);
- you need to create a slight movement of water: standing shrimp will be uncomfortable;
- it is important that the pH of the water is slightly acidic or neutral;
- copper content in water is unacceptable;
- Artificial aeration is welcome, and a low-noise compressor should be selected;
- To prevent crustaceans from crawling out of the aquarium, where they will quickly die, it is worth covering it with a lid.
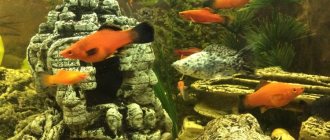
The decor and presence of plants are also very important - this serves as a shelter for the shrimp during the molting period, when the crustaceans are very vulnerable. In addition, you should avoid being close to predatory aggressive fish: shrimp may seem like an attractive lunch to them.
What to do if the aquarium is cracked? (+video)
It is a mistake to believe that a crack without a leak is safe, and you can wait until it is sealed. At any moment along the crack the aquarium may burst, so you need to act as quickly as possible:
- Even if there is no leak from a crack, it needs to be repaired urgently, and if repair is not possible, the device needs to be repaired (less often, its replacement).
- If the crack is serious (along the stiffener or along the entire length/width, or water is already flowing through it), it is better to immediately call a specialist.
If you can’t call a technician, try to do everything yourself. If the crack is small and located in the upper segment of the aquarium, use silicone to seal the crack.
If the crack runs along the horizontal, vertical or diagonal line of the container, then the first thing you need to do is remove the fish from it and temporarily place it in a jar of water. Don’t worry about their comfort now - ordinary jars, buckets, basins (no matter the size) will do.
You can replace the glass in an aquarium yourself, but this is an extreme case - it’s better to contact a specialist
Now we move on to eliminating a serious crack, for which we need to completely replace the damaged glass:
- First, we remove the cracked glass - if the aquarium is adhesive, then to remove the glass on the outer and inner sides, you need to make cuts along the joints with a cutter; if it is framed, then first we take out the old silicone from the grooves (to simplify the task, use a nail file).
- We remove the old glue (sealant) and then degrease the cleaned surfaces.
- We make a blank of new glass - we make it according to the template, and then we coat the ribs and joint surfaces of the structure with silicone sealant.
- We install the new glass in place of the old one, lubricate all the seams with silicone and fix the glass with tape or rope horizontally and vertically.
- We wait an hour and repeat the procedure of lubricating the seams with silicone sealant.
- We carry out a test for the integrity of the structure - the next day after fixing the new glass, pour water into the aquarium and wait 1-2 hours, periodically checking the structure for leaks.
- If everything is fine, drain the test volume of water, add soil to the aquarium, and then fill it with water and move the fish into it.
Getting ready for renovation
If the aquarium leaks and the water in it noticeably decreases, forming a large puddle on the floor, the problem cannot be left unattended. It is necessary to stock up on materials for repairs and think about what devices may be useful. In addition, before starting work, you need to move the fish into an auxiliary tank and remove all plants and decorations.
Tool and material
The tool without which the structure cannot be repaired is silicone glue. If the sealing of the seams is broken, use a special adhesive-sealant marked “For aquariums”. The packaging may also have a fish icon on it. This means that the composition is safe for living organisms and does not release toxins.
On a note! Sealants Isosil, Soudal, VIK Aquarium Silicone, Penosil can be used for water tanks: they hold glass plates together well and create reliable seams. They are used not only for repairing joints, but also for sealing cracks.
Items and materials that will be needed to repair the aquarium:
- gun for applying sealant;
- silicone sealant;
- construction knife for removing old sealant;
- shaving blades;
- masking tape;
- cotton pads;
- paper napkins;
- corrugated paper or cardboard;
- acetone for degreasing the surface;
- twine, rope, wooden slats.
What to do to prevent such a situation?
It is easier to prevent a problem than to eliminate its consequences later. It is enough to follow these rules:
- Try to buy a high-quality aquarium and special furniture for it (it’s better not to improvise and do everything yourself using improvised means).
- Use a soft substrate (between the aquarium and the furniture).
- The device must be kept out of the reach of children.
- Do not place anything above the aquarium (if necessary, these should not be heavy objects).
- Periodically perform a technical inspection of the device and assess its integrity.
- If possible, replace it with a new one every few years, without waiting for breakdowns (for many people, only the appearance of the first cracks becomes a good reason to change the aquarium to a new one).
Habitat in nature
Cherry shrimp are actually a color variation of the common neocardina, bred through selection and enhancement of bright colors. Neocardines, on the other hand, are distinguished by their inconspicuous, camouflage coloring, which is not surprising; they cannot survive with cherry blossoms in nature.
By the way, neocardines live in Taiwan, in freshwater bodies of water, and are distinguished by their rare unpretentiousness and speed in breeding. These were the first of the shrimp that began to appear in large quantities in the post-Soviet space, but gradually they gave way to cherry shrimp.
At the moment, shrimp lovers have developed a whole quality classification, which is based on the size and color of the individual; elite cherry shrimp sometimes cost a lot of money.
Breeding
A completely simple process, it is enough to create suitable conditions and place males and females in the same aquarium. The eggs can be seen under the female's tail and look like bunches of grapes.
The mating process for cherry shrimp looks like this. Usually after molting, the female releases pheromones in the water, signaling to the males that she is ready. The males, having heard the smell, begin to very actively search for the female, after which a short mating occurs.
In some cases, the female carrying eggs for the first time can shed them, probably due to inexperience or small size. To reduce stress, try not to disturb the female at this time and keep the water clean.
Typically, a female cherry shrimp carries 20-30 eggs over a period of 2-3 weeks. The eggs are yellow or greenish, becoming darker and darker as they mature. When shrimp are born, they are tiny, about 1 mm, but already exact copies of their parents.
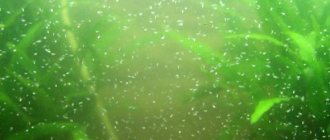
They spend the first few days hiding among plants, where they are almost invisible, eating biological film and plankton.
They don’t require any special care, the main thing is that they have somewhere to hide. After just a few days, the female can again bear a portion of eggs.
Other interesting articles
- Aquarium fish cardinal: Types, contents For everyone who has an aquarium in their home, the cardinal fish is one of the most suitable…
- Zebra fish: types and contents The aquarium fish pseudotropheus or zebra from the cichlid family naturally lives in the lake area…
- Neon fish: care, feeding, varieties, reproduction General information Aquarium neon fish from the Characin family are currently the most popular inhabitants…