Purpose
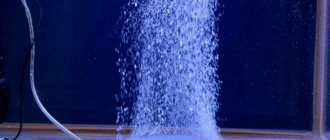
An aquarium sprayer is used to supply air to an artificial reservoir, which is pumped by a compressor and supplied to the device through a hose under pressure. Through small holes in the nozzle it is released into the water in the form of bubbles.
Aeration is necessary to saturate the water with oxygen. Fish and other aquarium inhabitants often experience a lack of oxygen due to overcrowding. The accumulation of large amounts of aquatic waste in water, high water temperature, as well as the great depth of the reservoir, combined with a small surface area, reduce the ability of atmospheric oxygen to dissolve in water. Lack of oxygen and excessive accumulation of carbon dioxide lead to illness and death of aquarium inhabitants.
In addition, the air entering the reservoir from the compressor constantly mixes the water in the container. This helps to equalize the temperature and prevents stagnation of water, saturated with waste from the inhabitants of the aquarium, in any one part of the artificial reservoir. This ensures protection of aquatic organisms from temperature shock and poisoning by organic decay products.
On a note! Sometimes sprayers are used as a decorative element of an aquarium. Small air bubbles rising along the back wall can become a real decoration for an artificial pond.
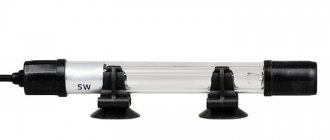
Oxidizer
photo can be enlarged
Unusual devices have also appeared in modern aquarium keeping. The oxidizer is an autonomous and self-regulating device that supplies your aquarium with oxygen year-round without the use of hoses and electrical wires.
The operation of the oxidizer is based on the catalytic decomposition of hydrogen peroxide, controlled by ambient temperature. The higher the temperature of the water where the oxidizer is installed, the faster the peroxide decomposes and the more oxygen is released. the oxidizer is simple and ingenious, because pure, not yet decomposed peroxide remains only in the device.
Using pure peroxide without an oxidizer is dangerous! If you simply throw a tablet of dry (dehydrated) peroxide or pour a peroxide solution directly into a body of water, the peroxide will gradually begin to break down, releasing water and oxygen. The water gradually mixes with the water of the reservoir. Throwing or pouring pure peroxide directly into a body of water is dangerous! Peroxide is twice as heavy as water and it immediately sinks to the bottom.
Firstly, all the peroxide will not decompose immediately, but will burn, oxidize and poison the bottom layers close to it, plant roots and beneficial bacteria.
Secondly, the acidity of the water immediately drops sharply, the reservoir will become acidic, and all living organisms will die. Therefore, the process of decomposition of peroxide into pure oxygen and water must be slow and controlled.
The secret of the oxidizer is simple - the catalyst is ceramics of a special composition, which completely, slowly and in doses, decomposes hydrogen peroxide into water (H2O) and active oxygen (O*).
Oxidizers - devices that produce pure active oxygen, always have an internal flask - a container filled with a solution of stabilized hydrogen peroxide. One or more catalysts are placed in the flask. The flask is closed with a lid; there are small holes in the lid. As the peroxide decomposes through these holes, the remaining peroxide is squeezed into the outer flask or ceramic base. These ceramic parts also serve as catalysts.
The peroxide from them does not splash into the reservoir because it is heavier than water. The peroxide on the surface of the outer flask or ceramic base also decomposes and pure oxygen enters the reservoir; tiny oxygen bubbles will come out of the oxidizer, dissolving almost immediately in the water. Only very few bubbles can be seen.
Main advantages
The compressor, together with an air sprayer for an aquarium, performs a number of functions that no other type of equipment can cope with:
- saturation of water with oxygen;
- equalization of temperature by mixing layers of water;
- prevention of water stagnation and poisoning of aquatic organisms by accumulated waste products;
- creating a current necessary for some species of aquarium inhabitants;
- reduction of point water pressure on hydrobionts;
- giving a decorative appearance to an artificial reservoir.
Varieties
There are two types of aquarium sprayers on sale: those made from natural materials and artificial ones. The first ones are made from special porous stones that can allow air to pass through, breaking it into small bubbles. Stone products are environmentally friendly and do not spoil the natural design of the aquarium, but they have one drawback - the noise created during operation. Therefore, aquarists often opt for artificial atomizer options.
Artificial products can have different shapes and are made from various materials (rubber, plastic, etc.). Most often in aquariums, especially large ones, flexible sprayers made of soft rubber with many small holes are used. It is easy to give such products the desired shape and place them in the required place of an artificial reservoir - on the bottom, wall, along joints or decorative elements.
Other types of artificial sprays - disk, ring or in the form of decorations - are used less frequently. Disk products are a flat disk made of porous material, the entire surface area of which releases air bubbles. Ring versions differ from disk ones by the presence of a hole in the middle. Large diameter rings are convenient to place around decorations or plant pots, creating an unusual design using a curtain of air bubbles.
Criterias of choice
To choose the best aquarium sprayer, you need to determine what it will be used for. When choosing equipment you need to pay attention to the following points:
- Power. This indicator depends on the size and configuration of the product and is determined by the number of air bubbles emerging from a unit surface area of the device. Power shows how quickly the aquarium will be saturated with oxygen. For large containers, it is recommended to choose long and wide rectangular products.
- The noise made by the device during operation. This aspect is especially important when the aquarium is in the bedroom or nursery. The noise increases if there is no soil in the aquarium and the sprayer is located directly on the glass, or if the amount of soil under the product is insufficient.
- Possibility of disassembling the device for cleaning in case of contamination. Since the device is usually placed at the bottom of the reservoir, over time the holes in it become clogged with silt or soil particles. If the device cannot be disassembled and cleaned from the inside, it must be replaced with a new one.
- Hole size. Aquarium sprayers can have both large and small holes. When choosing a device, you should take into account that sprayers with small bubbles saturate the water with oxygen more effectively.
- Appearance. Pet stores offer a large selection of sprayers of all possible shapes and colors. Thanks to this, you can choose an option that suits any aquarium design.
Aerator - what is it?
Before considering the question of how to choose an aerator and verticutter , you need to understand what is hidden under the terminology.
A water divider is a small nozzle that is attached to the spout of a faucet. The body is made of various materials:
Inside there is a built-in plastic module with a filtration system and a rubber or silicone gasket.
Help : without a special mesh, the consumption is about 15 liters per minute, with it the figure is reduced by at least half.
How to make an aquarium sprayer with your own hands
Aquarium sprayers sold in stores are often expensive and have a short lifespan. Therefore, many aquarists prefer to make them themselves from available materials. To do this you will need the following materials and tools:
- small diameter rubber hose;
- tee;
- stationery knife;
- stand (you can use a kitchen board).
A piece of the required length is cut from the hose. A tee is inserted into one end of the hose and the other end of the hose is attached to it to form a ring. Holes are made in the hose using a utility knife or other sharp object. In this case, the largest number of holes should be in the part remote from the tee. Near the tee, the number of holes should be small, as should their diameter. This will allow air to flow evenly through the entire sprayer.
After a sufficient number of holes have been made, a compressor hose is connected to the free end of the tee and the device is placed in the aquarium. Having turned on the air supply, evaluate the power of the resulting device and, if necessary, add more holes.
Operating Aquarium Sprayers
In order to connect the sprayer to a compressor or aerator, you need a standard rubber hose, which can be purchased at an aquarium store.
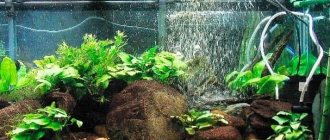
For uniform aeration, the sprayer must be installed:
- next to the heater to speed up the mixing of heated water with the rest of the aquarium;
- for a small and medium-sized aquarium in the center;
- in large aquariums there are 2-3 pieces in different corners.
For aesthetic reasons, sprayers are often buried in the ground. It should be taken into account that sprayers in the ground deteriorate faster. You can buy an aquarium sprayer on our website at affordable prices.
Objectives and methods of aeration
Enrichment of the aquatic environment with oxygen is carried out in the following ways:
- Water filter with diffuser. The pump drives water through it, into which air enters. The resulting mixture enters the aquarium.
- Compressor. The tube forces air through the sprayer to the bottom of the container.
An aquarium aerator is used to mix the water layers. A sprayer located next to the heater will evenly distribute heat by creating circular flows of air bubbles. A large aquarium receives oxygen through the surface. As a result, the upper layers have a higher concentration of oxygen compared to the deeper ones. Air bubbles from the sprayer cause water to move from the bottom to the surface, reducing this difference. The aquarium aerator is placed above the water level so that when it is turned off, water does not leak out of the tank. The problem can be solved by installing a check valve.
Startup and maintenance of the external filter
How to properly start and maintain an external filter for an aquarium?
The role of filtration in an aquarium is quite difficult to overestimate - the purity of the water depends on the quality of filtration - not only optical, but also chemical, often invisible to the eye. And as a result, the health and life of the inhabitants of the aquarium depends on how correctly the filter is installed and maintained.
In this article, we will voice several well-known truths about external filters for aquariums, which will allow beginners to avoid making trivial (but no less annoying) mistakes.
Running a filter
So, the new filter is ready for installation. We will not describe the process of installing tubes, hoses, various adapters, etc., since this process looks different for each filter; we will only dwell on the general points:
- First of all, remove the filter media and sponges that come with the filter from the bags. It sounds funny, but sometimes people forget to do this.
- Rinse the housing, baskets (if equipped) and all fillers and sponges with warm water to remove production dust. If you don’t do this, nothing bad will happen, but you don’t want extra dirt in the aquarium, do you?
- Place all the fillers as indicated in the instructions for the filter.
Biological activation of the filter
If you start an aquarium at the same time as a filter, it is especially important to biologically activate the external filter. But even if you install a filter to replace an old one, or instead of an internal filter, this will not be superfluous and will allow the filter to quickly become populated with beneficial bacteria and reach “full power”.
This is very simple to do - just apply one of the special preparations to the bottom layer of the sponges (or rather, the first one along the water flow) or to the porous ceramic filler, if the filter is equipped with one.
The most popular drugs for these purposes are presented in our store:
- Tetra Bactozym
- sera filter biostart
- Dennerle BactoClean
- JBL FilterStart
We don’t presume to judge which one is better - all 4 drugs are produced in Germany, and the Germans usually have good quality, so take any of them at your own discretion.
Important
: In order for bacteria to successfully settle in the filter, it is necessary to prepare the water in advance.
If the aquarium is already running, this will not require additional effort, and if the aquarium is fresh and tap water is being filled, definitely
be prepared using special conditioners that eliminate chlorine and heavy metals - these substances are just as (if not more) destructive for beneficial bacteria as and for fish.
After activation, you can finally assemble, connect and put the filter into operation, following the operating instructions.
At first (especially if the aquarium is new), the water may become cloudy and remain cloudy for quite a long time (usually about 1-2 weeks, sometimes up to a month). This is due to the fact that a large number of microorganisms begin to multiply in the water, serving as a breeding ground for each other - bacteria and ciliates. Usually such turbidity is called “bacterial” and it does not pose any danger to the aquarium population. It goes away over time, on its own - the main thing in the first months of the life of the aquarium is to feed the fish very sparingly, avoiding overfeeding (all food should be eaten in 2-3 minutes).
Often, beginning aquarists take cloudiness as a sign of some serious problems and begin to endlessly change the water, which only delays the process of establishing biological balance.
So, the filter is running, water circulates through the fillers, and the owner, satisfied with himself, watches the life in the aquarium.
This concludes the part of the article devoted to launching an external filter, giving just a couple more tips:
- Try not to leave excess length of hoses - cut off the excess so that the filter can be conveniently serviced later. Every extra centimeter of hose is additional resistance to water flow, which reduces the performance of the filter. But don’t overdo it - measure 7 times, cut once.
- If there is such an opportunity, you can put construction pipe insulation on the hoses - this will save energy during the cold season - after all, heat “escaps” through the surface of the hoses. This is a penny, of course - but a penny, as you know, saves the ruble.
- It won’t hurt to install a special pre-filter on the inlet pipe of the external filter (which is located in the aquarium) instead of the standard grille, which traps large dirt (leaves, etc.) and does not allow fish to get inside the filter - it will serve as the 1st stage of filtration from coarse dirt, which will allow you to less frequently service the external filter itself, washing the prefilter sponges from time to time. Currently, such prefilters are produced by Eheim.
Filter maintenance
Very often you have to answer the same question:
“Tell me, how often should the filter be cleaned?”
There is no exact answer to this question; only general recommendations can be given.
A clear indication for cleaning the filter is a noticeably decreased water flow - this can be determined either visually if the “flute” is located above the water level, or by placing your hand under the water flow - and compare the sensations with those when the filter was just started. If the difference is noticeable, it’s time to clean the filter.
However, we would not recommend waiting for such a decrease in performance every time and cleaning the filter a little more often, especially if the aquarium has or occasionally has problems with the growth of unwanted algae (plaque on glass, soil and plants, “beards”, etc. ).
The fact is that the filter only retains dirt on its sponges, which physically remains in the aquarium water and continues to slowly dissolve and be processed by all kinds of bacteria. If the aquarium is densely populated with plants that manage to “recycle” all these substances, using them for their own growth, there is no big problem. But if there are few or no plants in the aquarium, all these substances will be used as food for algae (not to be confused with plants), which will happily and vigorously begin to grow everywhere.
Therefore, we recommend that beginner aquarists clean the external filter at least once every 6 weeks. If after 6 weeks the filter is opened - and it is not particularly dirty (after all, each aquarium is individual) - next time the interval can be increased. If it’s the other way around, reduce it, or perhaps choose a more suitable filter.
Here are a few basic rules when cleaning the external filter:
- Sponges for coarse filtration and non-porous ceramics (manufacturers often put them in the 1st basket) can be safely washed under the tap, directly with tap water.
- Biological filler (porous ceramics, all kinds of balls, rings, etc.) should be washed only to remove coarse mechanical dirt, simply by dipping it into a container of water that has just been taken from the aquarium. This will allow you to preserve your hard-won colonies of beneficial bacteria. If you simply rinse these fillers “under the tap”, most of these bacteria will die.
- Manufacturers recommend changing a fine sponge (white padding polyester) with each cleaning - but experience shows that they are quite capable of surviving at least 1 wash (can be done under the tap). If original fine cleaning sponges cannot be purchased, they can be replaced with universal fine filtration cotton wool - it is easy to cut (and even torn by hand) and can be placed in any filter.
- Don't forget to clean the engine compartment and filter rotor - a lot of dirt accumulates there too and even colonies of algae and bacteria grow. If this is not done, after some time the filter may simply stop. For these purposes, you can use special brushes.
- From time to time it is useful to clean the hoses - for these purposes it is very convenient to use flexible brushes, for example JBL Cleany - universal and inexpensive.
If your filter is equipped with taps for separately shutting off the inlet and outlet water flow, we recommend that after the filter has been connected back to the hoses, first open the inlet channel, and after a few - the outlet - this will ensure that the filter is correctly filled with water and avoid the formation of air bubbles in the head of the filter and problems with restarting.
We hope that this article will answer some questions from novice owners of external filters.
Text (c) Akvionika LLC 2013, Illustrations (c) sera GmbH Use of text materials and photographs is possible only with the written permission of Akvionika LLC
Oxygen in the aquarium
This is an important factor responsible for the normal functioning of living organisms. The oxygen content in water depends on the number of inhabitants, the size of the container, and temperature. Aquatic plants play an important role in maintaining the gas regime. A large aquarium with numerous plants and a small number of fish is able to provide itself with oxygen as a result of photosynthesis. But you shouldn’t neglect aeration in this case either. In a small reservoir there are no natural regulation mechanisms, as in nature, so it is necessary to maintain the gas balance artificially.
The aerator forces air through the water. The gas breaks up in the atomizer into small bubbles, which release oxygen upon contact with the liquid. The activity of the process depends on the compressor and can be adjusted.
How to choose the right aerator for an aquarium
If you need an aerator for an aquarium, how to choose one causes certain difficulties for many. In this case, it is necessary to understand that an excess and at the same time a lack of oxygen has a negative effect on the inhabitants of the aquarium.
It is for this reason that the choice must be made based on several factors:
- dimensions of the aquarium;
- total number of inhabitants.
Some experts point out that with an abundance of numerous plants, it is possible to refuse to use an aerator. However, this is fundamentally wrong. This is largely due to the fact that at night, plants have the property of absorbing oxygen, which significantly worsens the conditions for comfortable living of the inhabitants.
Help : warm water requires more oxygen, which is why the aerator is an integral part, without which living creatures will simply die.
With an abundance of a wide range of products on the Russian market, an excellent option would be to consider the most popular models in more detail.
JBL PROSILENT A300
Diaphragm compressor made in Germany.
Main technical characteristics:
- external installation type;
- productivity indicator - 300 liters per hour;
- power – 3.9 W;
- designed for aquariums with a volume of 100 liters, when installed in a 400-liter aquarium it turns out to be ineffective;
- ability to adjust power;
- equipped with 2 air flow tubes - significantly improves the aeration of large containers;
- The noise level is no more than 38.5 dB, thanks to which we can talk about quiet operation.
Basic package includes:
- silicone hose 2 meters long;
- spherical spray;
- check valve
Warranty period is 4 years.
Main advantages:
- silent operation;
- long service life, which is confirmed by the warranty period;
- good basic equipment - there is no need to purchase additional accessories.
The disadvantages include the inability to regulate the flow. The average cost is 3 thousand rubles.
TETRA APS 300
Despite the fact that this is a German brand, production is located in China and Poland. A special feature is the constant flow of innovative products.
Models are equipped with:
Classification of device types
When considering the question of how to choose an aerator for a mixer , you must remember that it can be of several types. In this case, it all depends on the type of installation and principle of operation.
Installation type
The installation option often directly depends on the design features of the mixer itself. In fact, where there is a threaded connection, installation is carried out there. This is worth paying attention to before purchasing.
Today there are several types of threaded connections:
- external - installation is carried out by attaching to the internal surface of the mixer. This option is popular among Russian consumers, since another type is extremely rare. Due to its aesthetic appearance, no one will pay attention to the aerator;
- internal - as in the previous case, installation is carried out directly to the tap head. The expediency of installation may arise only in a few situations - households prefer large-sized taps (for example, they fit perfectly into the interior of the kitchen) or because a similar device has already been installed, which has become unusable due to long-term use.
The second option will be optimal only for those who want to highlight the device due to its massive dimensions and emphasize their individual style. In any case, it is worth remembering that each model copes with the task perfectly.
Important : the presence of good pressure in the house ensures the longest service life of a structure with an internal connection. However, what exactly to choose depends on the wishes of the household.
Varieties of models depending on features
There are several model ranges on the Russian market, including:
- disk - a special feature is the ability to break the flow of a jet using a specially designed disk with numerous small-diameter holes. In most cases, it has the form of a mesh - internal (with its help you can quickly find out the level of contamination of the device) and external;
- slotted - a specially designed membrane is installed in the device body, upon which a jet hits, slits are formed. It is through them that water flows, while being pre-saturated with a sufficient amount of oxygen.
In Russia, the optimal solution would be to use disk devices. This is largely due to the need to use coarse filtration due to poor water quality.
Models that are equipped with a membrane are distinguished by their speed and ability to significantly increase water quality. They are popular throughout Europe.
Information : membrane models are not common in Russia, because due to high resistance they significantly reduce the pressure - this is especially true in small cities. In addition, their cost is higher than the classic ones.
Useful tips
And finally, a few recommendations.
It is better to place the air sprayer in the center of the aquarium for the purpose of the most measured air exchange. However, in large tanks it is advisable to install 2-3 units in different corners. In addition, it is better to install them near the heater to quickly mix the heating liquid with the total capacity of the aquarium.
It is better not to bury devices in the ground , since this is more likely to cause them to fail; however, for aesthetic purposes, you can bury them in the ground.
Of course, the pores on them close up faster, but this is a consumable that is not really a pity. So to speak, everything is for the sake of beauty.
Once the pores of the sprayer become clogged, it is extremely difficult to clean it. Here's some advice on how to clean it without any problems. You just need to put the sprayer in the bleach solution for 30-40 minutes - and there will be no trace of the brilliant green. Then, upon completion of the soaking operation, the device is thoroughly washed with pipeline water and put back into operation. Or removed as a backup option.
Step-by-step compressor installation
Before purchasing a compressor, make sure it matches your electrical requirements. Detailed requirements and algorithm for assembling the device are always indicated in the instructions. Read them carefully and, if anything remains unclear, ask your consultant how to install the compressor correctly. Remember that a compressor that is too powerful can create uncomfortable conditions for the fish; a powerful current can only be eliminated by clamping the hose. But why overpay for electricity and listen to noise? This solution can also cause the engine to overheat. Our information article will help you choose the right aerator.
What affects oxygen concentration?
There are several factors that can significantly change the characteristics of a gaseous substance:
- Temperature. Warming water leads to a decrease in oxygen concentration. High temperature stimulates metabolism and gas exchange in the inhabitants. Intensive aeration of the water in the aquarium can solve this problem.
- Underwater plants. Their ability to oxygenate water is known to many. But do not forget that at night they themselves need this gas. In the dark, there is a fierce struggle for oxygen between all living creatures in the aquarium. You can solve the problem by turning on the aerator at night.
- Snails and bacteria. All living beings consume oxygen as a result of their vital activity, leaving behind a lot of organic matter. Its decomposition increases the shortage of valuable gas in water. To control the number of aerobic microorganisms, excess food should not settle to the bottom and excessive proliferation of snails should be prevented.
The intensity of oxygen saturation of the aquatic environment depends on the size of the air bubbles. Small ones give more oxygen to the water. For these purposes, wooden sprayers are used: it is better if they are made of linden. They give a uniform flow of tiny bubbles. Every 2 months, fake sprayers are changed due to clogged pores.
Main functions
Without exception, all modern faucets contain a diffuser. In addition to significant water savings, the device is capable of:
- significantly improve the quality of the jet - the spray will not fly in different directions. Without it, the pressure is too high, and it is difficult to adjust it to your needs;
- saturate the water with oxygen and significantly reduce the concentration of active chlorine, which negatively affects the human body.
The aerator allows you to reduce the noise level when the mixer is operating.
Is oxygen really that useful?
The methods described above are used both separately and together. The main thing is that there is no oversaturation with air. If you properly balance the number of fish, plants and light, you can avoid many problems. Whereas if the balance is disturbed, aquatic inhabitants can suffer from gas embolism, which leads to death. But this is possible in extremely rare cases.
Researchers have established a standard for oxygen concentration in the aquarium even for fry: 5 mg/l or more. Pet supply stores sell specialized devices that measure oxygen in an aquarium in test mode. If there is an excess of oxygen, then you can reduce the number of algae and plants or, which is more reasonable and simpler, reduce the amount of light directed into the aquarium. And also, as an option, aquarists often use the following technique: drain water in small portions, and instead pour in fresh and clean water. This way the air flow is regulated.
Home……….Information……….Aquarium sprayer
The oxygen supply system for the aquarium includes a sprayer, which not only helps create a comfortable atmosphere for the inhabitants of the aquarium, but also, as a design element, enlivens the picture of the underwater world. Thanks to the use of a spray, the operation of the aquarium compressor is significantly improved, and the water is more quickly saturated with oxygen.
price: 16500 rub.
Aquarium Vision200 Dimensions: 100x400x61 Capacity: 200.00 l. Description:
The Vision series, panoramic aquariums with a curved viewing glass, are distinguished not only by an impressive overview but also give the product a more elegant look.
Availability: IN STOCK price: 23500 rub. Aquarium Vision-300 Dimensions: 120x45x66 Capacity: 300.00 l. Description:
The Vision series, panoramic aquariums with a curved viewing glass, are distinguished not only by an impressive overview but also give the product a more elegant look.
Availability: IN STOCK price: 20,000 rub. Aquarium Aqua-Prestige-250 liters Dimensions: 102x42x65 Capacity: 250.00 l. Description:
The aquarium is designed in a classic style, has a sophisticated design, is highly reliable, and is suitable for both home and office.
Availability: IN STOCK price: 14500 rub. Aquarium Aqua-Prestige-160 liters Dimensions: 82x37x56 Capacity: 160.00 l. Description:
The aquarium is designed in a classic style, has a sophisticated design, is highly reliable, and is suitable for both home and office.
Availability: IN STOCK price: 21900 rub. Aquarium Aqua-Prestige-320 liters Dimensions: 122x42x60 Capacity: 300.00 l. Description:
The aquarium is designed in a classic style, has a sophisticated design, is highly reliable, and is suitable for both home and office.
Availability: IN STOCK
see all aquariums
Advantages of sprayers
Advantages of the first two types of sprayers:
- affordable price;
- Suitable for almost any air pump, even low-power ones.
- they are easy to disguise.
Ceramic atomizers are more efficient, but are more expensive and are suitable for compressors that develop a pressure of at least 1000–1500 mm of water column. Their disadvantages include noise during operation.
Long Tubular Synthetic Atomizers:
- can be easily disguised (attached with suction cups to a smooth surface);
- have an air supply regulator on the hose;
- come in lengths from 20 to 60 cm, which allows you to choose a sprayer for a specific aquarium;
- a long wall of bubbles creates active water movement.
Almost all internal filters are equipped with a built-in sprayer, in which an air hose is attached to the filtered water outlet tube. With the help of this hose, atmospheric air is mixed into the water flow and complete aeration is obtained.
Aquarium sprayer and everything you need to know about it
A quality aquarium sprayer should be dense enough to produce fine bubbles.
And its pores should not clog too quickly. The most common sprayers are in the form of short cylinders made of abrasive materials. But they have excessively large bubbles. Better quality aquarium sprayer made from white whetstone. But both of them are suitable for equipping the vast majority of even the most low-power air pumps. They can be easily camouflaged by placing them on the ground and pressing them down with something heavy, for example, a piece of lead. And their price is quite low. Dense ceramic atomizers are much more effective. But only pumps that develop a pressure of at least 1000–1500 mm of water column can cope with them. Every self-respecting company's instructions for its microcompressor say what pressure it develops. If it is 1000 or more millimeters, feel free to take a ceramic sprayer. They cost a little more and are less common on shelves, but they are able to produce fairly small bubbles.
Long tubular synthetic sprayers (Penn-Plax, etc.) are very good. The color and shape make it easy to disguise them in thickets of plants (they are attached to a smooth surface with suction cups), and the bubbles can be both small and large, thanks to the regulator air supply on the hose. Tubular sprayers are available in lengths from 20 to 60 centimeters, which means you can choose a sprayer specifically for your aquarium. And a long wall of bubbles creates active water movement even in a very large home pond.
Which aquarium sprayer is best?
There are two main types of air diffusers for aquariums: those made from natural materials and those made from artificial ones. The first ones are made of special porous stones, which allow a stream of air to pass through them, crushing it into many small bubbles that escape into the water. Such sprayers are the most environmentally friendly, but their disadvantage is the noise they produce during operation. Therefore, most people who have aquariums, and especially those who have them in the bedroom, choose the second type of sprayer.
They are made of soft rubber with holes through which air escapes. These nozzles are much quieter and often come in the form of long strips that can be spread across the bottom of the aquarium to ensure even gas saturation of the water. This sprayer option is also ideal for use in large aquariums designed for large volumes of water.
Although quite powerful and large compressors are produced, designed for large aquariums, experienced breeders suggest using not one, but several sprayers located in different areas of the bottom. Although it is not recommended to bury them in the ground, as this speeds up the clogging of the holes in the material, many still do this to give their aquarium a more aesthetically pleasing spring look.
Design of aquarium sprayers
Aquarium sprayers can have a wide variety of shapes: cylindrical, elongated, square, rectangular. You should choose exactly the size and shape that is best suited for your volume of water, and will also fit well into the bottom topography and underwater landscape created in the aquarium.
In addition to simple sprayers designed only to perform their main function, there are also special decorative sprayers for aquariums that are complex in design. They can take the form of a variety of objects or decorations made from baked clay: treasure chests, old vases, ships, pieces of wood. A sprayer is mounted inside each such figure, to which the compressor hose is attached.
When they work, it seems that air bubbles come from these objects. When using decorative sprayers, the appearance of the aquarium not only does not suffer, but even acquires a certain originality and individuality, since the choice of one or another figure depends only on the buyer’s imagination.
Another interesting option is backlit aquarium sprayers. They are equipped with special LEDs that create a uniform glow or periodic color changes. They can look like standard spray options or as decorative ones with one more additional opportunity to decorate the aquarium.
Thanks to such sprayers, even at night, your home pond will look unusual and beautiful, and the location of such sprayers will give the aquarium individuality and special beauty. With the help of light, you can place accents in the “interior” of the aquarium, attract attention to plants or figures on the bottom, and the whole environment will only emphasize the beauty of the fish living in such an unusual aquarium.