At the same time, our grotto will not only be decorative, but will also become an excellent shelter for various types of catfish, and even a food source, for example, for ancistrus.
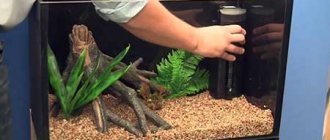
So, let's buy a coconut. We look first of all at its appearance - there should be no traces of mold. Shake the coconut - you should hear a characteristic gurgling sound inside. If the coconut does not gurgle, then it is probably spoiled and is not suitable for our purposes. The coconut is purchased, then the fun begins. There are as many options for the future of the grotto as your imagination allows. It can be a grotto with one entrance, or with several, located both at the ends and on the sides; both with straight holes and with asymmetrical holes.
We begin to “cut” the future grotto. To do this we need a drill, a hacksaw or a jigsaw and a knife. There are three spots on one end of the coconut - these are marks from the cutting. One of the spots does not have a hard shell and therefore breaks through easily. Using trial and error, we find it and pierce it with a knife. This is done in order to drain the coconut milk. There is one secret here: to make the milk flow out better and faster, drill another spot. The milk is drained, we use it for its intended purpose and move on. Using a hacksaw or jigsaw, we saw off the end on which there were stains - we get the future entrance to the grotto.
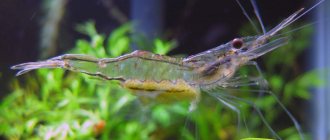
Now you need to clean the inner surface of the coconut from the pulp. To do this, take a knife and carefully, in small pieces, break off the pulp directly from the shell. We use the pulp for its intended purpose. The future grotto is ready. Next, you can use all your design skills and make, for example, a few more inputs and outputs with a jigsaw. The edges can be made uneven by breaking off pieces of the shell with pliers.
And finally, some tips. It is not necessary to remove the “hair” on the coconut (it’s a matter of personal taste); and if you have ancistrus, then in six months the coconut will be polished both outside and inside. If your aquarium is more than 100 liters, then it is not necessary to boil the coconut; in a smaller aquarium it can turn the water brownish, so boiling to remove the coloring pigment is recommended. The specific gravity of a coconut shell is greater than the specific gravity of water, so it sinks safely and does not require additional fastening. And also, as a decorative element, Java moss and anubias grow perfectly onto coconut shells - secure them only with a thin fishing line for the first time.
As you can see, making a coconut grotto is not a difficult process at all and can be done by anyone who wants to add variety to their underwater world.
How to make decorations for an aquarium?
If you are looking to create a unique aquascape within the walls of your home aquarium, you need to create your own aquarium decorations. For crafts, you can use both special materials from the store and improvised materials, but they are safe and pre-processed. Homemade decor can be made from natural or artificial raw materials; these can be simple or complex blanks. Simple decorations include the simplest grottoes, caves or wooden decks. Complex ones include sunken ships, chests, underwater cities, and bizarre underwater reefs.
How to install a background yourself
A background composition made in the form of an imitation of a rocky bottom, a coral reef or thickets of dense plants can recreate a colorful perspective on the walls of an aquarium. Proper lighting and decoration of the back wall of the aquarium will attract the attention of caring admirers of marine aesthetics. Of course, it's all a matter of taste, because some people prefer a completely darkened background, while others want to see something exciting.
The second option is more appropriate because it provides the opportunity to dream up. You can apply beautiful ocean-themed patterns to the back wall of the tank using a special self-adhesive film with a print. An important aspect is to attach the material well to the glass. To do this, you need to degrease the surface of the glass with a special solution, then moisten the glass with water from a spray bottle, and carefully stick the sticker on. Then use a plastic card to align the pattern, removing air bubbles under the coating.
You can make a background using foam plastic. The material is absolutely harmless and easy to use. It is necessary to burn one side of the part until small bubbles appear. When it cools down, you need to apply a thin layer of cement to the surface of the abrasive. The result will be a gray relief, similar to an underwater rocky reef. It is attached with the decorated side to the back wall of the aquarium using tape. It looks beautiful and natural.
See how to make a background for an aquarium.
Coconut decorations
Coconut is not only a delicious food product, but also an excellent material for creating underwater decorations. The used coconuts, after a long processing process, turn into cute “houses”. You need to buy a solid, not rotten coconut, make a hole in it using a drill or hammer and nail, pour out or drink the liquid. Next, make a hole in the wall of the nut so that it is convenient to scrape out the pulp. The process is of course labor-intensive, but the result will please the eye. When the nut is prepared, it should be boiled in boiling water for 10 minutes. Place it in boiled water for a day, dry it, and place it in a tank. Fish will gnaw coconut fibers in a matter of days; the fibers are good for digestion. Coconuts can be made in the form of boats, caves, or houses.
Instructions: how to make a coconut house for an aquarium with your own hands.
Decorations made from wooden driftwood
They look natural and recreate the semblance of a natural biotope, in which the fish will feel even more comfortable. Wooden roots and driftwood will have to be processed longer to remove all rot and parasites. If you accidentally find a rotten area on the surface of the material, immediately scrape it off and cauterize it. Remember that wooden driftwood from coniferous trees that release resin is not suitable for an aquarium. Other hard wood species can release tannins, coloring the water and making it soft. Therefore, you should be careful with such materials; they are not suitable for all fish.
If you find a dry root or tree sample, boil it thoroughly in water and salt for 6-12 hours. Next, steep the wood in boiled water for several days. Every day you need to pour out the old water and add fresh water. It is recommended to install the snag not in the corner of the tank, where it will easily swell and damage the glass. You can carve a wooden grotto in it, where the fish will happily hide.
Stone sculptures
Stone rocks look very interesting in an artificial reservoir, recreating the effect of an underwater volcanic environment. However, you should be very careful with stone decorations. Many minerals and rocks produce alkali, so they are not suitable for all fish. African cichlids, which have lived for centuries in slightly alkaline water, are more accustomed to pitfalls. Checking the alkalinity of a rock is simple: take table vinegar and drop it on the surface of the rock. If it starts to “hiss”, releasing foam, it means an alkaline reaction has begun.
See how to make a small stone grotto.
Before installing in the aquarium, stones and pebbles are processed by boiling in water for more than 10 minutes. Some breeds take longer. It is important that the edges of the stone block are not sharp or rough. Stones with a smooth surface treated from basalt, granite, sandstone can be harmless.
Clay and ceramic products
Clay is a useful substance that has a beneficial effect on the growth and health of plants. High-quality processed clay is an excellent material from which you can make beautiful caves and fish houses. What should you not make decorations from? From Chinese porcelain, that is, from dishes of this type. Ceramic clay pots and plates do no harm, but porcelain will be harmful. Therefore, be careful when choosing and installing any type of underwater decor.
AkvariumnyeRybki.ru>
DIY aquarium decor
It is very important for Pisces, like humans, to feel comfortable. For inhabitants of the aquatic world, plants, algae or stones are perfect. It is unlikely that you will be able to obtain live plants on your own, but you are quite capable of making homemade decor for an aquarium in the form of a grotto.
DIY decor - grotto idea
The best material for decorating an aquarium is stones. Why not enrich it with a grotto. Making it yourself is not difficult.
Take a glass bottle, strong thread, a wide brush, sandpaper, any flammable product such as cologne, alcohol or solvent. To treat the surface you will need tile adhesive and a special aquarium primer. As you can see, almost the entire list consists of improvised means.
- First of all, you need to prepare the bottle: the neck and bottom are cut off. To do this, you need to moisten a strong thread in a flammable substance and tie it near the bottom. Light the thread, wait 30 seconds, then quickly plunge into ice water. The unnecessary part of the bottle will separate exactly along the contour of the thread.
- We do the same manipulations with the back side of the container. To give the product a more natural shape, use pliers to break off any unwanted pieces.
- For the safety of the animals, it is necessary to sand the edges of the future grotto with sandpaper. You now have a pass-through glass pipe.
Stone finishing\
- Options for decorating an aquarium can be different, but small stones are best suited for decorating a grotto.
- In a small container, dilute the tile adhesive to the consistency of a thick cream.
- Place some of the stones on a flat surface. Glue is applied on top of the stones, where the glass blank is then applied.
- Using a thick brush, apply glue (0.5 cm) to the entire remaining part of the bottle and sprinkle with aquarium soil. Press down on the stones until they are pressed into the mortar.
- The structure will need at least a day to dry thoroughly. After this, soak the product in water for 48 hours so that all unnecessary impurities come out and cannot harm the inhabitants of the aquarium.
Just a few hours of effort, and your unique aquarium decoration with stones is ready.
WomanAdvice.ru>
Clay crafts
If possible, you can make a grotto from red clay. This method is the most labor-intensive of all, because the clay must be fired, otherwise the product will simply break.
So, first you need to build a cave of a suitable shape. For example, in the form of a pot with a broken side or just a rectangular house. To make it spherical, you can use a balloon: inflate it to the desired size, cover it with a layer of clay (not too thin), let it dry and carefully deflate the ball, being careful not to crumple the edges of the clay sphere.
Then the product must be dried. This can be done in the sun or in the microwave. After this, firing is required. If there is a workshop with a muffle furnace nearby, then you can go there. If not, then you will have to use an oven preheated to 220 degrees. It is better to leave the door ajar. Firing takes about an hour, after which the temperature gradually decreases over 15-20 minutes . If you turn off the oven immediately, the clay will become brittle.
After firing, you can place the product next to the fish. If you decide to paint it, you need to make sure that the paints are non-toxic and will not poison the water. It is advisable to additionally burn purchased shards to kill microbes.
How to decorate an aquarium?
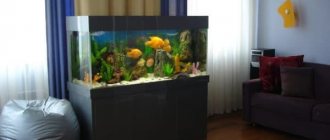
After purchasing an aquarium, the first question that arises is how best to decorate the aquarium. Creating a stunning design requires imagination, careful planning, diligence and, of course, the desire to create a miracle. I will give examples of aquarium design, talk about styles, materials and give useful tips that can help you in the future. I wish your beautifully decorated aquarium to become the center of everyone's attention!
Previously, during the early days of aquarium farming, there was no suitable equipment or special information about aquarium design. Most kept their fish in ordinary jars, without even dreaming of more. But time passed and everything changed. The world of modern technology has brought automation and new fashion trends. A whole trend in aquarium design has emerged, called aquascape . Now in a container you can recreate any natural environment, landscape, even a fantastic one. It all depends on the idea and the right material.
Design styles
Let's talk a little about design styles. There are many of them in the world of design art, and each is unique in some way. Let's consider only the main ones.
Dutch style
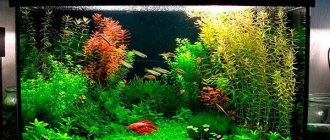
The basis of the Dutch style is lush and dense thickets. About 12 plant species are involved in its formation. For depth of perception, stem plants selected for color, texture and growth rate are planted in groups from the back wall to the front. A Dutch-style aquarium requires careful care: periodic pruning of plants, supply of carbon dioxide, proper selection of fish and abundant bait for plants.
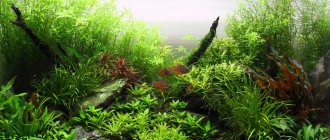
Natural style Nature
Everything is clear here, nature and everything connected with it. It could be a mountain landscape, forest, field, lake or ocean. In creating a natural style, special emphasis is placed on the asymmetrical shapes of only natural materials and living plants (about 5 species).
Iwagumi Style (Rock Garden)
Quite a difficult style to reproduce. Its main features are correctly placed stones of similar textures and shapes in a large open space.
Pseudo-natural style
Pseudo-natural aquarium design is accessible even to a beginner. Quickly and without any special financial costs. The aquarium contains regular soil, plants and fish. The lighting used is either sunlight or weak fluorescent lamps. No carbon dioxide supply.
Pseudo-sea aquariums were invented by seascape lovers. The design is as close as possible to the seabed (corals, shells and other attributes), but freshwater fish live in a pseudo-sea aquarium.
Collection style
This style is also suitable for beginner aquarists. Its essence is to combine a large number of different types of plants, from 15 or more. If in the Dutch style plants are planted in groups, then in the collector style everything is possible. Any variations in sizes and shapes are welcome.
Materials used in the design of aquariums
So, before you start decorating, decide what kind of fish will live in it. After all, each needs its own individual content features. And this is exactly what we need to take into account and build on from here. It’s better to once again get acquainted with the habitat and preferences of future residents than to redo everything all over again. Materials for home improvement can be varied. The main technical nuance of all materials is non-toxicity. Let's look at some of them.
Stones
Stones are a fairly significant element in decorating an aquarium.
They not only decorate and hide installed technical means from prying eyes, but also serve as shelter and substrate for some spawning fish. The following stones are suitable for aquariums: granite, basalt, gneiss, porphyry. It is better not to use dolomite, limestone, or sandstone in the design. They are only suitable for hard water aquariums. Good examples of stones can be found on the banks of lakes and rivers. Before laying, the stones must be thoroughly washed and boiled. Don't forget to check for lime and metal inclusions. To test a stone, just drop vinegar on it. If it sizzles, it means it contains calcium carbonate found in limestone. After checking, the stones are thoroughly washed again. If you don’t have the time or desire to tinker with processing stones, you can purchase them at a pet store.
There is no need to place stones with sharp edges in the aquarium. This may cause your fish to get hurt.
All large stones and structures are placed on the bottom before filling with soil. To avoid damage to the bottom, it is recommended to place plastic sheets under large stones. Large decorative elements are best placed in the background or on the sides. You should not place a cobblestone in the center, which will only take away precious space. Vertical stone slabs can be stabilized using silicone rubber based adhesive.
If the stones are small, they can be placed on the ground itself. But it is worth remembering that a fish that undermines the ground can be crushed by this stone. Basically, this type of decor is placed close to the walls of the aquarium or at a sufficient distance from them, so that the inhabitants of the aquarium do not get stuck. Using sealant from stones, you can create various stepped compositions and fancy caves.
Priming
Laying the soil is the next step in decorating the aquarium.
Soil is an important decorative element. In addition to its aesthetic function, it serves as a substrate for plants, spawning and fish life. Having selected the required fraction and volume, you can proceed to choosing a color. Here it’s whatever your heart desires. The soil can either completely match the color scheme of the aquarium or be completely different. When purchasing from a pet store, pay attention to what it is painted with. After all, paint can dissolve in water over time.
The best primer is natural, not colored with anything. Before filling the soil, heaters or bottom filters should be installed. In places where plants will grow, a nutrient substrate is poured. High bottom relief can be created using terraces.
driftwood
Natural boundaries for the inhabitants of the aquarium can be created by placing wooden elements on the bottom. The specific texture of the wood will fit beautifully into the underwater landscape of the aquarium. You can attach moss or other plants to the driftwood.
Can be used:
- dead tree roots;
- lying for many years in running waters;
- from hard wood (beech, ash, alder, willow, maple).
Can not use:
- with rot and mold;
- tree roots from muddy places;
- contaminated with industrial and agricultural waste.
The tree is cleaned of dirt and bark. To reduce the buoyancy of driftwood, boil with salt for more than an hour, rinse and leave to lie in cold water. The water is periodically changed to fresh. After this, you can begin registration.
Decorating an aquarium with shells
River and seashells, of course, look natural and beautiful. But before you put them in the aquarium, they need to be treated. Small shells are washed thoroughly with water, and large shells are boiled for at least 30 minutes. There is no need to place a shell treated with varnish or other protective material into the aquarium. To avoid injury to fish, it is better not to choose specimens with sharp edges. Remember that shells and corals increase water hardness.
Other items
The bottom of the aquarium can be decorated with an ancient castle, a sunken ship or a chest with multi-colored stones. The scenery can be very diverse. Glass vessels, ceramic or clay pots or any other design. Plants growing in pots look original. You can diversify the color scheme of the aquarium by installing bottom aquarium lighting in the form of a volcano.
Artificial plants for aquariums
Pet stores are replete with an abundance and variety of artificial plants for the aquarium. You can buy everything here. In terms of biological properties, artificial plants are, of course, inferior to natural ones. But with the help of them, even a beginner can decorate an aquarium quite quickly and in an original way. In addition, artificial plants have many advantages:
- quickly and easily cleaned of algae;
- will never be eaten by the inhabitants;
- always look new;
- tolerant to water composition.
You can combine artificial and natural plants. This way you will visually expand, enrich the landscape, make it more vivid in perception, and at the same time you will maintain biological balance in the aquarium.
Background for an aquarium
The decorative design of the background begins first.
This is usually the back wall. Two side walls can also be decorated. It all depends on the desire and initial idea. To create a background, you can use sheet backgrounds printed on durable film. Photo wallpapers of different themes, colors, shades are sold by the meter of different widths. It is better to take it with a margin of a few centimeters.
They are usually attached from the outside. If the base is thin, you can simply moisten it with water and carefully level it. If you plan to change the background often, it is better to use tape. If desired, photo wallpaper for an aquarium can also be glued on the inside with a special sealant designed for this purpose. But here certain inconveniences arise - the film, no matter how tightly you glue it, will peel off in water.
You can add volume to the back wall using a relief background. Recently it has gained great popularity. Its price is quite high, but it is still in great demand among aquarists. Attached inside the aquarium using silicone glue.
You can lay out stones or put cork tiles as a background.
The easiest way is to paint it with paint. And anyone can. Since you will be painting the outside of the aquarium, it will not affect the quality of the water or the health of the fish in any way. But this method has its drawback. If you decide to change something in the background design, it will be more difficult to do it after painting.
What else you need to know about the aquarium:
DIY aquarium decorations: underwater waterfall
A beautiful and mesmerizing spectacle will become the highlight of any aquarium. Before decorating, it is better to immediately write down all your wishes on a sheet of paper, draw a detailed drawing, decide how high and where the underwater waterfall will be.
The role of falling water will be played by sand. Only very small and clean ones are suitable for a good visual effect. Here you will need to experiment with selection. You will also need a tube with a sprayer. The waterfall will work on the principle of injection. Air bubbles rise up. Because of the pressure, small grains of sand are drawn into the tube and, rising up, fall. To avoid the formation of a pile of crumbling sand, you need to experimentally select the amount of material, air pressure and the diameter of the holes of the underwater waterfall.
Let's sum it up
Whatever theme and design style of the aquarium you choose, the main thing is that the reservoir is comfortable for the life of its future inhabitants. All decorations must be made of durable and non-toxic materials. It is the fish that will be the center of attention, and all other decorative attributes are only a harmonious addition to the interior, which should fade into the background. I wish you success in designing and creating your own individual underwater kingdom!
aquariumguide.ru>
DIY aquarium grotto
Without decorations, the aquarium looks empty and unattractive. Such aquatic design (or rather its absence) does not arouse particular interest. It is desirable that design elements are not only aesthetic, but also functional. One of these elements can be a grotto made by yourself.
Why do you need a grotto at all?
In principle, each owner independently decides what the landscape of his aquarium should be. However, a grotto is appropriate if the water house contains restless fish that chase each other. In this case, it plays the role of shelter from aggressive neighbors in the “house”. In addition, this beautiful decorative element adorns the aquarium landscape and is widely used in some areas of aquascape.
Artificial aquarium grottoes are sold in specialized stores. However, many aquarists prefer to make them themselves, at home.
Necessary requirements for materials
A cozy refuge for fish can be made from a variety of materials: glass, stones, plastic, ceramics, wood.
If you decide to make your own decorations, then a number of necessary conditions must be met, the first of which is the principle of “do no harm.” This means that the “building material” should not be aggressive towards the aquatic aquarium environment and its inhabitants.
- For example, stones should not contain lime, which increases the acidity and hardness of water.
- You should not use material with a high iron content, the excess of which provokes the growth of green algae.
- It is also not recommended to take stones for an aquarium from areas of industrial quarries and enterprises.
A homemade decorative design is unthinkable without gluing materials.
- Decorative elements should not contribute to injury to ornamental fish. The use of materials with sharp edges and corners is not allowed.
- The wooden parts of the structure should also be treated with care and attention. Some types of wood can release unwanted substances into the water. This applies, for example, to oak and tree species with a high resin content.
Once the necessary requirements have been determined, you can proceed to consider examples of making grottoes with your own hands.
Stone decorative structures
The simplest option is to create a small grotto using small pebbles, and flat river pebbles are suitable for this.
You can make a frameless shallow grotto by sequentially gluing stones to each other in such a way as to gradually, row by row, create a small hemisphere with an open entrance. And even if the shape of the fish shelter is irregular, this will even emphasize its naturalness.
There are several conditions:
- stones should not have sharp edges,
- The construction of the structure should be done directly in the aquarium, before filling it with water.
The result is a natural, functional and fish-safe part of the overall decor, the only drawback of which is the need to glue the very first row of stones directly to the bottom glass of the aquarium.
There is another way - a very labor-intensive one. A stone of the appropriate size is selected, in which a fish cave is gradually drilled using drills of various diameters. The work is dusty, noisy and difficult, but such a grotto has its advantages.
- Firstly, there is no need to use glue and paint.
- Secondly, such a solid “cave” can be installed anywhere.
However, you should not place the cobblestone on the glass; It is better to carefully lay it on the ground to evenly distribute the load.
Wooden grotto
The simplest option is a stump, in which holes are drilled of the size and location required according to your own design. Naturally, a stump or stump is selected without signs of rotting or decomposition, and it is cleared of bark.
The holes and all other necessary places are polished to prevent injury to the fish. To prevent rotting in aquarium water, the piece of wood should be burned with a blowtorch or gas burner. Read more about how to process wood in this article.
For such a natural grotto, you need a base, which is sprinkled with soil in the aquarium. By the way, you can glue a piece of wood directly to the bottom of the “can.” As a result of the work done, a grotto is obtained, combined with driftwood, and such a natural element of the landscape looks quite organic.
Glass as an ornamental material
You can make an excellent aquarium cave from an ordinary glass bottle.
Depending on the size of your pets, a bottle of appropriate capacity is selected: 0.5 or 0.33 ml. It must be rinsed thoroughly in hot water. Now you need to cut the bottle to the desired size.
- To do this, a harsh thread is soaked in gasoline, tightly wrapped around the bottle in the right place and set on fire.
- Immediately after the thread has burned out, lower the bottle into a container with very cold water.
- It breaks off exactly where the thread was tied.
- Now the sharp edges should be rounded using a fine file.
In principle, the design is ready, but if you decorate it, it will take on an original look. This can be done using aquarium silicone and coarse river sand. The outer surfaces of the glass grotto are coated with silicone, and sand is evenly poured on top.
The substrate for the outer shell can also be rolled fine gravel. The product should be allowed to dry for 24 hours, and then it should be placed on the bottom of the aquarium, sprinkled with soil on the sides. The fish will surely love such an interesting and safe shelter!
Clay grottoes
Each of us sculpted from plasticine as a child.
Now you can make a grotto yourself, but instead of plasticine you need to use red clay. From it you can make a grotto of the shape that your imagination suggests. True, the modeling itself is a small part of the work. First, the workpiece is dried for 3–5 days in the sun. In a city apartment, home craftsmen dry clay products much faster - in the microwave. What is it for?
The main thing is that all the water comes out of the clay, otherwise the product will quickly break.
Then firing is required. If you can find a production workshop with a muffle furnace nearby, then the problem is solved. If there is no such oven, then firing can be done in a conventional oven, heated to 220 degrees. IN
Firing time: 1 hour; it is recommended to keep the oven door ajar. There is such a feature: if after an hour the oven is immediately turned off, it will quickly cool down and the clay will become brittle. That is why the firing temperature should be reduced smoothly, gradually, over 15–20 minutes. After cooling, the homemade grotto is ready for its intended use.
Not all options for grottoes that you can make with your own hands have been considered. In fact, the ingenuity of home craftsmen has no limits, but the main condition - environmental safety - always remains the same!
Video: how to make a grotto for an aquarium with your own hands:
aquariumguide.ru>
Other simple options
Perhaps the easiest way is to make a cave out of coconut. You need to buy a fresh fruit, drain the milk from it, clean out the pulp and make entrances. You can leave the hairs. It is advisable to boil the new house.
Another simple way is to take a plastic bottle, cut off the neck, coat it with aquarium glue and roll it in sand or pebbles. Particular attention should be paid to the edges. To make it stable, you need to glue heavy pebbles around the edges or pour some directly inside. This option is especially good when you need to make a house in a hurry. However, you should remember that the glue must dry completely before immersing the craft in water.
Thus, making aquarium grottoes with your own hands is not at all difficult. It is only important to find environmentally friendly materials and use your imagination.
How to choose driftwood and decor for an aquarium?
To create a healthy aquarium, it is important that the fish have a place to hide. Fish that live in an empty aquarium are stressed and sick. In most cases, rocks, driftwood, plants, pots or coconuts and artificial elements provide decoration and shelter. There is a huge selection of aquarium decorations that you can buy, but you can also make your own.
Aquarium with Malawians
Stones
The easiest way is to buy the one you like at a pet store. Do not buy stones intended for saltwater aquariums if you have a freshwater one. They can significantly affect the pH of the water, so the packaging states that it is intended for marine aquariums only.
You also can’t use chalk, limestone, marble (more precisely, use in ordinary aquariums, they make the water hard, and are used by the Malawians, for example) neutral - basalt, granite, quartz, slate, sandstone and other rocks that do not release substances into the water. You can test the stone with vinegar - drop any vinegar on the stone and if it hisses and bubbles, then the stone is not neutral. Be careful when using large stones; if they are not securely secured, they may fall.
Bog driftwood
If you are interested in the topic of do-it-yourself driftwood in an aquarium, then you will find a large article at the link. Driftwood is a popular form of decoration in an aquarium; they create a surprisingly natural look for the aquascape. Particularly good are driftwood made from stained wood, that is, wood that has spent many years in water and has acquired the hardness of stone; it does not float up and does not rot.
Such driftwood is now available in stores, but you can also find it yourself. To do this, carefully inspect the nearest body of water for the shapes you need. But remember that driftwood brought from local reservoirs must be processed for a long time so as not to bring anything into the aquarium.
Driftwood can produce tannins over time, but they are not dangerous to fish. Water rich in tannins changes color and becomes the color of tea. An easy way to deal with this is to do regular water changes.
Driftwood and stones
Artificial decorations
The choice here is huge - from glow-in-the-dark skulls to artificial driftwood that is indistinguishable from natural ones. Do not buy decor from an unknown manufacturer, even if it is much cheaper. The signature decorations are quality craftsmanship, easy to clean and provide shelter for fish.
Substrate/soil
The soil must be selected thoughtfully. If you are planning an aquarium with a large number of plants, it is better to buy soil from well-known companies; it consists of mixtures and is ideal for all-rooted plants. Colored primers are sometimes used, but have both supporters and haters and look unnatural.
Sand is often used and has proven itself well, but it is more difficult to remove than gravel.
The main requirements for the soil are neutrality, it should not release anything into the water, and preferably a dark color, against which the fish look more contrasting. Fine gravel and basalt fit these parameters. These two primers are the most common among amateurs.
catfishes.ru>
From stone
This is one of the most difficult and time-consuming methods. To do this, you will need to find a stone that is softer in composition and modern special tools. After that, we begin to process this stone, cut and drill various kinds of holes, according to the design you planned. It is not recommended to lay such a grotto on the bottom; it is better to add aquarium soil under it. In the water, your new grotto will quickly become overgrown with various greenery, which will give a beautiful look to your aquarium. The big advantage of such a mainsail is that it is a one-piece product that has no seams or fastenings.