A little educational program. About photosynthesis.
As you know, almost all substances that make up any living organism (proteins, fats, carbohydrates, nucleic acids, etc.) consist of 99% of only three chemical elements: carbon, oxygen and hydrogen. The remaining 1% consists of macroelements: nitrogen, phosphorus and potassium, as well as the so-called “microelements” (primarily iron, calcium, magnesium, zinc, and others in smaller quantities - almost half of the periodic table). Green plants have an amazing mechanism that allows them to independently synthesize organic substances from carbon dioxide and water. Under the influence of sunlight, a special substance contained in their cells - the green pigment chlorophyll - produces simple sugar - glucose - from CO2 and H2O, and from it, with the help of macro- and microelements, enzymes can make proteins, fiber, starch and everything else that needed for the construction of a plant organism. During this reaction, oxygen is released into the environment. Plants use a small part of this oxygen for respiration, and the rest is released into the air or water.
So, for normal growth and development of higher green plants, a sufficient amount is necessary:
- carbon dioxide;
- water;
- sunlight;
- macroelements (nitrogen, phosphorus, potassium);
- microelements (iron, calcium, magnesium, zinc, etc.)
All these components must be balanced with each other. A deficiency or excess of any of them immediately gives advantages not to higher plants, but to harmful parasitic algae (green filamentous algae, scarlet algae, diatoms and others), which create problems in the aquarium. These organisms, which are millions of years older than flowering plants, are adapted to any conditions. For example, if your aquarium has a lot of light and little CO2, you give an advantage to filamentous algae, which can quickly fill your aquarium with tangled fibers of mud. What can be done to prevent this from happening?
In chemistry and biochemistry there is such a concept - “reaction limiting factor”. What this is is well understood by those who often go hiking: the speed of the group is always equal to the speed of the slowest of its members, who is the “limiting factor.” The same applies to the growth of aquarium plants. They have enough water in abundance (they live in it!), macro- and microelements come from the soil, from water and with the application of fertilizers, making good bright lighting is also not a problem, but difficulties arise from time to time with CO2. This is what becomes the “limiting factor” in the aquarium. Why? Why do carbon dioxide problems occur in an aquarium but not in nature? Let's figure it out...
Why is CO2 deficient in an aquarium?
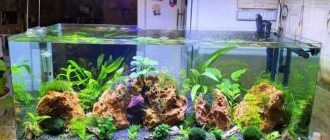
Look at the biotope of any natural fresh water body. There are usually few aquatic plants there, and they sit sparsely, and the bottom is covered with organic sediments, in which a variety of micro- and macroorganisms, mainly invertebrates, live in abundance. And there are plenty of fish and tadpoles... And all of them - from microorganisms that process bottom sediments to fish and frogs - release significant amounts of CO2 into the water. A different matter is a typical planted aquarium, which, as a rule, is densely planted with plants, and there are few and small fish in it (because most large fish spoil the plants). The usual population of our aquariums is small schooling characinka and guppies with platies, which, due to their small size and slow metabolism of carbon dioxide, emit very little carbon dioxide.
But in our ordinary aquariums there is plenty of light, and usually there is also enough nitrogen and phosphorus. So it turns out that CO2 becomes the “limiting factor”. Some plants, when deficient, are simply inhibited in growth and eventually die, while others have adapted to extract CO2 from minerals themselves, decomposing bicarbonates dissolved in any water. In this case, insoluble calcium salts are formed as a “by-product”, which fall out on the leaves of such plants in the form of a rough, unsightly crust (on which unicellular diatoms quickly settle). This trick can be performed by elodeas, anubias, hornworts and some other species that live naturally in stagnant bodies of water and are faced with periodic carbon dioxide deficiency there. So if we want the plants to look like in the pictures on the Internet, and not to be skinny, sad and drooping tails covered with limescale and algal growth, then willy-nilly we will have to think about adding carbon dioxide to the aquarium.
If you are accustomed to approaching such problems more meticulously, and my brief explanations do not convince you, I advise you to refer to the scientific article at this link, in which all this is explained in detail from the point of view of chemistry and biochemistry:
- Carbon dioxide and carbonate water system. Part 1.
- Carbon dioxide and carbonate water system. Part 2.
Let's move on to practice. But first, a little warning:
Don't overdo it!
Of course, CO2 supplied to a planted aquarium in reasonable quantities stimulates the growth and development of plants. But the key word here is “reasonable”! Before moving on to the description of carbon dioxide supply systems, I would like to remind you that, as you know, through negligence you can break parts of the body that are not too prone to fractures . And if excessive aeration, for example, is difficult to harm the aquarium, then excess CO2 can easily poison your fish and shrimp, so control over its concentration is necessary. And the first thing you need to purchase before you start feeding your plants with carbon dioxide is an indicator of its content. The optimal concentration of CO2 in an aquarium is 5-20 mg/l. A carbon dioxide content of less than 3 mg/l threatens plants with starvation, and 30 mg/l is a concentration dangerous for fish and invertebrates.
Carbonate hardness, water acidity and CO2 concentration are interdependent parameters, so knowing two of them you can determine the third. Indicators of carbonate hardness (kH) and acidity (pH) of water, as well as this table will help you more accurately understand what the concentration of CO2 is in your aquarium:
Using a bubble counter, you need to adjust the flow of carbon dioxide from your system into the aquarium so that its content is in the “green” region. If your aquarium is stable, then it is usually enough to adjust the indicator once every month or two, remember the gas supply rate in bubbles per minute, and then simply maintain the supply at this constant rate. At night, the CO2 supply must be turned off (manually or with an automatic valve), otherwise the pH of the water will drop significantly at night.
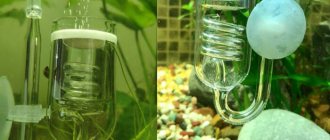
You can simplify the procedure by purchasing a glass indicator of the CO2 content in water, the so-called “drop checker”. The color of the liquid in it changes depending on the concentration of carbon dioxide, and means the same as the colors in the plate in the figure: yellow - a lot of CO2, blue - little, and green - just right. It is better to never let it turn yellow: usually the liquid in a drop checker turns yellow when the concentration has exceeded a level dangerous for fish. Please also keep in mind that the “drop checker” is a rather “braking” device and does not respond to changes immediately, so after changing the gas flow rate you must wait half an hour before its readings begin to correspond to reality. The indicator liquid in drop checkers lasts up to three months, then it turns pale, cloudy, and requires replacement. By the way, liquids for drop checkers of different brands sold in pet stores are completely interchangeable (their composition is exactly the same).
Many literary sources advise, given the usual carbonate hardness in our aquariums of about kH = 4, to set the carbon dioxide supply rate to about 5 bubbles per minute for every 50 liters of aquarium volume. It is clear that this figure is approximate, but it is better to regulate the flow using indicators by starting with it. otherwise, again, there is a risk of “overdoing it”.
Drop checkers:
CO2 indicator Dennerle Mini CO2 indicator Dennerle Maxi
What you need to know about carbon dioxide cylinders for an aquarium?
What do you need to know before purchasing and starting to use a carbon dioxide cylinder?
There are 2 thread standards for carbon dioxide cylinder valves:
- Russian-made cylinders, equipped with domestic valves with 3/4″ thread
- cylinders of Russian and foreign production, equipped with imported valves with a 21.8 mm thread
We always have on sale metal adapters and gaskets for them of the required size from 21.8mm to 3/4″ and vice versa, so there are no problems with interchangeability.
Carbon dioxide, technical and food, is refilled at the same gas filling stations, with the difference that for food purposes the cylinders must be washed. But whether they do it or not, like many things in our country, most often remains a mystery. Therefore, no matter how much we strive for purity, this is unlikely to be verified, as a result of which there is virtually no difference between technical and food gas for aquarium purposes; the chemical formula of the gas is the same. Although, of course, to use gas for carbonating drinks, we recommend contacting specialized companies.
In a filled cylinder, the working pressure is 60-70 atmospheres, at the outlet of a special reducer (i.e. directly to the aquarium) it should be reduced to approximately 1.5-2 atmospheres.
After several months of enjoying the sight of the rapid growth of aquarium plants, when carbon dioxide is supplied, the pressure in the cylinder begins to rapidly drop. This indicates that the CO2 remaining in the cylinder is only in a gaseous state. You should not wait for the moment when the pressure gauge needle comes very close to the zero value. You need to think about refilling the gas cylinder, or purchasing a spare cylinder, because... Most refueling stations require a small residual pressure in the cylinder (3-5 atmospheres), this is a subjective sign of the cylinder’s tightness and suitability for refueling. If you empty the tank completely, it is possible (but not necessary) that you will have to deal with some unnecessary formalities and an increase in the cost of refilling. However, if the cylinder is purchased from us, we will refill it even if it is completely empty. And of course, there is absolutely no need to run to refill the tank if it seems to you that the pressure has just begun to drop. It is possible that there is still 100-150 g of liquid gas left in the cylinder and you will still be able to use it for a couple of weeks. It is optimal to have 2 cylinders so that one full one is always in stock, because a sharp decrease in the concentration of carbon dioxide in the aquarium will affect the condition of the plants.
How much gas will I get from a 2 liter cylinder?
It all depends on the consumption, the efficiency of use, your experience, and the saturation of the aquarium with plants. After all, some have an aquarium of 300 liters, some have 100, some have a dense underwater garden, some have several bushes of plants, gas consumption is accordingly different. On average, we can say that it should last for 3-4 months for a 200 liter aquarium.
What type of cylinders made in Russia are sold in our store?
Currently, we sell only new cylinders made in accordance with GOST, 2l volume, only with a flat bottom, with a manufacturer’s certificate, with both standard thread sizes of 21.8mm for imported reducers and 3/4″ for domestic ones. Cylinder certification is carried out every five years, the date of the first certification of the cylinder during its production is stamped on the body, it can be easily read on the cylinders sold by us. That is, after purchasing a cylinder from us, you use it, recharging it an unlimited number of times, for 5 years, after which the gas filling station will require certification, which is most often done there, it costs about 300-500 rubles. After which you use the cylinder for another 5 years until the next certification, etc.
| Attention! If the seller claims that the inspection period for a domestic cylinder is not 5 years, but 10, the cylinder was not produced in accordance with GOST, this is a deception! By purchasing such a cylinder, you are taking an unjustified risk! All cylinders produced in Russia according to GOST have a certification period of 5 years! We sell only cylinders made in accordance with GOST! |
What information is printed on the body of the cylinder and does it have a passport?
The following information is stamped on the body:
-manufacturer’s trademark, cylinder number
-date (month, year) of manufacture and year of next survey
-working pressure in MPa (kgf/cm2), max. pressure at which the cylinder was tested during certification
- cylinder capacity, weight, quality control department stamp
Domestic cylinders sold by us are accompanied by a laminated passport
As a rule, documents are not included with imported special small-capacity cylinders for aquariums. They also have all the information stamped on the body; it contains similar data as Russian cylinders. Some imported manufacturers (Germany) provide brief instructions.
Regarding documents for components (reducer, EM and needle valve) for carbon dioxide systems with a Russian cylinder. In addition to the cylinder, there is also a passport for the carbon dioxide reducer. Some buyers are also interested in certificates for sprayers. But they do not exist in nature. Because This item is not high pressure.
What are the differences between domestic industrial and imported aquarium CO2 cylinders?
| Advantages | Flaws | |
| Domestic cylinders | Low price. High safety margin. Refilling is possible at almost any technical gas and fire extinguisher filling station. | Heavy. Susceptible to corrosion when stored in high humidity conditions. |
| Imported cylinders | As a rule, they have a more attractive appearance and are often made of steel painted with glossy enamel or high-strength polished aluminum. Aluminum cylinders produced by ISTA (Taiwan) have the lowest weight. Most cylinders do NOT corrode. | High price. There are often refusals of acceptance at technical gas filling stations. |
Industrial carbon dioxide cylinders produced in our country, still according to USSR standards, have a much greater safety margin than imported cylinders produced specifically for aquarium equipment, because they were initially designed for work in enterprises, mechanical shocks, multiple refills and not very careful users. Their disadvantages include their “rough design”, since they are made from very thick steel pipes, and this is also associated with a lot of weight, for a 2-liter filled cylinder this is about 6 kg. Therefore, fragile girls who plan to carry a cylinder on foot to a gas station need to have a good understanding of this before purchasing. We draw special attention to customers who are particularly demanding in terms of design, that the design of domestic steel industrial cylinders is very different from the design of special aquarium cylinders made of polished aluminum alloy. As well as the price of the latter, which is several times higher. And the most important advantage of domestic cylinders is the possibility of refilling them everywhere. In practice, we have seen that the most popular and in demand format for carbon dioxide aquarium cylinders is a volume of 2 liters, both for domestic and imported ones. Cylinders of higher volume require more physical effort to carry; not all clients can do this, and not everyone has enough free space in the aquarium cabinet.
How do we refill cylinders in our company?
We can offer you a service for refilling carbon dioxide cylinders for an aquarium. Either Russian cylinders purchased from us, or imported cylinders for an aquarium (Taiwan or Germany), regardless of origin.
1. Refilling the cylinder with delivery by courier.
- Our courier arrives and draws up an act of accepting the empty cylinder(s) for refilling.
- Pay the courier for the service of collecting the empty cylinder(s)
- As a rule, within 1-3 working days we refill the cylinder(s), the courier brings it (them) back, you sign the invoice, the acceptance certificate, pay the cost of refilling and delivery costs (the cost of collection and delivery in accordance with the current tariffs for store website)
- At your discretion, you can combine the collection of an empty cylinder or the delivery of a refilled cylinder with the delivery of other goods you need from the store’s assortment.
CYLINDERS ARE NOT ACCEPTED FOR REFUELING:
- WITH TRACES OF MECHANICAL DAMAGE
-VOLUME LESS THAN 0.5L AND OVER 3 LITERS
-HEIGHT OVER 485 mm
-WITH VALVE THREAD DIFFERENT FROM STANDARD USED IN RUSSIA*
-WITH AN EXPIRED CERTIFICATION
- HAVING BUILT-IN (NON-REMOVABLE) PRESSURE GAUGES
-CYLINDERS WITH EXPIRED INSPECTION PERIOD ARE ACCEPTED FOR REFUELING BY INDIVIDUAL AGREEMENT
*-standard thread: 21.8mm (in increments of 14 threads per 1 inch), or 3/4″
Where to get CO2 from?
So, from all of the above, we understood that since CO2 is so necessary in the aquarium, and the fish do not produce enough of it, then it should be supplied forcibly. But where to get it from? There are many options. If you have a small aquarium of 10-30 liters, and you are near it most of the day, then you do not need any CO2 generator at all: in such a jar it is enough to carefully pour a 20 ml glass of ordinary drinking water into the aquarium 2-3 times a day sparkling water from a bottle (of course, not sweet, not salty or mineral). It’s better to take the cheapest one, which is made from tap water - it’s guaranteed to have no harmful additives. If you have a larger aquarium, you will need a carbon dioxide generator, fittings for supplying it, a bubble counter and a reactor that ensures its dissolution in water at the required concentration. Let's start with generators.
Fermentation generator
Drexel bottle
The oldest method of producing carbon dioxide in the aquarium hobby is the fermentation method, based on the reaction of sugar and yeast. The principle is known and understood by everyone: yeast in an aqueous solution eats sugar, turning it into alcohol and carbon dioxide. If the process is carried out in a sealed container, then the resulting CO2 can be fed into the aquarium through a tube. The advantages of the yeast method are clear - “cheap and cheerful”: sugar and yeast cost pennies, everyone can knead the brew, and, it would seem, there are no costs. But it's not that simple!
Firstly, yeast eats sugar quite quickly, and CO2 is released normally only in the first couple of days. Then the solution runs out of sugar, and the yeast itself is poisoned by the resulting alcohol and dies. In order to slow down the process, aquarists have come up with many different tricks: from the banal “mix, but do not stir” (so that the sugar dissolves gradually) to the addition of soda and various thickeners (gelatin, agar, starch), which make it difficult for yeast cells to get to the coveted sugar . But even the most advanced fermentation device “bubbles” CO2 for no more than two or three weeks, after which it still needs to be disassembled, drained of the foul-smelling contents and refilled.
Secondly, during the period of intense fermentation, organic foam is formed in the reactor, which can, once it gets into the aquarium, cause a “biochemical catastrophe” in it, so carbon dioxide from such an apparatus must be passed through a “ Drexel flask ” so that foam, drops, etc. stayed in it and did not reach the aquarium. It is best to pour a little baking soda solution into the bottom of such a bottle so that CO2 gurgles through it, clearing not only foam, but also alcohol vapor, acetic and other acids formed during fermentation.
Thirdly, if you skip the end of fermentation, the excess gas pressure in the reactor may be replaced by insufficient pressure, and instead of supplying gas to the aquarium, water from the aquarium may begin to flow into the reactor. This means that a check valve is needed to shut off the tube in such a situation.
Finally, fourthly, the rate of gas release during fermentation is very unstable, depending on the ambient temperature, the type and quality of yeast and many other factors, and it will have to be constantly monitored using a bubble counter, at the beginning of the process limiting the flow of gas into the aquarium, and at the end - opening to the fullest.
To be fair, it should be said that since there are quite a few fans of the “fermentation” method among aquarists, which is considered environmentally friendly and natural, some well-known manufacturers of aquarium equipment, following their beliefs, produce industrial kits for producing CO2 by fermentation. As a rule, these kits include a replaceable bottle with “biogel” (a solution of sugar and a special thickener) and special “slow” yeast, as well as all the necessary accessories. The contents of the bottle usually work for about a month, after which you will have to buy a new bottle.
An example of such a set:
- CO2 system for aquarium Dennerle BIO 120
- CO2 system for aquarium Dennerle BIO 60
- CO2 system Dennerle Einweg 160 Primus
- CO2 system JBL ProFlora bio80 eco 2 with refillable cylinder for aquariums from 12 to 80 l
- CO2 system JBL ProFlora bio80 eco 2 with refillable cylinder and mini CO2 reactor for aquariums from 12 to 80 l
- CO2 supply unit Dennerle Nano Bio
Replacement bottle:
- Spare Dennerle gel bottle
In general, the simplicity and cheapness of the “mash” turns out to be apparent, but it requires constant care. What other options are there?
Consequences of CO₂ shortage
The importance of supplying carbon dioxide to the aquarium has been sorted out. But what could be the consequences of a lack of this compound in aquarium water? In fact, the consequences can be different:
- weakening of aquarium plants;
- sudden death of flora;
- accumulation of calcium on the surface of leaves;
- an increase in pH levels, which in turn will lead to a weakening of the protective functions of fish;
- deficiency of iron and other beneficial elements;
- the appearance of algae and their damage to aquarium plants.
A lack of carbon dioxide will negatively affect aquarium vegetation.
If aquatic plants grow well enough an aquarium All the nutrients that algae need for development ( nitrates and phosphates) will be immediately absorbed by the plants. But low CO₂ levels will significantly reduce the activity of these plants, which in turn increases the chances of algae. This is why it is so important to ensure a stable supply of carbon dioxide to the aquarium.
Tetra General Tonic Tetra Contralck Sidex Tetra Bactozyme Tetra Vital Tetra NitrateMinus Tetra AquaSafe Hydrogen Peroxide
Chemical method
Kipp apparatus
The second method of obtaining CO2 is much less common in the aquarium hobby. It is based on a chemical reaction between bicarbonates or carbonates (baking soda, lime, potash, chalk, marble, eggshells, dolomite, etc.) and acids (acetic, hydrochloric, citric, etc.), in which carbon dioxide. In order to control the reaction rate and the volume of CO2 released, the process is usually carried out in a rather complex unit called the “ Kipp apparatus ” (its classic laboratory version is shown in the figure), in which the reaction between solid carbonate and liquid acid can be finely controlled. The advantages of the method are the low cost of the starting components. The disadvantages are generally the same as those of the fermentation method: the difficulty of adjusting the process, the need to periodically change reagents (lime and acid are consumed), as well as the need for the same protective devices - a Drexel flask and a check valve - because chemical CO2 is also capable of carrying away traces of acid and other harmful components, and the return of aquarium water into the device can damage it.
Exotic ways
We will not dwell on them in detail, we will only say that they exist. This is the production of CO2 using an electrolyzer, a powder generator, a TPV device, a hydrocarbonate thermoreactor, and other strange devices, the use of which in household aquarium keeping is not only difficult, but also, in the absence of skill, can be dangerous. Similar exotics should perhaps include “dry ice” (solid carbon dioxide) evaporators, which can lead to explosions and frostbite in the wrong hands. Among the industrial exotics, we can note the tablets for saturating water with carbon dioxide. Such tablets usually consist of calcium carbonate and dry organic acid, as well as retardants and mineral additives. When placed in an aquarium (or in a special device - a carbonator installed on the bottom), such tablets gradually dissolve, releasing CO2 into the water. However, it is impossible to control this process, and their effectiveness raises reasonable doubts.
An example of such tablets:
- Tablets for saturating water with carbon dioxide Hobby Sanoplant CO2 100 tablets
- Tablets for saturating water with carbon dioxide Hobby Sanoplant CO2 20 tablets
What remains? Not the cheapest, but the most modern and reliable solution: supplying CO2 from a cylinder...
The second way to supply CO2 to an aquarium is a CO2 cylinder system.
The gas obtained by the first method enters the aquarium under very low pressure, so diffusers and many other types of mash reactors are not suitable. The cylinder system is much more convenient, gas comes directly under pressure from the cylinder, but it is very different in price. Braga is much cheaper, but it also has its drawbacks, for example, as I already said, the low pressure of the incoming gas, in addition to this, the uncontrolled supply of CO2, that is, there is even a certain danger of mash, if something goes wrong, you can put all the fish. Such cases, as a rule, are not frequent, but you need to remember this. So, decide for yourself whether you need CO2 or not, and which supply method you choose. Good luck!
Virnik Ilya,
Especially for AQA.ru
No entries found.
Cylinder systems
Today, the most common and reliable are cylinder systems that supply CO2 to the aquarium from disposable or reusable (refillable) gas cylinders.
Disposable cans , similar to aerosol cans, with a volume of 100 to 500 ml are a good solution for small aquariums. From such a canister, once a day, in the morning, a “bell” or “inverted cup” type reactor is filled with carbon dioxide (we will talk about the types of reactors below) and during the day this volume is gradually dissolved and used by plants. The gas in such a can lasts for about a month or two, depending on the intensity of use.
An example of such a set:
- Tetra CO2-Optimat Diffusion Set
Spray can for him:
- Tetra CO2-Depot cylinder
For very small nano-aquariums, CO2 systems are produced with replaceable cans , similar to cans for old Soviet soda siphons or for pneumatic pistols, for example, these:
Systems for “siphon” cans:
- CO2 Hagen kit
- CO2 supply kit Dennerle Nano Set
Spray cans for them:
- CO2 cylinder Hagen (3 pcs)
- Replacement CO2 cylinder Dennerle (3 pcs)
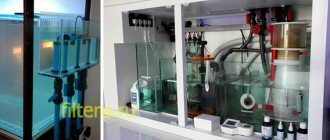
Much more common are refillable refillable cylinders with a reducer . In such cylinders with a capacity of 1 to 200 liters, CO2 is in the form of a liquid under pressure. To supply gas from them to the aquarium, you need a two-stage reducer that reduces the pressure to a reasonable level. Usually it is equipped with two pressure gauges, one of which shows the pressure in the cylinder (and allows you to control how much carbon dioxide is left in it) and the second - the outlet pressure.
Reducer example:
- CO2 reducer Sera Flore CO2
The gas supply is regulated by a needle valve (fine adjustment valve) and a special solenoid valve , usually included in aquarium CO2 cylinder kits - they allow you to automate the adjustment of the gas supply, set daily regimes and turn off its supply at night (when there is no one to consume it anyway). You will definitely need a bubble counter (for what we have already described above) and a check valve that prevents aquarium water from being sucked into the reducer (which can easily fail due to water).
Needle valves:
- JBL ProSilent Control high-precision adjustable valve
- Double needle valve CO2 Dennerle
Solenoid valves:
- Solenoid valve ADA EL-Valve
- Solenoid valve JBL 12V CO2
- Solenoid valve Sera
Bubble Counters:
- Bubble counter ADA CO2
- Dennerle CO2 Bubble Counter
- Bubble counter FERPLAST
- CO2 Bubble Counter Flore
Check valves:
- JBL CO2 check valve
- CO2 check valve Dennerle Prof
- CO2 check valve Dennerle
AQUAkmv
Post Views: 5,524
I would like to tell you how my acquaintance with carbon dioxide supply systems began. Like any aquatic enthusiast, at one point I was no longer satisfied with the species composition of my plants.
gearbox ur 6-6
At that time, I had the simplest plants - vallisneria, hornwort, elodea, some types of cryptocorynes and a small speckled echinodorus, which did not want to grow. Well, the winged fern is small, stunted with many blackened leaves. In general, nothing exotic, and the plants did not grow very willingly. At one point I even thought that the aquarium was “cursed”, well, no plants grew, even if you cracked. Like any advanced aquarist, I turned to the Internet in search of a solution to my problem. After surfing all the well-known forums, I came to the conclusion that I needed carbon dioxide, since my aquarium was sparsely populated, the plants simply did not have enough CO2. Because of this, the pH was higher than 7, which also contributed to the inhibition of the growth of higher plants (which cannot be said about blackbeard and threadwort). After weighing all the pros and cons, I decided to put mash on my 110-liter aquarium. A cheap and not very convenient solution for aquariums larger than 50 liters. Without hesitation, I made a spray bottle from a dry lilac branch. And on the very first evening of using the mash, I saw bubbling in the plants (the so-called perling), my happiness knew no bounds! But the joy ended very quickly along with the mash((2-3 days and the mash stopped bubbling. I tried a lot of recipes, the maximum I achieved was 14 days on one charge. The disadvantages of this system are obvious: the impossibility of fine adjustment, the impossibility of shutting off the gas supply At the same time, my more advanced friends were telling me how convenient the cylinder is, that one charge for 150 rubles lasts them for six months or more... And I decided that it was time...
...it's time to get yourself a normal CO2 system! Having searched the Internet for ready-made solutions, I was not satisfied with anything in terms of quality/price. It was decided to collect everything myself, piece by piece.
Schematic diagram of a carbon dioxide kit for an aquarium
The first thing I started looking for was a cylinder, but not five liters, as most people use, but two. The five-liter cylinder was good, both in price and in volume, but it did not fit me in size in my cabinet. And then I came across a two-liter oxygen cylinder! I was happy to buy it.
medical oxygen cylinder
The next item was purchasing a gearbox. After studying the Internet, I realized that I needed exactly the UR-6-6. Bought. But I encountered another problem: the cylinder was medical with an angle valve and a non-standard outlet thread - naturally the gearbox did not fit ((I had to order an adapter from a turner. The price was 250 rubles. After that, everything fit perfectly.
gearbox ur 6-6
Now comes the fun part. “Body kit” for the cylinder. It includes a solenoid valve and a fine adjustment tap. Now there are many companies producing these components, they even have everything in one: gearbox, electric valve, fine adjustment valve. There are Chinese, there are European. The price also varies greatly. I settled on components from the Italian company Camozzi. The company is quite well known in narrow circles and produces pneumatic equipment.
Here is a sample list of what you need to buy:
- Throttle RFO 352-M5 1 piece
- Union fitting with nut 1511 6/4-M5 1 piece
- Nylon O-ring M5 2661 M5 2pcs
- Nylon O-ring 1/8 2661 1/8 2pcs
- Solenoid connector A70-G70 122-800 1 piece
- Mini-distributor electric 2/2 1/8 1 piece
- Nipple for tube 2601 8-1/8 1pc
in the photo: 1. pressure inside the cylinder (norm is from 6 to 8.5 MPa. If <6 - the cylinder is almost empty, if >8.5 - URGENTLY BLOW OUT EXCESS GAS) 2. pressure after the reducer (norm from 0.2 to 0.8 MPa, depends on what carbon dioxide is sprayed with. If there is a bell, a ladder, then 0.2 MPa is enough, but if it is ceramic, then more pressure is needed) 3. gearbox ur-6-6. It is convenient because both scales show pressure in MPa, and not in liters. 4. Solenoid valve with . In principle, an optional option that allows you to turn off the carbon dioxide supply using any timer or controller. If you do not install it, then the supply is turned off by screwing the tap on the cylinder. Attention! NOT ON THE GEARBOX, BUT ON THE CYLINDER! 5. Fine adjustment valve, or needle valve, or throttle. With it we can set the exact number of bubbles per second. I usually set it to 30 bpm. 6. First check valve.
Well, we purchased the most important thing, all that remains is the little things - to buy a couple of check valves, a bubble counter and a reactor.
In the photo: 7. Bubble counter 8. Second check valve Let's take a closer look at the reactor. Now there are 1001 ways to dissolve carbon dioxide in an aquarium. The simplest, but also the most ineffective is a dry sprig of rowan/raspberry/viburnum/lilac. There are also active ones, those with a built-in pump, ceramic funnels, ladders, bells, etc. But I settled on the most, in my opinion, effective - flow-through with a ceramic sprayer.
In the photo: 9. My flow reactor installed on the water supply of an external filter.
Well, that's all, the system is assembled. You can launch! 1. We fill the cylinder strictly according to WEIGHT! No more than 0.7kg/1l; 2. We fasten the gearbox with the body kit; 3. Place the cylinder vertically, completely close the valve on the reducer (usually you need to unscrew the screw valve completely); 4. Open the tap on the cylinder. ATTENTION! After opening the tap on the cylinder, IT IS STRICTLY PROHIBITED TO PLACE THE CYLINDER HORIZONTALLY!!! If the liquid fraction of carbon dioxide gets into the gearbox, it will be damaged! 5. Let's see what pressure the first one shows. Should be in the range from 6 to 8 MPa; 6. Smoothly begin to tighten the tap on the gearbox until 2 is 0.6 MPa; 7. Now you can plug the plug of the EM valve into the socket; 8. Set the number of bubbles on the fine adjustment tap; 9. It remains to check the system for leaks. We take “fairy” and pour it into a plate. We find any brush in the house and “foam” all the joints of the system, looking for where bubbles are inflated. If there are no bubbles, then that’s all; if there are, we stretch out the leaks.
The number of bubbles per minute can be calculated using the formula:
N=( KH * V ) / 30
Where: N – number of carbon dioxide bubbles per minute V – volume of water in the aquarium KH – buffer (carbonate hardness)
Important : It is not advisable to give CO2 in larger quantities than the formula recommends. Because It won't do any good, but you might end up with an outbreak of blue-green algae.
I'll add a little. As you can see, my Camozzi fittings and gearbox are connected by a flexible hose.
To fix this and make a rigid connection, you need to buy a Futorka 2521 1/8 - 3/8, it is in the Camozzi catalog.
From the EM valve side:
From the gearbox side UR 6-6:
Now my plants grow much more readily! I hope this article will help novice aquarists in assembling their own CO2 system. Thank you for your attention)))
CO2 reactors, atomizers and diffusers
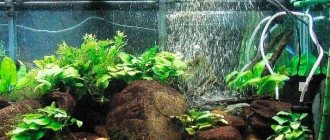
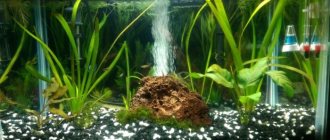
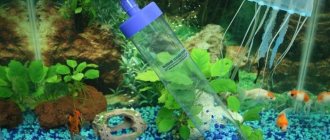
So, the method of generating CO2 has been chosen (I hope that it is still a cylinder and not a “fermenter”!), accessories have been selected, and the final touch remains - how to supply CO2 to the aquarium so that it dissolves in the water and does not erode from it into room? Of course, conventional sprayers, with which we aerate water, are absolutely not suitable! With their help, we will saturate with gas not the aquarium, but the room in which it stands. You need special devices, which in the aquarium industry are called the collective term “CO2 reactors”. Let's start with the simplest ones.
"Bell" or "inverted cup" . Actually, what it is is clear from the name. Usually this is a small plastic or glass container that is filled with water, placed in the aquarium with the open side down (attached to the wall using a suction cup) and filled with gas from a cylinder. During daylight hours, the gas from the cup gradually dissolves and is consumed, and in the evening the cup is filled again with water so that the operation can be repeated in the morning. This CO2 reactor is only suitable for the smallest nano-aquariums, because... its effectiveness is low. The main advantage of the “bell” is that with its help it is impossible to “overdo it” and create a CO2 concentration in the container that is dangerous for fish.
Diffuser ADA Wood
Wooden diffuser - a diffuser of deciduous wood (usually rowan, birch, willow or linden are used). Such a diffuser (unlike a conventional air spray) creates tiny gas bubbles that facilitate its dissolution. The advantage of such sprayers is simplicity combined with significant efficiency. Disadvantages are the need to supply gas under fairly high pressure (otherwise it is difficult to “push” such a stick), variable performance (the wood gradually swells and deteriorates) and fragility (replacement is needed every 2-3 months). You can make such a diffuser yourself, or you can buy a ready-made one:
Glass ceramic and membrane diffusers
This is the most common and diverse type of reactor for dissolving CO2. What unites them all is the principle of operation: gas is supplied to a glass container located under water, the upper part of which is closed with a semi-permeable microporous glass disk, ceramic plate or plastic membrane. There are tiny holes in its surface through which the gas is slowly slowly pressed into the water in the form of tiny bubbles. The supply pressure is regulated in such a way that there are few gas bubbles (and not as in the figure on the left!), and they would not reach the surface of the water, dissolving completely in its thickness.
Diffusers:
- ADA Pollen Glass Beetle 30
- Dennerle Pfeife Mini
- Dennerle Pfeife Maxi
- ADA Pollen Glass Mini
- ADA Pollen Glass Large
- Dennerle Topf Mini
Another type of reactor is the so-called “ bubble ladder ”. These are glass or plastic transparent labyrinths in which each CO2 bubble, launched from below, gradually rises along steps or in a spiral, slowly passing through the water column and dissolving in it along the way. With the correct setting of the “ladder”, not a single bubble should reach its last step, or it should reach so small that it has no chance of reaching the surface of the water. This thing may be bulky, but it usually doesn’t need decoration, because... Just watching the bubbles rising through the labyrinth is a truly meditative sight! There are a great variety of these ladders available, in different shapes and sizes. Their advantage is not only the mesmerizing slow dance of bubbles, but also the fact that they (unlike wooden and membrane diffusers) do not require excess gas pressure, which allows them to be used together with “mash” type generators. They also do not need a separate bubble counter - they can be easily counted with a stopwatch at the entrance to the reactor.
Video 1
Carbon dioxide supply methods
To maintain the optimal concentration of CO₂ in water, several types of systems are used, which have their pros and cons. We are talking about a cylinder installation, CO₂ generators and the use of carbonated water. Now more about the features of each type.
There are different ways to supply CO₂
Balloon installation
For maintaining large tanks, a bottled supply of carbon dioxide is best suited. Such a system consists of a control panel and the cylinder itself. However, you can assemble it yourself. But it’s much easier to buy a finished product in a store. Of course, this will hit your pocket hard, but you can save a lot of time and effort.
CO₂ cylinder system
- reliability and cost-effectiveness of the design;
- large tank with carbon dioxide;
- availability of CO₂ supply control;
- stability and continuity of product operation;
- the ability to fully automate the process if you connect a special controller.
- high cost of construction;
- complexity of installation.
Note! When choosing a cylinder installation, you will need to deal with a high-pressure cylinder. And this is already a health risk.
DIY CO₂ system TOP 11 unpretentious aquarium fish TOP 10 largest aquarium fish TOP 20 beautiful aquarium fish TOP 12 most expensive aquarium fish
Video - CO2 cylinder system for aquarium
Sparkling water
There is an old, but quite effective way to supply carbon dioxide to an aquarium - using regular soda. This is a CO₂ concentrate, so using sparkling water can increase the amount of carbon dioxide in the aquarium to the desired level. For 100 liters of aquarium water you need 200 ml of fresh sparkling water. It is recommended to add soda in the morning along with fertilizer . But if the water sits for a while after opening, the carbon dioxide will begin to erode, so the dosage will need to be increased.
You can also use sparkling water
On a note! According to calculations, a liter bottle of soda should be enough for a small aquarium for almost a month. Any water can be used, except salt water.
Undoubtedly, using soda to enrich aquarium water with carbon dioxide has a number of advantages.
- no additional equipment is needed ( bubble or reactor for dissolving carbon dioxide);
- ease of application of the method;
- economical (soda is inexpensive);
- efficiency for aquariums of different sizes;
- ease of use of the nano-aquarium .
- high cost of 1 gram of carbon dioxide when compared with other methods;
- unstable concentration of carbon dioxide in the reservoir;
- low CO₂ supply intensity.
This method is considered uneconomical when considered in the long term. It is also not suitable for owners of large aquariums. But without taking into account these shortcomings, such a method has a right to exist.
Using soda for an aquarium is not very profitable
CO2 generators
Another way to supply CO₂ to the aquarium is using a special generator. There are two types of carbon dioxide generators: mash and a chemical generator using soda and citric acid. Both methods are suitable for medium-sized aquariums up to 100 liters. For larger reservoirs, the intensity of such generators may not be sufficient. Now more about each of them.
Braga
The generator consists of a small tube and a vessel with mash, which must be hermetically sealed. Its functions can be performed by an ordinary plastic lemonade bottle. Also, when creating the design, a second bottle can be used, which will act as a foam trap. Such a trap will protect the aquarium from foam from the mash.
Basic diagram of a homemade CO₂ fermenter
To create mash, you need a two-liter bottle of water, half filled, dry yeast (about 3 grams will be enough), 300 grams of sugar. The mash should be played for no more than 14 days. Of course, changing the ingredients can extend the fermentation period, but, as practice shows, the generator will not operate on mash for more than 3 weeks.
- ease of installation of the structure;
- ease of use;
- low cost of the generator;
- design safety.
- no regulation of carbon dioxide supply;
- fragility (system resource is quite low);
- lack of stability of carbon dioxide supply.
Note! A mash-based CO₂ generator is nothing more than a temporary solution, as it is not suitable for a long period.
CO₂ generator based on mash
Soda and citric acid
A more stable CO₂ generator than a mash generator. The fact is that it is easier to control the release of carbon dioxide by adding a solution of soda and citric acid. Consequently, aquarists prefer a solution of citric acid and soda to release carbon dioxide rather than mash.
Soda and citric acid
- low cost of the generator;
- ease of assembly and operation;
- design safety;
- stability of carbon dioxide supply;
- ability to control the intensity of CO₂ supply.
- low intensity of carbon dioxide supply;
- weak system resource;
- the need for constant monitoring.
All of the above systems for releasing CO₂ must include in their design a special reactor for spraying gas bubbles into the aquarium. Such reactors also make it possible to control the amount of carbon dioxide. You can find a large number of reactors that operate on different principles. But the simplest option is to supply carbon dioxide to the aquarium filter , or rather to its input.
CO₂ generator circuit from soda and citric acid