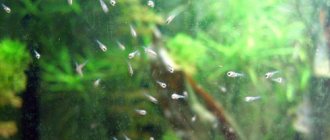
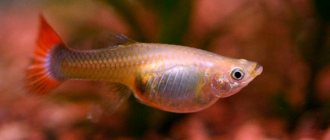
Aquarium fish are not just beautiful pets. They require attention and some care. This is especially true for fry. After all, in order to grow up beautiful and healthy, they need to create the right living conditions, as well as feed them with balanced food.
This applies to all ornamental fish and guppies as well. What to feed guppy fry - this question invariably arises among their owners. And if everything is more or less clear with adult fish, then what and how to feed the kids still needs to be figured out.
What are the feeding habits of fry?
The most important rule is that fry need to be fed differently from adult fish. Babies are given food up to 6 times a day, unlike adult fish, which are fed 2 times a day.
The second important rule is portions. There should be enough food for everyone, but it should not remain on the surface and then settle to the bottom . This must be carefully monitored and the excess removed immediately after the baby guppies have eaten. Otherwise, you can create dangerous conditions for the life of fish. The food settles to the bottom and a lot of nitrogen forms in the water, this is harmful to the fry and can lead to the death of the entire brood.
The third main rule is habitat. As you know, guppy fry need to be separated from large fish in a separate container. Water needs to be collected from a large aquarium, where the parents of the guppies live. Water is changed daily.
Every aquarist should remember these three rules. But there are many other nuances, which we will discuss further.
Harvesting "live dust"
As soon as the ciliates are diluted in sufficient quantities, they should be given to the fry. This is where the difficulty arises, because microscopic creatures are difficult to catch, and pouring rotten water, saturated with organic matter, into a nursery aquarium is harmful for young fish.
One of the simplest and safest methods, for which you will need:
- syringe without needle;
- test tube or any other oblong container;
- cotton wool or foam rubber.
It is carried out in a few simple steps:
- Carefully remove the water with the accumulation of ciliates from the jar using a syringe.
- The test tube is half filled with this liquid.
- A piece of cotton wool or foam rubber is placed on top of the water from the jar.
- The other half of the test tube is carefully filled with fresh water and waited.
- Due to the lack of oxygen, the ciliates begin to suffocate and rise to the top, making their way through the layer of cotton wool.
- The microorganisms that have accumulated on top, along with clean water, are collected with a syringe and given to the fry. This procedure can be repeated 2-3 times.
As the fish grow, they can gradually be switched to other foods with a larger fraction - grated egg yolk, Artemia and Cyclops nauplii, microworms.
What do kids eat
The same food is suitable for fry as for adult fish. However, this food should be smaller so that babies can swallow it. When choosing dry food, you must first knead it almost until it becomes dusty.
In addition, in pet stores you can find special food that is intended for fry. They are balanced and contain all the necessary components for the proper growth of babies. The most famous is Tetra MicroMin, but there are also its substitutes, which are also excellent for growing aquarium fish.
You can also feed newborn guppies using natural fish food, it can be vegetable or protein. Everyone chooses the most convenient option for themselves.
It is difficult to say which type of food is better; you need to look at the development of the fry and then draw conclusions.
Babies need to be monitored especially carefully in the first days of their life . Everything is important for their proper growth: nutrition, habitat, light - it must be turned on constantly, you can also use a lamp to provide the babies with light.
Let's take a closer look at the types of food for fry.
Live food
Many are still inclined to think that live food is suitable for better development of fry, especially in the first days of life. Usually this is live food ground to dust.
After just a week, the fry’s diet can be diversified with brine shrimp, small bloodworms, and rotifers; grown-up fry of cyclops and microworms eat well.
You can also prepare natural food for your pets at home. You can use milk and egg yolk for this.
Egg feed
You need to hard boil the egg. Then separate the white from the yolk; we don’t need the white. And the yolk needs to be ground on a fine grater, add about a glass of water to it and stir until a homogeneous consistency is obtained. After this, we collect the liquid into a pipette and lower it into the aquarium. This will be protein food for the fry. They really enjoy eating it.
Video: Preparing food from eggs
Milk
It is more difficult to prepare food from milk and it will take a lot of time. Pour milk into a bowl and evaporate it until you get a dry powder. This powder should be fed to the fry.
Food made from milk and eggs cannot be considered complete; it must be alternated with other types.
Live food at home
This is microworm house breeding. This food consists of almost only protein, and it is very useful for young guppies. How to separate it? In a bowl, mix corn flour and water to the consistency of sour cream, add a piece of yeast, mix everything and throw in a microworm (you can get it from an aquarist you know). In a few days it will multiply there and the food is ready.
Video: DIY live food for fry
For those who cannot breed worms at home, for aesthetic reasons, it is better to use other types of feed, including industrial ones.
Live fish food
Nematode
Excellent food for any fry. They are easy to keep and very small (from 0.04 mm to 2 mm in length and 0.10 mm in width). Unlike a microworm, a nematode culture can be left unfed for several weeks without dying.
The nematode is a soil roundworm - Turbatrix aceti, which can also live in silt. Since nematodes are live food, they are especially suitable if the fry refuses artificial food. Nematodes can live in aquarium water for up to a day, so they do not quickly poison the water and can be eaten by aquarium fish fry within a day.
Nematodes live in very acidic environments, feeding on bacteria. To prepare a growing medium for them, take a mixture of apple cider vinegar and distilled water. Vinegar should be ordinary, without additives.
For example, we take half a liter of vinegar and half a liter of distilled water, mix and add a couple of spoons of sugar or a few slices of an apple without peel.
An apple is needed to create a breeding ground for bacteria. After a week or two, the solution will become significantly cloudier, which means that the bacteria have multiplied rapidly and it’s time to add the nematodes themselves.
Nematode culture can be purchased on the Internet, from birds, or from familiar aquarists.
Add vinegar eels to the solution and place the jar in the dark. In a couple of weeks the culture will be ready.
The most difficult thing is to filter out the nematodes, since they live in a very acidic environment and adding them along with vinegar can be fatal to the fry. You can pour vinegar into a bottle with a narrow neck, seal the top with cotton wool and pour fresh water on it.
Nematodes will move through the cotton wool into fresh water and can be caught with a pipette.
Another method of breeding nematodes is even simpler and more often used.
The nutrient medium is rolled oatmeal or oatmeal, which needs to be brewed until it becomes thick sour cream. After the oatmeal has brewed, you need to add about a teaspoon of table vinegar per 100 grams of medium.
Next, the mass is laid out in a layer of 1-1.5 cm in saucers or other containers and a nematode culture is placed on top. Be sure to cover the container so that there is a moist environment and does not dry out.
In just two or three days, the nematodes will already be crawling onto the walls and can be collected with a brush.
One of the nuances of breeding nematodes in this way is that the culture should be in a warm place. The layer should not be too high, no more than 1.5 cm. If mold appears, then the medium was too liquid or not enough vinegar was added.
Of course, you need to feed the nematodes by adding fresh porridge from time to time. When? This will already be visible in the process. If the yield has decreased, if the medium has darkened or water appears on it, if there is a smell of decomposition.
You can also feed with a few drops of kefir or carrot juice, even a couple of drops of live yogurt.
But it’s easier to have several containers with nematodes in stock and, if something happens, just switch to another one.
Nematodes are excellent food - small, lively and nutritious. They can be fed even to fry of different sizes, since the nematode itself is also different.
Zooplankton - ciliates
Ciliates are not the only microorganisms; they are a mixture of various microorganisms measuring 0.02 mm or more.
To start your own culture of slipper ciliates, place some hay, spinach or dry banana or melon peel in a bottle of water and place it in a sunny place.
The problem is that you cannot control the types of microorganisms in such a culture, and some may be toxic to the fry. To protect yourself, first boil the hay, spinach or banana peel and then add a culture from familiar aquarists to the water, which is dominated by the ciliate slipper.
The water needs to be aerated to reduce the smell from fermentation, and siphoning off the residue from the bottom will extend the life of the crop for a few more days.
So, fill a liter jar with water and bait - dry banana peel, pumpkin peel, hay and place it in a non-sunny place. Add a culture of ciliates to the water, preferably from familiar aquarists.
If not, then you can even get it from a puddle or local reservoir, although there is a risk of bringing something else in. Wait a few days for the ciliates to multiply.
You can catch it in two ways - filtering through paper and lowering it into water or darkening the jar, leaving only one bright place where the ciliates will gather. Then you simply collect them with a tube.
Ciliates are not as tenacious as nematodes, so you will have to start a new jar every couple of weeks. But at the same time they are extremely small and can be eaten by all types of fry.
Green water - phytoplankton
Ciliates can be divided into two categories: zooplankton (we talked about it above) are tiny microorganisms. Phytoplankton are tiny algae, ranging in size from 0.02 to 2 mm in length.
Aquarists use green water as food, but it is actually phytoplankton.
Green water is extremely easy and simple to obtain. Simply take some water from the aquarium, pour it into a jar and place it in the sun.
The sun's rays will cause the water to turn green within a couple of days. When this happens, simply add some water to the aquarium with the fry. Instead, add water from the aquarium.
This is very similar to breeding ciliates, only even simpler. Any water from an aquarium contains both zoo and phytoplankton, but by increasing the amount of light we stimulate the growth of phytoplankton.
One problem is our climate, in winter or autumn there won’t be enough sunlight, but you can just put it under a lamp, the main thing is that the water does not overheat.
If you have a microscope, then you can generally grow only the crop that you need, but in my opinion this is unnecessary.
Microworm
The microworm (Panagrellus redivivus) is a small nematode (0.05-2.0 mm long and 0.05 mm wide) that appears too small for a fry. But they have one quality that makes them stand out: they are very nutritious.
To create a microworm culture, mix cornmeal and water until creamy, then add a quarter teaspoon of yeast.
Green water is simple, accessible, very small in size, and fry eat it well from the first days of their lives. And most importantly, it does not die in the aquarium and serves as a source of food for the fry for several days. For greater efficiency, you need to keep several jars at the same time, in case the plankton suddenly dies in one.
Place in a jar with a lid, which has holes for ventilation, in a layer of no more than 1.5 cm and add a culture of microworms.
The easiest way to get them is from a bird or from familiar aquarists. But if there are none, then you can find a damp pile of fallen leaves in the nearest park, collect them and bring them home. In it you will find very small, white worms, which you need to add to the container with the nutrient mixture.
After a couple of days, you will see microworms crawling out onto the walls and which you can collect with your fingers or a brush.
The fry eat them voraciously, but like nematodes, microworms do not live long in water, and it is important not to overfeed. When you collect them from the walls, some of the nutrient mixture may get into the water, but don't worry, it will also be eaten by the fry.
As a rule, it lasts for two weeks, after which the launch must be repeated. Rolled oats are also used as a nutritional mixture, but the smell from it is more unpleasant and the quality of our oats leaves much to be desired.
However, there are many recipes for preparing the culture; you are free to choose your own.
What do pet stores offer?
Tetra food is especially popular. A special series is being developed for kids, suitable only for them.
Tetra BioMin
This food contains all the necessary components for the proper development of guppy fry. The developers have combined all the nutritional components in one paste:
- Artemia.
- Mosquito larvae.
- Beef liver.
- Fish liver.
- Yolk.
- Sprouted wheat flour.
The food is available in the form of a paste. The food is squeezed out of the tube in measured doses. One dose is enough for one feeding. You can squeeze the food directly into the water, where it dissolves and is ready for consumption.
Feeding guppy fry with this paste will give them everything they need for proper and complete growth and development.
Tetra MicroMin
This food is available in the form of a dry mixture, which contains all the components necessary for the fish.
- It contains useful vitamins A and D, they are needed for the appearance of a bright color.
- Carotene.
- Vitamin T, also known as growth vitamin.
- Calcium.
Manufacturers specially develop the composition of the food and all components are contained in it in the dosage required by the fish.
JBL NovoTom
This food also contains all the necessary additives for the proper growth of the fry.
Stages of development of fry of spawning fish
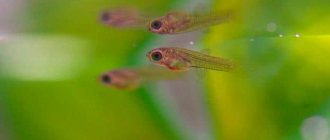
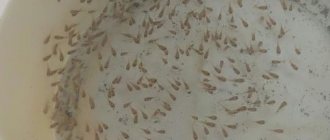
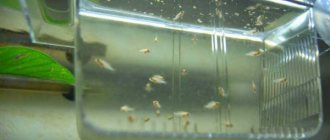
1 - Caviar. Typically, for most aquarium fish, incubation of eggs lasts about 24 hours from the moment of fertilization. Plus or minus a few hours, depending on the ambient temperature. 2 - Larva. After hatching from the egg, the larva practically does not swim and sits motionless on the walls and bottom of the aquarium. The larva has a yolk sac from which it receives nutrition. This stage of development lasts about 3-5 days. 3 - Malek. Having absorbed the yolk sac, the larva begins to swim, this is an already formed fry that begins to look for food and feed on its own, it is at this moment that feeding must begin.
stages of fry development
If in nature the process of feeding the fry is decided independently, since the spawning of fish itself begins during the rainy season, river floods, when a large amount of organic matter gets into the water, which in turn stimulates the growth of microorganisms, which are excellent food for the fry, then in the aquarium the food is added by the aquarist , controls its quantity and the process of eating. Under natural conditions, the fry feeds on absolutely everything living that fits into its mouth and whatever it can catch.
Plant food
The diet of guppy fry, as well as adult fish, must include plant foods . Green algae. They usually grow in the aquarium itself, making up phytoplankton. Also in every aquarium there is zooplankton, represented by the smallest living organisms. They will become food for the fry from the very first days of their life.
Such phytoplankton can be grown at home.
You need to pour water from the aquarium into the jar and place it in a place where direct sunlight falls on it, thus starting the process of photosynthesis. After 2 days, this water can be added to the container where the fry live.
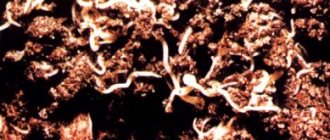
Top 2 - Bloodworm
A well-known and widely available live food for aquarium fish, rich in protein (up to 60%). It ranks first in nutritional value among live fish food.
They look like small red worms, but in fact they are the larvae of non-biting aquatic mosquitoes (bell gnats). Adults of these mosquitoes do not bite because their mouth parts are underdeveloped.
The bloodworm gets its bright red color thanks to an iron-binding protein, which is why the larvae are also called bloodworms. In nature, bloodworms can live in dirty water with low oxygen levels precisely thanks to this protein. And by feeding fish and shrimp such iron-rich foods, they get brighter, more saturated colors.
In nature, mosquito larvae live in bottom mud and feed on detritus and microorganisms.
Bloodworms are sold on sale in dry, freeze-dried, frozen and live forms. Of course, live food will be the most useful, especially during the period when fish are preparing for reproduction, but freeze-dried and frozen bloodworms are quite nutritious and healthy.
Live bloodworms do not last long. The life cycle of the larvae is quite short, only 10-12 days. Before feeding the fish, the larvae should be washed with clean water. In summer, it is recommended to first rinse the food with a weak solution of potassium permanganate, and then with water.
This type of live food is more suitable for large numbers of fish in large aquariums, since it is desirable that the entire portion be eaten within 2-3 days.
Collecting bloodworms in nature on your own is not recommended, as the risk of the larvae carrying infections and diseases is high. It is better to purchase a live product from a reputable breeder.
Storage
Method 1. You can store bloodworms in the lower part of the refrigerator in a damp state. Usually the larvae are laid out on a damp sponge in a small container. Bloodworms need to be washed daily, removing dead larvae.
Method 2. Freshly purchased, unwashed bloodworms are laid out in a thin layer on slightly damp newspaper. The bloodworm is covered with the same newspaper on top and rolled up. Stored at the bottom of the refrigerator compartment. Before feeding, rinse with water in a net. In this form, the bloodworm remains alive for up to 2 weeks.
Method 3. Place fresh live bloodworms in a net and rinse. The water after this procedure should drain well, so that only drops of water remain. The washed bloodworms are placed in a tight bag for transporting fish and distributed in a thin layer. In this form, the package is placed in the freezer. In this form, bloodworms are stored for quite a long time, unlike frozen dry ones (dry frozen bloodworms need to be fed within a month).
Boiled yolk
For the fry of some types of aquarium fish, for example, gourami, zebrafish, etc., boiled yolk can be used as a starter food. It is not difficult to prepare such food. Take a chicken egg and boil it hard. Peel the shell, take out the yolk and cut it into two parts. Pour water into a half-liter jar, rub your finger over the surface of the cut part of the yolk and rinse in the jar. Let's repeat several times.
Let the yolk microparticles settle to the bottom of the jar and add the muddy water. Pour in clean water and repeat until the water in the jar becomes completely clear. You need to add yolk microparticles into the aquarium little by little and preferably near the compressor sprayer. Since the yolk is a perishable product and is eaten by the fry only in a suspended state, it is necessary to launch several ampullary snails to the fry, which will collect uneaten yolk particles from the bottom.
Ciliate slipper
For the smallest fry of egg-laying fish species, the ciliate slipper is well suited. But do not confuse it with other types of ciliates. In fact, there are a lot of species of ciliates, but not all of them are suitable for fry to eat. Separating the slipper from other types of ciliates is not so easy, but it is still possible.
As a last resort, you can breed mixed species of ciliates, among which the fry themselves will choose the ciliate slipper. Breeding ciliates is very simple. Take a clean three-liter jar, fill it with aquarium water and add 2-3 thinly cut carrot wheels or a small piece of dry banana peel.
After 1-2 days, when the water in the jar becomes cloudy, remove all the fertilizer and leave the jar until the water in it becomes completely clear. Usually takes 7-10 days. In clear, bacteria-free water, ciliates are clearly visible to the naked eye. Feeding ciliates to fry is very simple by pouring ciliates into the aquarium through a hose or simply over the edge of a jar.