Post Views: 436
5
(2)
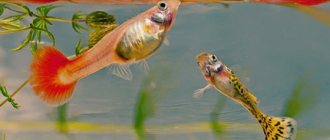
Nematodes or roundworms are a type of protostomes from the molting group. Currently, more than 24 thousand species of parasitic and free-living nematodes have been described. Free-living nematodes live in soil, fresh water and the sea, where their numbers can exceed 1 million individuals per 1 m3. They play an important role in ecosystems. Cultivated nematodes are small (1-2 mm long), spindle-shaped worms that move by bending their entire body. In the aquarium hobby, these worms are called microfood or microworms. Used as food for fry and small fish species. Breeding nematodes at home is not difficult, worms are not demanding, but there are some nuances.
container with nematode
Description of the nematode and its varieties
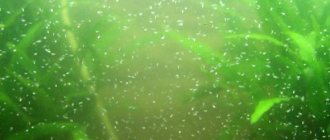
Nematodes are microworms that grow from 1 to 2 mm. They move by wriggling their whole body and are mostly white in color. Nematodes can live both in the external environment: rotten and diseased plants, wet soil, puddles, and in the home: spoiled food, beer residues and yeast.
Aquarists use this type of worm as food for fish, growing them at home. Breeding nematodes does not require special conditions or high costs. However, despite the large variety of worms and the ease of breeding, not every species can be used for feeding.
| Nematode name | Description | Habitat |
| Vinegar eel | Grows up to 2 mm, viviparous. The offspring develop inside the individual within a week. | Vinegar that has not been processed, spoiled homemade wine. |
| Panagrell | Length 2-3 mm, rich white color. | Spoiled food, yeast, diseased plants, landfills. |
| Banana | Grows up to 1.5 mm, body diameter up to 40 microns, has very little weight | Spoiled bananas. |
The table shows the types of worms that can be eaten by fish. Other types of worms can cause the following problems:
- illness or discomfort inside the fish;
- water damage;
- creating an environment for the development of bacteria and parasites.
These problems can lead not only to numerous diseases, but also to the death of fish.
Breeding enchytrae worms
These are thin, up to two centimeters long, white and yellowish worms. They are found in garden soil and sometimes in flower pots.
To breed them, use a flat wooden box with a lid. Place the soil with a lumpy structure into the box, slightly damp. Make holes in the ground and put in them a small number of worms and food (flour boiled into a pulp, boiled potatoes, white bread soaked in milk). To prevent the food from becoming moldy, cover it thoroughly with soil. Store the box in a warm place, making sure that the soil does not dry out.
In a few weeks, it will be possible to find enchitrae curled in balls in the ground. Separating them from the ground is simple: just throw a ball into the water, the worms will leave the ground and curl up again into clean balls.
Where can I get nematodes for starter cultivation?
Purchasing nematodes is not difficult, but when purchasing, you should take into account some nuances in order to avoid additional costs. You can buy worms:
- At the poultry market. Many bird owners feed their birds and offer microfeed for sale.
- From fishermen. Here it is necessary to carefully check the nematodes for the presence of other worms that cannot be fed to aquarium fish.
- In specialized stores. Although rare, these types of worms are found in pet stores. There you can not only purchase them, but also get advice.
- In the online store. This is one of the riskiest ways to get it, so be careful when choosing.
- For experienced aquarists. You can also get additional advice from them.
But no matter where you buy your nematodes, you must first wash them thoroughly to remove them from the environment in which they were hatched. Otherwise, there is a risk that your fish will die from bacteria in their breeding habitat.
Acetic eel - live food for fry - Mafia Betta Splendens Cockerel Fish
Origin and nutrition of the vinegar eel.
The acetic eel (also known in the aquarium hobby as a microworm) is one of the minority of the nematode family that leads a free (non-parasitic) lifestyle. In nature, the eel is said to be found alone in damp soil, multiplying unusually on carbohydrate (grass, fruit and vegetable) waste. Some hotheads, taking advantage of the fact that the Internet will tolerate anything, have recently been intensively reprinting rumors from each other that supposedly the vinegar eel feeds on vinegar. Of course, this is not true. But it feeds on a specific “bacteria” of acetic acid fermentation, accordingly adapting to life in a fairly high concentration of vinegar. The buyer receives the culture of the “bacteria” necessary for eel nutrition along with the eel culture (in the form of a paste that smells strongly of vinegar). Breeding vinegar eel. Breeding this type of nematode is quite simple. We will need:
- box/container with a lid in which the microworm will reproduce
- Hercules (cheapest)
- vinegar eel culture
Dilution: 1. Take rolled oats porridge, and boil it, boil it.....steam it, then wait until it cools down. 2. Spread the porridge along the bottom of the container in a layer of 1-1.5 cm. 3. Place the purchased microworm culture on top. That's all that was required of us! And now, so that the box with the microworm does not catch everyone’s eye, we hide it somewhere in the toilet, in the nightstand... Wherever. The temperature is not significant for them; they reproduce at a breakneck speed. Acetic fermentation must occur in the nutrient substrate, otherwise you may get mold instead of a microworm. Mold can also appear if the substrate is too liquid, when water freely releases on the surface. However, isolated islands of mold can appear on a well-prepared substrate; they should be selected with a stick and the substrate should be mixed.
If everything is done correctly, then within a day the substrate should begin fermentation, as evidenced by bubbles of carbon dioxide released from it and the characteristic sour smell of vinegar fermentation. If the substrate smells rotten, it means “the process has not started.” And charging the substrate should be repeated again.
Already on the 3rd day you can see an accumulation of microworms on the walls of the container; all that remains is to collect them with a spoon and throw them to the fry.
Once every 2-4 weeks we will have to report the porridge to the nematodes. To do this, we will remove half of the nutrient mixture and add freshly prepared (under step 1) substrate.
Good luck! Ekaterina Mokrushina
How to breed nematodes at home
As previously written, nematodes do not require special care and control during reproduction, unlike other live food. They will multiply in any place where there are putrefactive bacteria.
There are several main ways to breed worms at home:
- With milk. It is necessary to mix milk and bread until a thick paste is obtained, since the worms can die in a liquid consistency. Add the starter culture and close the container tightly. Place in a dark and warm place for 4 days.
- On oatmeal. Pour boiling water over the oatmeal and let cool. Add finely grated carrots to the same pulp. Then add the starting culture.
- On thick cooked oatmeal. Cook the oatmeal in a ratio of 1:2 over low heat, let it cool, and start the nematodes.
- With sour milk. To speed up reproduction, it is better to add a couple of drops of diluted vinegar, mix well, and then add nematodes.
- On bread. The bread crumb must be doused with boiling water, allowed to cool and squeezed out. You can add grated carrots scalded with boiling water, and then place the culture.
The worms should be kept in a dark place where the temperature varies from 23 to 28 degrees. However, do not forget to close the container tightly, otherwise the worms may escape. After 3-4 days, the active process of reproduction begins. After 10 days of reproduction, the number of worms can increase 250-300 times.
To prepare them for use, it is necessary to lower an object with a smooth surface into the container for several minutes, onto which the nematodes will climb. Collect the worms with a brush into another container filled with water. The worms must be washed until the water runs clear.
How to feed fry with microworms
Representatives of nematodes are usually called microworms. The following aquarium nematodes are currently used to feed fry:
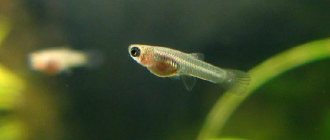
1. Vinegar microworm (other names: vinegar eel, vinegar nematode)
Photo 2
2.Panagrellas.
3.Walter worm.
4. Banana microworm. (Banana worm)
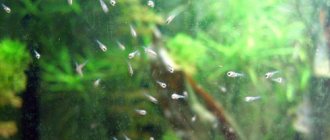
All of these nematodes are non-parasitic, easy to culture at home, and resistant to shipping in hermetically sealed bags, which has made them very popular among aquarists. These nematodes in the aquarium remain viable for up to a day, and the uneaten and dead ones are easy to remove - after feeding, the nursery aquarium is not placed strictly horizontally, but at an angle, and the dead microworms that have accumulated at the junction of the bottom and wall are removed with a siphon.
A microworm nematode used in aquarium farming, which is fed not only to fry during the transition period from rotifers to Artemia nauplii, but also at later stages of growth, giving microworms as a treat.
Photo 3
The fry of some types of aquarium fish refuse vinegar microworms. This phenomenon is most common among gouramis and angelfish. You can change their attitude towards this type of food offered by changing the environment in which the microworms are grown. This works best when using media on carrots. How to prepare such a culture yourself is described below.
Vinegar eel
Three species of nematodes are cultivated under this name (Turbatrix aceti, T. ludwigii and T. Silusae) - larger worms, reaching a length of 4 millimeters, so they can be observed even with the naked eye.
Photo 4
For some unknown reason, the claim that the vinegar eel feeds on vinegar is spreading from site to site. In fact, the microworm's food is bacteria that multiply during acetic acid fermentation. Indeed, you can get this nematode in a bottle with vinegar, but the vinegar must not be pasteurized, grape vinegar at the stage of vinegar fermentation. The yield of the nematode will be extremely small, so almost no one uses this method.
We must tell the truth - this nematode is the least nutritious for fish used to feed fry. It contains everything:
— 10.1% protein;
- 19.5% fat.
That is, the most necessary component for fry, protein, is a minimum amount.
To compensate for this disadvantage, you will have to feed the babies more often, compared, for example, with feeding when using the Walter microworm nematode or conventional panagrels.
For those who are interested in this microworm, breeding does not cause problems
Breeding vinegar nematode
Among those who are attracted to this nematode as food for fry, there is no general consensus on how to breed the vinegar eel most productively. Several options are offered, which, in principle, are almost identical in terms of productivity of living biomass of microworms, excluding the first method..
1. For one and a half liters of water, take one and a half liters of unpasteurized vinegar and one small firm apple. Do not use colored or flavored types of vinegar.
Mix water and vinegar and add an apple cut into slices, after peeling it. Choose those varieties of apples whose slices do not remain floating on the surface, but sink to the bottom.
The prepared culture medium is poured into a cuvette, covered with glass, leaving a gap for air to enter, and exposed to bright light. After ten to fourteen days, the medium will become cloudy - this is a signal that a sufficient number of bacteria have developed in the prepared medium and a culture of eels can be introduced.
After adding the acetic nematode culture, the cuvette is placed in a black plastic bag, which is usually used for collecting garbage, so as to limit the flow of light and placed in a dark place where room temperature is constantly maintained.
After three to four weeks, the eels will reproduce in numbers sufficient to feed the fry.
The culture can be used for about a month, if signs of its depletion are detected, adding a piece of apple.
2.The second method of breeding eels
Photo 5
First prepare the substrate:
- 50% black soil;
- 30% sand;
- 10% peat;
- 10% moss.
The ingredients are first boiled separately for ten minutes, then cooled and stirred. The prepared substrate is placed in a small pot for indoor plants, which is placed on a tray with water.
The nematode culture is laid out on the surface of the substrate and watered with kefir so that a thin layer is initially formed. The pot is covered with glass and placed in a dark place at room temperature.
Four times a week, add food for microworms - kefir.
3. Breeding vinegar eels on a medium of white bread and carrots
White bread is pre-soaked in water, squeezed out and placed in a ditch in a layer two to three centimeters thick. Place some finely grated carrots on top, add the eel culture and cover with a lid.
After about a week, the eels will have multiplied enough to be harvested. They do this with a brush, collecting it from the walls.
The peak of reproduction lasts about two weeks, after which the culture begins to fade. You can extend the life of the culture. Feeding begins as soon as microworms stop crawling onto the walls.
White soaked bread and grated carrots are laid on the surface of the depleted culture.
Photo 6
Then continue to cultivate as usual.
Panagrella
Photo 7
The second type of nematode used to feed fry is Panagrellus redivivus. These are smaller worms than eels, whitish in color, very mobile, measuring approximately 1 millimeter in adulthood. the diameter of the body practically does not exceed 50 μm. These are the nematodes that most professional aquarists think of when microworms for fry are discussed. It is possible to observe them without a magnifying glass only by the boiling of the outer surface of the culture, it is better to do this by viewing it at an angle (the so-called “boiling of the medium”).
Photo 8
In nature, they can be found among rotting remains of vegetation, in fermenting substrates, in landfills, and are often found in poorly washed beer barrels.
Very often they are found in the culture of such worms for feeding aquarium fish as enchytraea.
Looking at panagrels under a magnifying glass, you can easily notice that some worms are more slender, having a tail part twisted in a spiral - these are males. In a normally developing panagrel culture, there should be four females per male. In a dying culture, the ratio changes - 1 male to two females.
Photo 9 Male panagrella
Photo 10 Adult female panagrella
Feeding this type of fry with a nematode is more productive, since it contains more protein than vinegar eel.
How is panagrel bred?
For breeding, a nutrient medium such as barley flour brewed into a slurry is used. 250 grams of barley flour are boiled for ten minutes in a liter of boiling water. Then the resulting mass is thoroughly mixed and cooled.
Better results are obtained when using a medium prepared on the basis of oats - 200 grams of oat flour or 150 grams of oatmeal, or 300 grams of forage oats. Excellent results are obtained when using ordinary oatmeal. These products are also poured with a liter of boiling water and boiled for ten minutes, and then proceed in the same way as when preparing a medium for barley.
Photo 11
Many aquarists grow panagrel on a medium of ground boiled vegetables, to which they add milk, a little food casein, 4% of the total amount of soy peptone, a few drops of liver extract and vitamins for aquarium fish, which can be purchased at AquaMegaMall.ru.
The prepared medium is placed into culture cuvettes. The material from which they are made is practically irrelevant. These can be wooden, or plastic, or glass or enamel containers; naturally, the latter are preferable because they are easier to clean.
A panagrel culture is placed on top of the nutrient substrate in a layer of one to one and a half centimeters. In order for development to proceed optimally, the desired initial population density is 300 worms per square centimeter.
The introduced panagrels colonize the nutrient medium to a depth of five millimeters.
The cuvette is covered with a flat lid. To create optimal humidity, a layer of sponge is glued to the underside of the lid, which is periodically moistened.
Optimal cultivation conditions
They try to maintain acidity and temperature:
— pH 3.5 — 4.5
— temperature in the range from 20°C to 25°C.
It should be noted that panagrels can withstand prolonged temperature drops of up to 2°C and temperature increases of up to 29°C and pH increases of up to 7.5.
If there is a need to preserve the culture of this microworm for a long time, temperatures are reduced to seventy to seventy degrees. At such temperatures, the crop can be preserved in good condition for a long time.
Panagrella reach maturity on the third day after hatching from the eggs.
Photo 12 Feeding fry with panagrels
On aquarium forums you can find offers for the sale of panagrell eggs. There is no point in purchasing such a product, since such eggs do not exist in nature. These microworms are viviparous. The eggs develop inside the female; the development period is on average 60 hours at t = 20°C. Before reaching 25 days of age, the female gives an average of 15 litters of new panagrelae in an amount of up to 300 individuals. When cultivated in optimal environmental conditions at t = 21°C for ten days, the mass of the introduced culture increases eight times, and the number of worms increases 400 times.
Maintaining panagrel culture
The culture is reseeded depending on the temperature or other factors that determine the intensity of microworm reproduction. The need for reseeding is indicated by increased formation of liquid on the surface of the culture and darkening of the substrate. This usually occurs after 24-40 days of cultivation at t=20°C.
The reseeding date can be delayed if, starting from the twentieth day, you start feeding the microworms with ground oatmeal. In this case, you can extend the period before reseeding by three months.
In any case, reseeding is necessary when the density reaches 1.5 mg/cm².
Walter's Microworms
Photo 13 Walter's microworms
Walter's microworms (Panagrellus silusioides) are nematodes proposed to aquarists in Germany in 2002 by Helmut Walter, having very small sizes of 50 microns in diameter with a maximum length of one and a half millimeters, which makes it possible to use them for feeding fry in the early stages of growth, as well as the use for feeding neons, labyrinths. They tolerate transportation well, are easy to cultivate, reproduce intensively and can provide food for even large batches of fry.
Almost all types of aquarium fish are excellently fed with Walter's worms, and for fry of fundulus, cockerels, tetras and gourami, zebrafish, barbs and many others in the first two weeks of life before switching to feeding on Artemia nauplii, many aquarists call these nematodes the best food.
The small size of the Walter microworm makes it possible to use them as starter food for fry of viviparous fish, bypassing the stage of feeding with ciliates.
The advantages of Walter microworms also include their extreme mobility. Remaining viable throughout the day in fresh water, they are in constant motion, attracting the attention of the fry.
The attractiveness of breeding these particular worms is their higher nutritional value compared to vinegar eels and other panagrels. And first of all, a fairly high protein content, which is necessary for the successful growth of fry in the first place.
Walter's microworms contain:
48% protein;
21% fat;
7% glycogen;
1% organic acids;
1% nucleic acids.
Seeing Walter's worms with the naked eye is problematic. Their presence is indicated by the faint flickering of the upper layer of the nutrient medium at the beginning of intensive reproduction, and then by the “paths” that the worms leave behind, crawling onto the walls of the cultivator or onto flat objects placed in the cultivator for subsequent collection.
Photo 14 Feeding Walter microworms
Breeding
The optimal temperature for breeding is from 20°C to 27°C. On the fourth day of keeping in such temperature conditions, the female begins to produce up to forty new microworms per day and this rate is maintained until the end of her mating cycle, which is 35 days.
To cultivate Walter's microworms at home, you will need plastic containers measuring 15 x 10 centimeters, five to eight centimeters deep with lids. Containers for ice cream, mayonnaise, margarine and the like are often used. You will need to make small holes in the lid for air access.
Microworms can also be bred in larger containers. However, the larger the container, the slower the optimal reproduction is achieved, but the culture retains productivity longer.
The nutrient medium is prepared on the basis of oatmeal or oatmeal, oatmeal. The product is mixed with settled water until a fluid mass is obtained, which still should not be too watery. A pinch of active yeast is added to the surface, sprinkled with water and a culture of microworms is spread on it. Then close the lid and put it away in a place where the temperature conditions will be met.
After about five days, it will be possible to collect the multiplied microworms from the walls of the cultivator with a brush.
The most optimal temperature for intensive reproduction is 26°C-27°C
Subsequently, the feeding procedure is performed in the same way as for other microworms.
To remove worms not eaten by the fry between cleaning the aquarium, it is recommended to add snails to the fry, and if the fry are large and mobile, a couple of shrimp.
The culture is updated every three to four weeks. If the crop becomes too liquid, you can extend its shelf life by adding a small amount of oatmeal or oatmeal until the required consistency is obtained. But if an unpleasant odor appears, this is a signal that an immediate recharge is required.
If you plan to feed a large number of fry, it is recommended to plant a new crop every week. As a diluting material, use the old one in the amount of one tablespoon.
In the intervals between cultivation for feeding fry, manufacturers of Walter microworm cultures do not recommend storing them at temperatures below 20°C.
Banana microworm
Photo 15
Banana microworm (Panagrellus nepenthicola) (nematodes have recently been increasingly used by European and American aquarists, since it is even slightly smaller in size than Walter's microworm. The length of this nematode rarely exceeds 1.2 millimeters, the diameter of the body, which is especially important for the lifting fry, since it is this indicator that determines the fish’s ability to capture prey, rarely reaches 40 microns.Plus, the very low weight of this microworm allows it to hover in the water column for a long time, ensuring the fry’s accessibility to it.
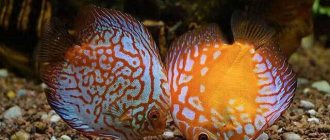
This nematode is considered by most aquarists to be the best food for fry. Banana microworms are used to successfully feed fry of even fish such as discus, not to mention other cichlids, bettas, almost all species that take food from the bottom, predatory fish species, gourami, lalius and even baby axolotls.
Photo 16 Feeding floating betta fry with a banana microworm
Many aquarists who professionally breed fry claim that this microworm can be used to raise the fry directly after the yolk sac has been reabsorbed, bypassing the stage of feeding with ciliates. To do this, after washing the settled microworms in distilled water, they are filtered through a gas with the required mesh size to obtain young nematodes, wait for the required fraction to precipitate and add it to the fry.
This nematode is superior in nutritional value to the vinegar microworm and the percentage of proteins, fats and other substances necessary for the fry is similar to Walter’s microworms.
Breeding, maintaining and restarting a banana microworm culture is similar to breeding Walter's microworm. The banana microworm will reproduce without bananas, but to achieve optimal results, it is still better to add a little mashed banana pulp or a couple of drops of some edible fruit acid to the oatmeal or oatmeal.
Photo 17 Fry hunt for banana microworms
You can also use oatmeal with banana crushed in a mixer for porridge or oat-based baby food with the addition of bananas.
Everything else is the same as for the Walter microworm.
The crop is depleted very quickly - with intensive harvesting, signs of depletion begin to appear after just a week and a half. The crop is fed with a new portion of oats and banana, and after two to three weeks it is recharged. General principles for extending the life of a crop, including the addition of vitamins, are described below.
Where to get microworm culture
Getting a starting culture of a microworm such as vinegar eel will not be a problem. It is sold at bird markets, and aquarists generously share it on forums. In the end, if you prepare a nutrient medium as described above, very often eels will grow in it on their own.
It is more difficult to purchase a starter for panagrel, Walter microworms and banana microworms. If they are not available in a store that sells aquarium supplies, you can purchase them on Ebay. Of course, this is more expensive, but you will be sure that you have become the owner of a pure, high-quality culture. Microworms tolerate transportation well.
Photo 18
From time to time, banana worm culture is available on the Internet from the Chelyabinsk manufacturer of this micronematode.
Photo 19
Having received a starting culture that contains a microworm for fry, it is bred on the media described above.
How to feed microworms to fry
Nematode feeding for all types of described microworms is fundamentally similar. Microworms that have crawled onto the walls or onto supports in the environment are collected with a brush, which is rinsed in a vessel with clean water. Some aquarists who breed problem fish species only use the water in which the fry are kept. After microworms settle to the bottom, the procedure is repeated until the turbidity disappears.
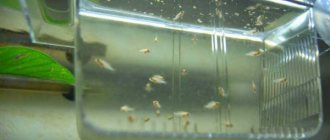
Photo 20
Nematodes collected at the bottom are either simply poured into the aquarium with the fry, or collected with a syringe and then brought into the places where the fry gather, or by releasing the nematodes near the aerator, reducing the power so that the microworms are spread throughout the entire space of the aquarium.
Photo 21
Some aquarists introduce a banana microworm to the fry without first washing it, using the tip of a toothpick instead of a brush.
After feeding, the excess microworm is removed with a siphon and 1/10 of the water is replaced. How to do this is described in the article “Successful rearing of fry = algorithm for proper feeding, conditions of detention.”
Breeding problems
Those who breed vinegar nematodes most often encounter the problem of mold development.
In order to prevent the formation of mold, which is possible even under standard optimal conditions for the development of the culture, it is advisable to stir it every day. This can be done either with a brush or with a regular stick.
The formation of mold may also indicate a violation of the normal conditions for the development of nematodes
The reason is that the nutrient medium is too liquid in consistency. Easy to fix. Make the new nutrient medium thicker.
The second reason for the increased development of molds is the insufficient number of nematodes in the growing medium. It's also easy to fix. Prepare a new medium in smaller quantities and introduce a pure culture of nematodes.
The temperature at which the nematode is cultivated is too low. Slowing down the development of nematodes with a decrease in temperature reduces their food needs, as a result, putrefactive bacteria and mold spores brought in with the air do not have time to be processed by microworms.
Increased mold growth can also occur when cultivating in vessels into which the nutrient medium is added in quantities that create a layer that is too thick. Therefore, it is recommended to breed microworms not in jars, but in flat cuvettes in which the layer of medium does not exceed one and a half centimeters.
Typically, the appearance of mold is a signal of depletion of the nutrient medium and the need to renew the culture.
Signs of culture depletion
The moment indicating the time has come to recharge the culture is indicated by:
- Reducing the number of microworms released;
- Darkening of the substrate;
- The top layer becomes watery;
- Changing the characteristic smell of vinegar fermentation to the smell of rotting.
When these signs appear, you need to either prepare a new crop or add additional nutrition to the old one.
Drosophila reproduction
When cultivated on oats and carrots, all nematodes emit a slight odor, which is often not even perceptible to humans at the initial stages of cultivation. But insects sense it very well, in particular the common house flies and fruit flies. Therefore, the openings for air supply to the nematode culture must be covered with fabric.
Getting rid of the unwanted presence of both the flies themselves and their larvae is quite simple - you need to cover the crop more tightly with a lid, while at the same time preventing the crop from being hermetically sealed.
How to eliminate crop depletion
When signals appear that the microworm culture is depleted or that there is a lack of nutrients for them, proceed as follows:
1. Periodically add a few drops of beetroot or carrot juice, a few drops of kefir. Some aquarists use live yogurt, even with fruit and berry fillers - a couple of drops.
2. You can find such tips for improving the condition of the crop as adding hard, mild, dried, finely grated cheese.
3. An increase in the rate of development of nematodes is facilitated by the addition of vitamins to the nutrient medium. Such additives not only improve the cultivation of microworms, but also make them more beneficial for the fry. You can add ordinary vitamins ground into dust, sold in pharmacies, to the culture, but it is better to use special vitamins for fish, sold at AquaMegaMall.ru Excellent results are obtained if you use drugs such as Sera FISHTAMIN, Prodac Vitamin, SEACHEM Vitality, JBL Atvitol, Sera VIPAGRAN BABY. It is enough to add 3-5 drops to the microworm culture with a total culture volume of 250-300 milliliters.
Read more about feeding fry in the articles:
“Standard requirements to be observed when feeding fry”
“Successful rearing of fry = algorithm for proper feeding, conditions of detention”
“Ciliates for fry - breeding at home (where to get them, how to breed - breed - grow) and feeding (how to feed)"
“Artemia salina is a universal food: eggs, larvae, mature crustaceans for fry, juveniles and adult freshwater and marine fish, as well as shrimp, corals and other aquatic organisms”
“Dietary supplements (probiotics, feed additives) for aquarium fish – an important step in the development of modern aquarium farming”
“Freshwater and saltwater rotifers - breeding at home”
How to store worms after breeding
Nematodes can be stored in a dried state for a long time. This is due to their protective reaction to low temperatures.
The worms must be placed in a cool, dark place along with their habitat. The temperature in this place should be about 0 degrees. They can be stored this way for about 2 years. If necessary, bring them back to life (the temperature should be gradually increased to 25-27 degrees). However, only worms whose lifespan is 1-2 days come to life in this way.
Breeding "Microworms"
Aquarists call various viviparous nematode worms “microworms.” These are small, 1 - 2 mm in length, worms. To dilute this live food, you need to place a small amount of nematodes in a saucer or photobath, covered with glass, with a paste of oatmeal or oatmeal. In a warm place, after two days the worms appear in large numbers. They crawl out of the mush onto the edge of the saucer. There they can be easily collected with a brush and washed into the aquarium.
Magazine “Family and School” aquaria.com.ua aquariumistika.mirtesen.ru aquadomik.ru
A common problem when breeding nematodes
One of the main problems during breeding is mold. This formation indicates non-compliance with the conditions of reproduction, namely:
- substrate consistency is too thin;
- too little starter culture in the environment;
- the temperature is not high enough;
- low-quality nematodes;
- exposure to direct sunlight.
To solve this problem, it is necessary to create a new habitat and carefully follow all the rules during reproduction, namely:
- the consistency of the medium should be thick;
- the temperature should not be lower than 22 degrees;
- Avoid exposure to direct sunlight.
If you have questions or doubts, you should consult with experienced aquarists.
One for all
The uniqueness of mycorrhizal fungi is also that they are able to form so-called communication networks.
And not only with one plant, but with several at the same time. In this case, nutrients are transferred from one to another both through the body of the fungus itself and the mycorrhiza of these crops. This allows plants, while at a distance, to “feed” each other. I think you have noticed more than once that seedlings grown from self-seeding under the mother plant always develop better than those planted strictly according to all the rules. Perhaps mycorrhiza, like a mushroom “umbilical cord,” connects it with the “mother” who feeds it...
But this connection is not only nourishing, but also informational. It has been proven that plants instantly and equally respond to the same influences, even when distant from each other. Information is transmitted through various chemical compounds. By the way, our nervous system works in a similar way: from the cerebral cortex and sensory organs, signals go to other organs and back through numerous chemical reactions and specific compounds.
Mycorrhiza is alive as long as the plant lives. In perennial crops it lasts for many years together with the “host”, in annual crops it lasts only one growing season.
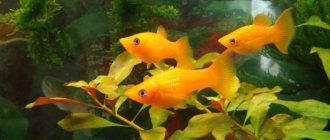
Feeding the fish
Nematodes can be used as main food and bait. They are mainly used to feed fry, since they are not very nutritious for adult fish. To increase the nutritional level, nematodes must be mixed with special food or vitamins.
After washing, the nematodes are either poured into the aquarium along with the remaining clear water, or collected in a syringe and then released near the aerator. This is done so that the worms are evenly distributed throughout the space. After feeding, it is necessary to replace 10% of the water or simply catch the excess.
Nematodes can live for several days in an aquatic environment, which means that the amount of food must be strictly observed. To do this, you need to monitor how long it takes for the fry to eat the worms, as nematodes can cause water pollution and develop bacteria that can harm the fish.
Breeding ciliates
To breed ciliates , you can first have them in small quantities. In a jar with a capacity of 3 liters, pour water from the aquarium to three-quarters of the volume and place dried lettuce leaves, rutabaga, and a small bunch of hay there. The jar is placed in a warm, semi-lit place. After a few days, the ciliates form a whitish cloud. At this point, it is necessary to pass air through the water using a microcompressor.
Ciliates be given to in dry form. This is done like this: a blotter or cotton wool is placed in a funnel, through which water with ciliates . After filtration, a blotter or cotton wool is dipped into the aquarium water, and the same amount of water is added to the jar as was consumed (half the volume from the aquarium, half from the tap).