Elodea is very popular among home aquarium owners. If you examine an elodea leaf under a microscope, you will find that it consists of only two layers of cells, where the top layer has larger cells than the bottom. And if you look at this plant longer, you can discover very interesting facts about its structure.
This type of plant is often used for an aquarium.
Description and characteristics of elodea
The algae belongs to the aquaticaceae family. North America is considered its homeland. In nature, it can be seen in lakes and ponds, so it has another name - pond snail.
In addition to natural reservoirs, Elodea takes root well in aquariums.
You can recognize the plant by its characteristic external signs:
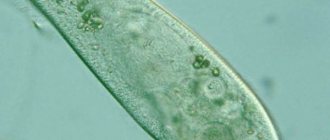
Cell structure of Elodea leaves.
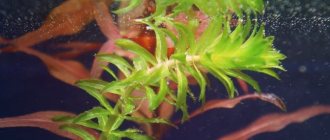
Long branching stems resemble cords. The shoots are brittle. They reach 2 m in length.
- The entire length of the stems is covered with numerous whorls.
- The leaves are narrow and long, with sharp tips, bright green, slightly curled. Length about 1 cm, width - from 2 to 5 mm.
- Each whorl contains 3 leaves.
- At the top of the stem the foliage is lighter and more transparent than at the base.
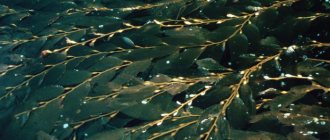
- Elodea spreads along the bottom of an aquarium or pond and branches heavily. Many vertical shoots grow from the main shoot.
- In nature, during the cold season, the plant sinks to the bottom. In an aquarium, with proper care, it grows throughout the year.
Examining the structure of an algae cell under a microscope, you can see that each leaf consists of 2 layers of cells. The cells in the upper layer are larger than those in the lower layer.
If you throw a separate branch into the aquarium, it quickly grows and sprouts shoots.
In a short time, dense thickets are formed, similar to an emerald net. The algae grows especially rapidly in summer. At this time, it is necessary to remove some of the shoots. In stagnant water without filters or aeration, it grows more slowly due to a thin shell of carbon dioxide.
Structure under a microscope
Studying this plant is a common practice in school biology lessons. To do this, you need to cut one leaf from the stem, place it on a glass slide and drop a little water there. The top must be covered with a cover glass.
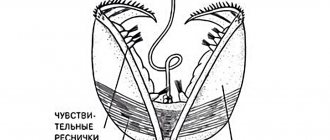
The structure of elodea cells under a microscope consists of two layers. The cells of the upper layer are more transparent and more elongated at the edges. When magnified, the cell membrane, cytoplasm, which has a granular structure, chloroplasts and the cell nucleus are clearly visible. Often the nucleus can be covered by chloroplasts. Basically the entire cell is filled with clear cell sap.
There are a number of nuances in the color of cells
A detailed examination reveals that chloroplasts are distributed only throughout the cytoplasm. On the side they have a flattened shape, on top - rounded, from which we can conclude that they have the shape of a lentil. Chloroplasts move at different speeds, which is affected by temperature and other influences.
If you place a source of bright light above the leaf, the process of photosynthesis will begin, promoting the formation of starch grains in the chloroplast body, which look like small luminous grains.
When iodine is added, these grains will acquire a characteristic blue color. The cytoplasm will become yellowish and stop moving, since iodine has a detrimental effect on it. The cell nucleus will also turn yellow.
A living plant cell has the properties of semi-permeability, which is characterized as follows: the edges of the cytoplasm are completely permeable to water, but at the same time completely impenetrable to solutions with large molecules. Since the cell sap contains a high concentration of salts, sugars and other substances, and the external environment contains a lower concentration, water entering the vacuole will equalize the concentration of the cell sap and the external solution.
By artificial means it is possible to create conditions where the concentration of the external environment will be higher. To do this, the plant leaf must be placed in a hypertonic solution. Such solutions include:
- potassium nitrate solution (15%);
- sugar solution (30%);
- sodium chloride solution (0%), etc.
To observe the plasmolysis process, follow the instructions below.
Plasmolysis process
Under the influence of the solution, the water passing into the protoplast will begin to enter the surrounding liquid, the vacuole itself will shrink, the cytoplasm will detach from the cell walls, and the resulting space will be filled with an external solution. This process is called “plasmolysis”.
In order to observe such a process, it is necessary to place a leaf on a glass slide, drop a little water, cover it again with a coverslip, then select a cell with a clearly visible cytoplasm. After this, you need to drop a solution on one side of the glass, and put filter paper on the other. The paper will begin to draw in water and help the solution penetrate.
Similar processes can also be observed if a similar experiment is carried out with onion scales. If the cell has been exposed to iodine, it will be impossible to induce plasmolysis in it even with the help of various solutions.
Plant species
There are 3 types of plants grown in aquariums:
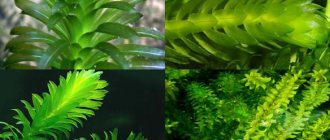
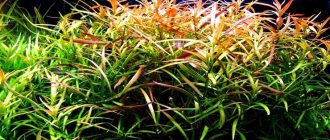
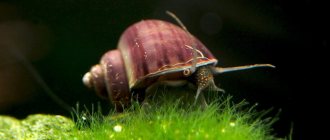
- Elodea foliage. This species is most popular among aquarists. It is sold in most specialty stores. It is distinguished by a brownish tint of the stems at the base. The color of the leaves is from pale to bright green, the length of the plates is up to 5 cm. In a reservoir it quickly creates dense thickets. The roots are poorly developed. When bred in aquariums, shoots grow up to 70 cm in length. They produce large white flowers with three petals. Grows throughout the year.
- An equally common type is Elodea serrata, or densa. Its shoots are lighter and thinner, the thickets are more transparent compared to dense-leaved ones. Through them, light freely penetrates into all parts of the aquarium. This variety is suitable for breeding in small aquariums. Too dense thickets in a small tank interfere with the movement of fish. This type of elodea has high decorative properties and creates shelter for fish.
- The Canadian variety is a perennial plant with long shoots. Individual stems grow up to 2 m in length. There are no powerful roots, so the pond snail floats freely in a pond or is attached to the ground by long aerial roots - rhizoids. The stems are thin and brittle. They grow translucent leaves of bright green color. This species grows better in cold water. It is unpretentious and adapts well to different conditions.
How to plant correctly
There are several ways to plant elodea in an aquarium:
- Let the shoots float freely in the water. The plant is able to live and grow without rooting.
- Plant the stems in the soil. It is best to root in washed river sand.
If a new plant is purchased in a store, it is wrapped in damp cotton wool. Having brought the shoot home, you need to remove the cotton wool and rinse the roots well, if any. To plant, you will need thin tweezers. Grab the tip of the stem and carefully bury it into the substrate. You can press the shoot with a pebble in this place.
It is better to plant elodea in the ground at the back wall of the reservoir.
Using Elodea
Elodea is an indispensable plant in aquariums and small standing ponds in the garden. It effectively greens the pond, serves as food for fish and a refuge for fry. The green mass grows quickly; you just need to periodically remove its excess.
As a result of photosynthesis, a large volume of greenery releases a lot of oxygen, which enriches the water. The role of elodea as a natural filter is very important. It collects suspended matter, absorbs harmful substances and prevents the development of putrefactive bacteria.
In an aquarium, a green mass with lacy leaves is often placed in the background. It creates a wonderful backdrop for plants with larger leaves.
Conditions for keeping elodea in an aquarium
Optimal conditions for breeding elodea in an artificial reservoir:
- The water temperature should be in the range from +14 to +23°C. The Canadian variety prefers cooler water – no higher than +20°C. If the aquarium is too warm or cold, Elodea will stop growing.
- The optimal pH level is between 6.5 and 7.5.
- Water hardness can be any. However, when transplanting, it is important that the stiffness in the new and old places is the same. Sudden changes are detrimental to the plant. Transplantation from too hard water to soft water is allowed, but not vice versa.
- Elodea does not like salt in water. If other inhabitants of the aquarium need salt treatment, the plant must first be removed.
- The water must be clean and clear so that the plant receives enough sunlight. In muddy water it can get sick and die.
- Lighting is required to be bright and uniform. Due to lack of light, the bright green color changes to brown. Then the plant sheds its leaves and dies. The duration of daylight should be at least 10 - 12 hours.
- The water flow speed should be low, otherwise algae will accumulate in one corner of the reservoir. Because of this, decorative properties will suffer.
Elodea forms dense thickets under water, which is why it received the name “water infection.”
Elodea uses waste products of fish and other aquatic inhabitants as food. Therefore, it does not need additional fertilizers and fertilizing. Adding a small amount of carbon dioxide to the water accelerates the growth of algae.
The pond fish grows quickly and can take up the entire volume of the aquarium. Therefore, it needs periodic pruning. Before removing excess shoots, the plant must be removed from the aquarium. A special net or rake will do. Such measures are associated with the toxic properties of the plant sap. If you start trimming right in the aquarium, small fish may die .
Leaves and shoots absorb dirt and a suspension of small particles from water well. However, this does not mean that the aquarium does not need cleaning. Elodea stems should be rinsed periodically with clean running water.
What can you do with elodea?
Cut a sprig of elodea, place it cut side up in a glass or large glass filled with water, and place it in bright sun or in front of a strong electric lamp.
Now watch carefully.
Rice. Homemade cuvette for displaying oxygen evolution on screen
You see: a bubble swells at the cut of the stem. So it broke away, rose to the surface of the water and burst. Here's another and another. Count how many bubbles are released from the elodea sprig per minute.
This releases a wonderful gas from the elodea - oxygen.
Everyone knows that oxygen is needed for breathing by all living things: humans, animals and plants. Along with the release of oxygen by Elodea in its leaves, another phenomenon occurs.
“We are present here at one of the most curious moments in the life not only of a plant, but of the entire organic world. The existence of all life on earth depends on this moment: each such bubble of oxygen leaves behind in the plant a corresponding amount of carbon, which turns into organic matter. All living things feed on this organic matter; There is no other source of food on our planet.
Moreover, at this moment the light and warmth of the sun's ray take a latent form, are composed in the plant, being released again in the form of light or heat when the organic matter burns in our ovens or oxidizes in our bodies. At this moment, one might say, the knot is tied, the outcome of which is the fate of the entire organic world and man.
So said the wonderful scientist, botanist K.A. Timiryazev at one of his lectures, showing on the screen the most interesting moment of life - the release of oxygen by elodea.
We, too, can, if we have a projection lamp, show this phenomenon of life on the screen.
We suggest you read what to feed your iguana: food for iguanas
Let's get a piece of rubber tube or thick rope and two identical pieces of glass. Place a tube or rope between the glasses in a semicircle, squeeze it tightly and tie it on both sides along the edges with rope or wire. Pour water into the resulting flat tray (cuvette), almost like a slide, and place a sprig of elodea cut side up.
Benefits and harms
Elodea not only decorates the aquarium, but also brings benefits:
- Algae actively absorb carbon dioxide and produce oxygen, which is necessary for other aquatic inhabitants.
- For small fish (swordtails, guppies) it serves as a shelter.
- Cleans the aquarium from dirt, absorbs metabolic products of fish.
- Destroys pathogenic microorganisms infecting the aquarium.
- Suppresses the growth of other algae that are undesirable for the pond. Thanks to its rapid growth and absorption of nutrients, it prevents the growth of black beard and threadbare.
- Some types of fish - golden ones, angelfish - like to eat elodea leaves.
The harm to the plant lies in the poisonous sap. The toxin is not dangerous for humans and large fish species. And small species (less than 5 cm long) may suffer. To avoid this, do not leave damaged stems in the pond and prune them directly on the spot.
Positive and negative effects of elodea on the ecosystem.
Living apparatus for obtaining oxygen
Elodea can be used to produce oxygen. Take a glass jar, fill it with water and place cut elodea branches in it, cut side up. Cover the elodea with a funnel filled with water with the end capped. Sprinkle a little bicarbonate of soda into the water to increase the amount of carbon dioxide needed to feed the elodea and release oxygen.
Rice. Obtaining oxygen from elodea branches
Place this device in bright sunlight or electric light. After a while, you will notice that air accumulates in the funnel tube, under the plug. There is more and more of it. When there is enough of it, light a splinter and after a red ember is formed, put it out. Now take out the cork and quickly bring a smoldering splinter. It will flare up as oxygen comes out of the funnel.
To prevent the oxygen squeezed out by the pressure of water from below from coming out so quickly, hold the funnel with your hand. You can accumulate oxygen in a test tube. To do this, tip a test tube filled with water onto a funnel, pressing the hole with your thumb. In a day or two, the test tube will be filled with oxygen.
Here is a device for producing oxygen by using the active activity of small elodea leaves.