About Artemia
Artemia lives for about 4-6 months. The crustaceans are heterosexual; males are distinguished by an enlarged pair of antennae, with which they capture the female during fertilization. Linked together, a pair can swim for several days. Adult brine shrimp can lay eggs every 4 days.
In the absence of a male individual, females are able to reproduce through parthenogenesis - larvae. Then young crustaceans emerge from the mother’s unfertilized egg.
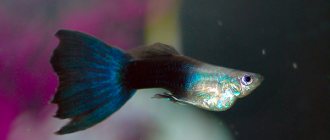
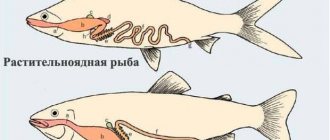
Artemia have acquired particular value in the aquarium industry as live food for fish. During all life cycles, Artemia is suitable for food. Almost all aquarium fish fry are fed nauplii (artemia larvae), and medium-sized fish are fed with mature crustaceans.
Life cycle of Artemia: cysts - hatching process - young crustaceans - nauplii - juvenile stage - adults.
Maintenance and care
To obtain high-quality fish food, you must follow some recommendations, otherwise the crustaceans will not grow or will quickly die:
- The optimal temperature is 20-26 °C.
- The water should be salty: sea or table salt is suitable, but in no case iodized (iodine is harmful to crustaceans). Salt concentration is 30-35 grams per liter of water.
- The water needs to be renewed weekly (about a quarter). Replacement requires salted water. Also, in case of evaporation, it is worth adding the missing amount.
- Crustaceans need a filter with a sponge and aeration.
When keeping and breeding Artemia, the most crucial moment is feeding. In nature, Artemia feeds by filtration on microalgae and small protozoa. Suitable for them at home:
- specialized food;
- spirulina (ground);
- baker's yeast;
The yeast is pre-diluted with a small amount of water and sprinkled on the surface of the water. You need to feed the crustaceans 2-3 times a day in small portions.
Water after feeding should “self-purify” within 48 hours. If this does not happen, then there is a lot of food for artemia, and they do not have time to eat everything. You will have to replace a third of the water, and give a smaller portion at the next meal.
Why is it valuable?
Salina crustaceans are a valuable source of extremely important proteins, fats and essential amino acids. Artemia can live in high salt concentrations, alkaline or acidic environments. The closest related organisms are Cyclops and Daphnia.
By breeding fish at home and simultaneously growing brine shrimp for feeding, you will provide your pets with an excellent source of nucleic acids.
Artemia is used not only in aquarium farming, but also for medical purposes, using them to create drugs and biologically active additives, for example “Kavesan”.
Breeding Artemia at home: 3 ways
Artemia cysts can be purchased in stores or ordered online. For better removal of cysts, it is recommended to use settled water with the following indicators:
- temperature: 26-30 °C;
- acidity: 8.0-9.0 pH (0.5 g/l soda can be used);
- salt: 20 g per 0.5 liter of water.
Aeration is also important: with aeration, approximately 60-70% of crustaceans hatched from eggs, without - about 8-10%. The compressor is adjusted in such a way as to prevent the eggs from sinking to the bottom.
Method number 1: in a jar or simple
You will need a jar (suitable for any size), a lid, two plastic hoses, and an aerator. Need to:
- Prepare the water.
- Pour in the eggs, calculating 1 teaspoon per 1 liter of water.
- Make 2 holes in the jar lid so that the prepared tubes fit tightly into them.
- Close the jar with a lid and insert the tubes. It is necessary that one of them reaches the bottom of the container: on one side you need to attach a sprayer, and on the other side - a compressor. The second one is installed in such a way that it does not reach the water; it is needed for air removal.
- At the recommended temperature, the crustaceans hatch within 24 hours, at a lower temperature - later.
To collect atemia, you need to swap the hoses: the tube connected to the compressor should not reach the water, and the second one is lowered to the bottom of the jar. The other end is placed in a clean container, covered with thick nylon on top. When the compressor turns on, water is poured into the container, and the crustaceans remain on the fabric. The water must be poured back into the jar.
Some aquarists do not cover the jar with a lid and do not use a second tube; in this case, the eggs are incubated, but in smaller quantities.
Method number 2: in an incubator
For this method you need to make an incubator. You will need: 2 clean plastic bottles with a volume of 2-3 liters, a compressor, 2 straws (flexible and rigid). All actions are also very simple:
- Bottles need to be trimmed. The neck of the first is cut off, the bottom of the second.
- The bottle without the bottom is inserted neck down into the second one.
- A solid tube with a spray nozzle must be connected to a flexible tube of the compressor and inserted into the container.
- Pour water (in accordance with the recommendations) and pour in the previously prepared eggs: soak in a 5% saline solution for 30 minutes and then rinse.
- Eggs require 24 hours of light to hatch.
Artemia is collected in the same way as in the first method: filtered using a straw through a cloth.
Method number 3: in an aquarium
The first methods are good for growing nauplii for fry. To breed adult crustaceans for fish, you will need an aquarium of approximately 10-40 liters. You will also need a heater, thermometer and filter.
The tank should be installed in a place inaccessible to direct sunlight. You can take a container in which you plan to grow and propagate artemia in the future:
- prepared water is poured into the aquarium;
- install all necessary equipment;
- water parameters are monitored within 24 hours, and if no changes occur, Artemia cysts are poured into the aquarium;
- The brine shrimp will hatch in about a day.
Collect crustaceans using a flashlight. First you need to turn off the compressor and direct the light to the corner of the aquarium. Artemia have positive phototaxis and will move towards a light source. All that remains is to collect them using an enema or a net.
www.killi.ru
Reading aquarium forums, you often come across a question similar to this: “I have spawned such and such fish!” What to feed the fry when they appear?
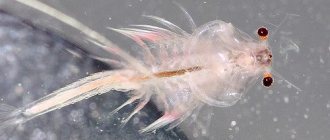
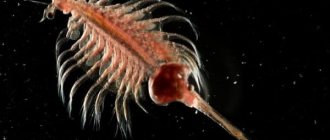
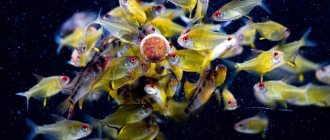
Today, the best starting (that is, the very first) or subsequent food for fry of most aquarium fish in terms of nutritional value and ease of preparation are the nauplii (larvae) of the saltwater crustacean Artemia salina. They are quite easy to breed at home if you have a head on your shoulders, straight arms and good balls! — non-decapsulated brine shrimp eggs of good quality. It should be noted that on the Internet, in the conversations of aquarists, on food packages and especially in the minds of beginners, there is a lot of confusion due to the fact that not only adult crustaceans are called brine shrimp, but also their larvae - nauplii, and even decapsulated and non-decapsulated brine shrimp eggs. First, let's be clear. As the British say “Hu from hu”: Artemia are adult crustaceans up to 12 mm in size:
They are often sold in frozen bags labeled “Frozen Artemia”:
Freeze-dried Artemia - Food made from freeze-dried (freeze- and vacuum-dried) Artemia crustaceans. Sold in bags labeled “ARTEMIA sublimated” in the form of a dry gray powder with a yellow or greenish tint. Freeze-dried food is closer in quality to live food compared to dry food. In addition, in comparison with frozen ones, there is no risk of buying repeatedly defrosted food or defrosting it without bringing it to the freezer in the summer. Sublimation technology has roots in the space industry! Probably the first consumers of freeze-dried food were astronauts.
Frozen Artemia nauplii Sold frozen, in bags with the inscription “Frozen Artemia nauplii” This goodness cannot be fed to all babies and not at any age. But if they eat well, then why not? For particularly demanding ones, especially in the first weeks of their life, live nauplii are still recommended. Firstly, they force the fry to chase live food and thereby train the body through physical activity. Secondly, not all fry of predatory fish eat stationary food, especially in the first 2-3 weeks of life.
Decapsulated eggs from the store are Artemia eggs without capsule shells. Can be stored at room temperature and low humidity. Sold in jars and bags with the inscription “ARTEMIA decapsulated” in the form of a dry orange powder. They can be fed to grown fry or small fish, but before feeding it is better to soak this food in water for 5-10 minutes.
Such eggs are not suitable for breeding nauplii! However, if you decapsulate the eggs yourself shortly before incubation, you can greatly increase their productivity (yield).
Non-decapsulated eggs are Artemia eggs that are not devoid of capsule shells. Sold in bags with inscriptions
"Dry Artemia":
"Artemia-U":
or in the form of a mixture with salt “Artemia-mix”:
And also by weight in the form of a yellowish-gray powder. You cannot feed undecapsulated eggs to fry or fish! But this is exactly what we need to hatch (incubate) live nauplii - the best food for fry!
Artemia eggs, decapsulated at home shortly before incubation . If you take non-decapsulated eggs, place them in the “White” and shake for 3-5 minutes, waiting until the shell-capsule on them dissolves and they turn from yellow-gray to orange, and then rinse them with cold water and immediately charge them into the incubator, then the incubation rate and percentage of yield the nauplii will rise. Typically, eggs are decapsulated when the percentage of nauplii emerging from them is low or they do not want to bother with filtering nauplii from the shell after incubation.
Another way to improve yield is to freeze undecapsulated eggs before incubation. To do this, you can simply always keep a supply of eggs in the freezer and take them out as needed a few days in advance.
Now about the incubation and feeding itself: To incubate nauplii from eggs, they must be placed in salt water at a temperature of 24-30'C and with good round-the-clock aeration (air blowing). It should be taken into account that at 30'C nauplii emerge after 24 hours and almost all at the same time, and at 24'C the emergence is extended over 2-3 days. Moreover, by the time the last nauplii emerge from the egg capsules, the first ones have already lost their nutritional value. To heat the incubator to 30'C, you can move it closer to the radiator, use an incandescent lamp or another method. As an incubator, you can use 1 or 2 liter glass jars, 0.5 - 0.7 liter glass bottles, but it is better, after spending a little time, to create a simple design from a plastic bottle installed upside down: The fact is that in jars and glass bottles at the bottom there are areas with poor mixing of water. Some of the eggs are wasted in them because... For the successful emergence of nauplii larvae, the eggs must be in constant motion and well aerated. But in a plastic bottle placed upside down, the “bottom” area is minimal and there are practically no areas without stirring.
Now I will describe the simplest and, in my opinion, quite effective nauplii incubator for 1-2 broods of fry.
Take a plastic bottle of 0.5 or 1 liter, and if necessary, 1.5 or 2. Cut off the bottom 2-3 cm high. In the middle of the bottom, make a hole with scissors or a soldering iron for a compressor hose of such a diameter that the hose fits tightly. We glue the bottle cap with aquasealant or Chinese superglue in the middle to a piece of glass or ceramic tile measuring approximately 6x6 - 8x8 cm. You can give it a round shape by lowering it into a basin of water and cutting off the corners with simple scissors. This will make it easier to remove and install the incubator container on a cramped shelf. The corners will not catch on other objects. This will be the stand. When the glue dries, screw the bottle to the stand more tightly, holding the lid, not the glass or tile! We put the bottle upside down (on the stand we made), pour water. If it does not leak, we pass the hose from the compressor through the cut-off bottom from its inside (it now plays the role of a lid) and insert it into the bottle “in reverse” - so that the splashes from aeration flow back into the incubator. We pass the hose, cut slightly obliquely, to the very bottom of the bottle neck and supply air by adjusting the pressure with a tap installed on the hose in a convenient place. If there are no leaks, add eggs (0.5 - 1 teaspoon per liter of water) and salt (3-4 teaspoons per liter). It is advisable to take water at room temperature or a little warmer - 30-32'C. I take it directly from the tap, adjusting the temperature “by touch.” It is better to make 2 incubators of this design and charge them alternately - one day, the second on the next day, the first on the third day, etc. Artemia nauplii hatch from eggs with a supply of nutrients and are small in size. After a day, this reserve is depleted for growth and movement. And although they grow up, their nutritional value decreases significantly! That’s why we need 2 incubators, working alternately - we incubate in one, feed from the other. The next day, vice versa.
It is convenient to check the readiness of the food by looking at the eggs in the incubator through a magnifying glass. The nauplius does not emerge from the egg immediately, but first halfway. At this moment, he resembles a parachutist or an umbrella: Selection must be made when there are very few “paratroopers” or no ones at all. It is important to separate nauplii from egg shells and parachutists as best as possible because fry may die if they eat food containing a large amount of indigestible egg shells. In order to separate the hatched nauplii from the shells (capsules, shells) of the eggs, you need to lift the lid (formerly the bottom of the bottle) and after a few minutes suck the solution from the bottom of the incubator into a tall cylindrical wine glass or similar vessel. Then, on one side, illuminate it with a bright light source, for example, a table lamp, and wait for the nauplii to gather in the light on this side (I use an LED panel from those sold in auto parts stores to replace incandescent lamps in interior lamps, powered from a power supply to 12 volts of an old calculator. You can use Chinese power supplies with a voltage switch. I use the same socket to illuminate spawning grounds and hatchlings at night). When the eggshells (the shells of their capsules) float to the surface, and the dead, unhatched eggs settle to the bottom. It is important not to delay this moment too much, because without aeration the nauplii quickly die. Now you need to carefully suck out the nauplii and strain them through a net made of the smallest tissue (mill gas). And for delicate fry, it is also advisable to rinse with fresh water. It is convenient to do all “suction” procedures with a small enema or a syringe with a 20-25 cm long tube attached to it. For fry of viviparous fish and large cichlids - angelfish, cancer, cichlid, etc. Nauplii can be given from the first day, as soon as they begin to swim horizontally in search of food. Small fry - labyrinths, characins, barbs, zebrafish, etc. You can feed nauplii from the third day, giving them for several days along with dust or ciliates and observing whether they eat or not. As soon as the bellies of most of the fry turn orange when feeding, the ciliates and dust can be discarded. If the fry eat nauplii, their abdomen turns orange.
This is another advantage of this food: you can simply control whether all the fry eat the food or not. Baby nauplii should be fed in small portions, but more often - up to 6 times a day, but not less than 3! For example: in the morning, then coming home from work and finally before bed. The dim light in the malyavnik should remain on at night. Firstly: by feeding around the clock, the fry will grow faster. Secondly: without lighting, dormant fry can be eaten by snails planted in the hatchery to eat up the remaining food. In addition, fry, such as angelfish, cluster in heaps in the dark and die en masse!
Nauplii can live in fresh water for 6-8 hours, but when they die, they spoil the water. To clean the bottom, you can plant 1-2 snails of small ampularia in the hatchery - up to 12 mm, or use coils, physical. But you don’t need to plant a lot of them, nor do you need to give them extra food. Each snail, being a living organism, itself introduces a significant dose of ammonia and other waste into the water. Therefore, you need to select the dose of food so that by the next feeding almost all of it is eaten by the fry, and not by the snails. However, the fry are also not allowed to starve. They get stuck and then can’t be straightened out!
Sergey Slyzhnyak (Nikolaich)
‹ Females of N. Gunter eat eggs Up Seasonal killifish. From egg to egg. ›
Advantages and disadvantages
One of the main advantages of using brine shrimp as feed is their nutritional value.
Due to their high-quality composition (about 20% fat), crustaceans provide fry and medium-sized fish with all the necessary substances. The result of feeding young animals with Artemia is high survival rate and rapid growth. For larger fish, adult crustaceans can be given as a delicacy.
But this is not the only advantage of Artemia:
- cysts are inexpensive and are sold in many pet stores;
- Artemia eggs are stored in the freezer for a long time without losing their ability to develop;
- incubation of nauplii takes about two days, so even if there is an unexpected addition to the aquarium, there will be something to feed them;
- minimizes contamination of the fish aquarium;
- Even a beginner can cope with the removal of Artemia.
With all the advantages, there is also a disadvantage. Breeding brine shrimp takes time and effort. It is necessary to follow all the recommendations so that the crustaceans hatch, do not get sick in the future and do not infect all the inhabitants of the aquarium.