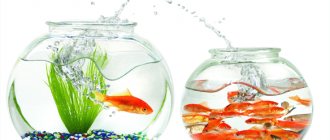
New technologies for growing garden plants make it possible to combine hydroponics and fish farming. Manufacturers offer installations for industrial greenhouses and for home use.
Large farmers raise commercial fish and at the same time grow greens, lettuce, and spinach. Home growers have the opportunity to enjoy the beautiful appearance of exotic aquarium fish and always receive fresh herbs. What is the principle of aquaponics? How was the technology connected to the home aquarium?
What aquarium plants can be grown in a greenhouse?
Most plants used in aquarium keeping are hygrophytes.
In the wild, they grow in coastal water zones and in flooded or wetlands. The seeds of the aquarium plant Hemianthus micranthemoides grow well in closed greenhouses.
In greenhouse conditions they take root well:
- echinodorus (Echinodorus sp.);
- Hemianthus micranthemoides;
- Hemianthus callitrichoides Cuba;
- cryptocorynes (Cryptocoryne sp.);
- Glossostigma elatinoides;
- Micranthemum sp. Monte-Carlo;
- creeping staurogyne (Staurogyne repens);
- hydrocotyle tripartita;
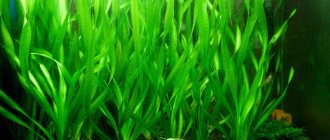
- needle grass (Eleocharis acicularis);
- Pogostemon helferi;
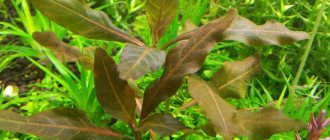
- Alternanthera reineckii;
- grass-leaved bladderwort (Utricularia graminifolia);
- Hygrophila pinnatifida;
- Indian rotala (Rotala indica);
- Anubias barteri nana (Anubias barteri var. nana), etc.
They perceive the transition from aquatic to terrestrial conditions well, as well as the subsequent move to the aquarium.
Growing aquarium plants in a greenhouse allows you to germinate seeds, root sprouts, temporarily place specimens when restarting the aquarium or to kill algae. Their appearance may change greatly.
The shape, size and color of the leaf plates change. The shoots of rotala, micranthemoides, anubias and other long-stemmed perennials are lengthening. In the air environment there are no such loads as in water, so most often the shoots grow faster. This property can be used to quickly green up an aquazone.
Cryptocoryne disease is not typical for greenhouse specimens. In rosette varieties (lagenandra, echinodorus, etc.), flowers and seeds may appear, so transfer to greenhouse conditions is sometimes used to obtain high-quality seed material.
Aquarium installation
Before you begin installation, consider all details carefully. Usually the aquarium is built in such a way that it can be maximally visible from any corner of the room. Make sure that the wall under the aquarium is free and not overloaded with parts. Wall aquariums look best in the center of the wall, like paintings.
Aquarium in the wall in loft style
Aquarium in the wall in a minimalist style
In an apartment designed as a studio, you can find a tank in a more interesting place - in a partial partition without a door. Thanks to the built-in aquarium, the partition will look original, and the apartment itself will be filled with a certain mystery and fabulousness. In this case, it is better to mount the wall-mounted aquarium not in the center, but from the edge, directly into the end part, using fasteners. This arrangement will give the room a unity of style, and at the same time a clear zoning line will be visible.
Aquarium in a niche
Aquarium in the partition in the kitchen
Mini greenhouse for aquarium plants “Survive until Spring”
Mini greenhouse for aquarium plants “Survive until Spring”
- Quote
Post by AndreBens » 19 Feb 2015, 20:58
Mini greenhouse for aquarium plants “Survive until Spring”
- Quote
Post by barsik-tver » 24 Feb 2015, 16:08
Mini greenhouse for aquarium plants “Survive until Spring”
- Quote
Post by AndreBens » Feb 24, 2015 5:52 pm
Link viewtopic.php?t=9423&p=383664#p383664 only there are 2-watt modules, 4*5630 - better than 3*5630 - they don’t heat up.
Added after 53 seconds: message #1345 and below
Mini greenhouse for aquarium plants “Survive until Spring”
- Quote
Post by AndreBens » Mar 20, 2015 10:43 pm
Mini greenhouse for aquarium plants “Survive until Spring”
- Quote
Post by Ilya Nikolaevich » March 20, 2015, 11:21 pm
Mini greenhouse for aquarium plants “Survive until Spring”
- Quote
Post by AndreBens » Mar 22, 2015 08:03
Why did I grow it? To answer questions and practice technology. For example, there is a plant, there is not enough of it, but you want a lot (for example, cube ground cover, graminofolia). It’s unpredictable on the windowsill, it’s easy to overcook and it’s impossible in winter. And here - in a dark place, 2-3 watts of energy in total. I made sure it was a spectrum. 6500K is self-sufficient. Prepared biomass cubes for making moss hummocks. The system is simple and does not require daily maintenance such as spraying. So, out of curiosity, I see how much has grown and once a week I drip from a syringe. At work they don’t let me put up an aquarium, so at least
Added after 1 minute 41 seconds: I will put these, but in glass vases. It will also be beautiful.
Mini greenhouse for aquarium plants “Survive until Spring”
- Quote
Post by AndreBens » Mar 22, 2015 12:39 pm
Mini greenhouse for aquarium plants “Survive until Spring”
- Quote
Posted by AndreBens » Apr 27, 2015 12:59 pm
Mini greenhouse for aquarium plants “Survive until Spring”
- Quote
Post by AndreBens » May 13, 2015, 11:01 am
Mini greenhouse for aquarium plants “Survive until Spring”
- Quote
Posted by momnasty » May 15, 2015, 6:29 pm
Mini greenhouse for aquarium plants “Survive until Spring”
- Quote
Post by AndreBens » May 16, 2015, 00:35
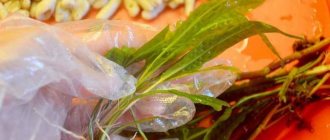
1. Amano's secret wabi-kusa soil composition, commercial product 2. Soil, clay for binding, sphagnum moss, thread wrapping for mold - planting before or after wrapping. The threads will either rot or hide under the growing grass 3. My method is earth, a little clay, coconut fiber, vermiculite, sphagnum. In the center there is a stone for weight, if you suddenly want to drown a mound in the aquarium, they recommend it. I decided not to rewind with threads; coconut fibers play the role of reinforcement. I wanted the finished look right away.
In general, a lump is made that holds its shape. The sculpting is a pleasure, and I really liked the fit too. A hole is made with a stick and the grass is stuck in. Everything is very fast and positive. You just take it and sculpt it. The search for “wabikusa kokedama” has many links and videos; you can get a finished bump in minutes. There are no secrets, no matter what you do, it turns out well. Then someone wraps it in plastic for a while, I placed it in a vase in a humid environment and covered it with glass. Mini paludarium. Then they put the mound-ball in a vase and spray it several times a day, depending on the plants. I used riccia, hydrocotyla, phoenix, christmass, cube, flame - all aquarium. Then I stuck in a potted cyperus. Covering it with glass makes cleaning easier. In fact, it’s not there, I spray once a week. What I love. The first days I watered it every day. The main danger is roasting in the sun. So I made a lamp, and my hummocks are not on the windowsill. This weekend I’ll put some more on it, quite democratically - soil with forest moss, aquarium plants on top and put it on the windowsill, but not in the sun. I'll try to make them different in design. I'm sure it will work out too. I really want to get a ball with a ground cover and a cyperus tree on top, like a palm tree. But my cat. she is shaking from cyperus. At night, it climbs onto a shelf at a height of 1.7 meters and eats a flower in a pot. It won't let you grow. Many are grown in transparent salad bowls. In Japan, I read that specialized stores sell components. In fact, everything is very simple, a bowl with ingredients, everything is kneaded. Then the plants are stuck in. It can also come from nature. I liked everything I saw on the Internet. Indeed, the concept of “beauty in simplicity” is very pronounced on kokedama. Such a small Earth in miniature.
Added after 15 minutes 22 seconds: I have a vase filled with fine gravel soil and water. It is possible without soil, the main thing is a transparent container.
Mini greenhouse for aquarium plants “Survive until Spring”
- Quote
Posted by momnasty » May 16, 2015, 02:34
AndreBens , from the description everything seems easy to do, but I’m sure the main secret is golden hands
And I just had a 40 liter aquarium empty, it was all scratched from the inside, but when dry it’s almost unnoticeable. I’ll try to make a composition for the balcony according to your recipe. Not nano, of course, but I would like to try to depict a piece of the forest. I’ll put it in a shaded place; during the day it gets very hot on my balcony. And next to it is a solar-powered lamp so you can admire it in the dark. You just need to find clay. Probably pharmacy pure blue clay will be suitable for this purpose - I read that people use it to make root tablets for plants. Thank you for the inspiration!
What to make a greenhouse from
Plastic and glass containers are most suitable for arranging a greenhouse.
Plastic food containers are well suited for making greenhouses for aquarium plants.
It can be:
- containers with lids;
- pastry or cake packaging;
- disposable glasses;
- cut bottles;
- coffee cans;
- empty aquarium, etc.
Keeping plants out of water is easy. A little skill in growing garden and indoor flowers will be enough.
The roots need good drainage, otherwise they will rot and the sprouts will die. To do this, fill the bottom of the selected container with fine gravel (fraction up to 5 mm), expanded clay, perlite, Kapchagai aquarium soil, etc. You can perforate the bottom and place the container on a pallet.
The soil should be light, moisture-absorbing, non-alkaline (pH less than 7). A universal garden mixture, leaf soil with peat or the addition of vermicompost will do. A layer of coarse sand is poured on top.
Fine gravel and specialized soil are used as a substrate for the greenhouse.
The total thickness of the substrate is 3-6 cm.
Example:
- gravel substrate – 1-2 cm;
- soil – 3-3.5 cm;
- sand – 0.5 cm.
The seeds are poured on top of the moistened substrate. Sometimes cuttings are rooted in the same way, but more often they are dug in. Air humidity should be high. To do this, cover the top of the container with glass, a transparent lid or cling film and ventilate it periodically, for example during watering. A small greenhouse can be placed under a cap made from a cut-off plastic bottle.
After planting the seeds, the greenhouse is placed on a windowsill or in a well-lit place.
The containers are placed on the windowsill. In the autumn-winter period, and sometimes all year round, additional lighting is required. It is selected individually.
It is necessary to take into account the moisture-loving nature of these plant forms. It is necessary to keep the soil constantly moist; drying out of the earthen coma is unacceptable. It is regularly moistened with a spray bottle, avoiding waterlogging.
Also, seedlings should not be exposed to dry air flow, cold drafts, or temperature changes. A standard complex of liquid mineral fertilizers is used as fertilizing.
When they get stronger, the lid can be removed for a while, gradually accustoming them to living conditions. Not all aquacultures can adapt, so you need to carefully monitor their reaction, increasing humidity to the same level if necessary. Staurogynes, glossostigmas, eleocharis, pogostemons, utricularia, lileopsis, etc. get used to room conditions better than others.
It is allowed to grow aquarium seedlings in a flower pot. In this case, it can be placed inside a transparent plastic bag. To maintain high air humidity, the edges of the bag are tied or secured with an elastic band. Several flowerpots can be installed in an empty aquarium and covered with a glass panel on top.
You can change the terrestrial environment to an aquatic one when the young plants are fully grown.
Containers for florariums
The first requirement is transparency. Any waterproof, rigid material with good light transmission will do: glass, plexiglass, extruded polystyrene foam. There are also models made of wood with transparent inserts. The choice of shape and type of container depends on the type and size of plants, the location of the florarium and the creative idea.
The simplest and most elegant solution for homemade open florariums is special vases for succulents. They can be round, cylindrical, cubic or trapezoidal. Vases are sold with and without lids.
Designer vases of unusual shapes
Their walls are half or even less lower than ordinary vases. Due to this, the container is maximally open to air and light. Such conditions are optimal for dry florariums, where succulents and cacti thrive.
Low-sided bowls are ideal for plants in arid climates
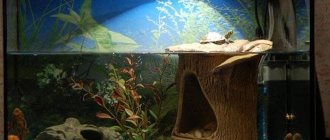
Aquarium
The fish house comes with useful accessories: an internal filter, a lamp, an air compressor, a heater and a sprayer. They simplify the maintenance of the mini-greenhouse. If you plan to use the aquarium after fish or other living creatures, it is important to thoroughly clean and disinfect it before starting.
Idea: the container can be painted with acrylic paints, varnished, or decorative elements can be glued on the outside.
Tropical plants can be added to a former fish aquarium
Flask
They are often chosen for mini-florariums with 1-3 plants. The holes on the top and side of the flask look original and simplify access to the plants. To care for the sprouts through the high neck, you will need long tongs.
Laboratory flasks for mini-greenhouses
Cup
A great idea for tabletop mini-gardens in the office and at home. It is enough to place one plant in a glass and decorate it with small natural or artificial decor. Dishes with smooth walls work best.
Mini florarium in a glass for your desktop
Original forms
Manufacturers of mini-gardens offer containers created according to individual designs for different interior styles. Florariums in the form of a birdcage, in the form of complex geometric shapes, look impressive. For homemade mini-gardens, you can use available materials: wine bottles, glass teapots, Christmas tree balls, test tubes and even light bulbs.
Florarium in the form of a Christmas tree toy
How to make an aquarium in the wall of an apartment with your own hands
You should try to think through the installation of an aquarium in the wall in advance, at the initial stages of repair work. After completing all the finishing work, it will not be possible to integrate this decorative element into the partition without destruction.
If you want to save on installing an aquarium, you can do the work of constructing a niche or portal yourself, and entrust the installation of the aquarium and communications to specialists.
The sequence of wall preparation for mounting an aquarium is as follows:
Preparation
Cleaning the wall from facing materials and plaster.
Marking the future portal (niche)
It is necessary to mark on the wall the location of the future aquarium, taking into account the design of the room, to determine the place through which the aquarium will be serviced.
If the aquarium is not located along the entire length of the wall, the lower border should be located at least 90 cm from the floor. Often there is an option to install an aquarium according to the principle of placing works at exhibitions - at eye level. This option is suitable when the aquarium has a width significantly greater than its height. If there are children in the house, this method of placing a tank with pets will not be the safest for them. It will be possible to watch the fish only by standing on an elevated platform. And if adults are not around, this is an additional danger to their health.
To the planned width of the aquarium, it is worth adding a few centimeters on each side and at least 30 cm to the height for connecting the necessary communications - lighting, sterilizer, drainage system, compressor and others.
The “golden ratio” is considered a beautiful proportion for harmonious visual perception. You can easily calculate it to select a location for the portal by using a calculator from the Internet.
Sawing an opening
Using a special saw for gas silicate and expanded clay blocks, you can start cutting out.
In modern construction, interior partitions that are not load-bearing are erected from gas silicate and expanded clay materials. They are wide enough and easy to cut holes in. Installation of an aquarium in a brick wall is possible only at the stage of its construction, otherwise the stability of the partition will be compromised .
If you plan to hang the aquarium in a niche, then at this stage you should take care of a strong mortgage on which the hangers will be attached.
There are also partitions made of plasterboard on a metal frame with internal soundproofing finishing. In this case, it is impossible to make the frame of the opening without specialists. Such a wall will need to be built from scratch, and mortgages will need to be installed for the installation of a heavy structure.
Strengthening the opening
Necessary stage. Strengthening is done using a metal plate. Its length must exceed the length of the vessel being installed, and be located on the side blocks. This stage compensates for their inevitable shrinkage.
Video: DIY aquarium in the wall
Laying grooves under electrical wiring
It is better to connect the electrics for the tank to a separate circuit breaker in the electrical panel. The main units - the filter and the compressor - must operate in standby mode during the long absence of the owners.
Frame decoration
It can be attached directly to the tank. Its task is to mask the seams connecting the vessel with the wall, the zone of water evaporation. It can be made of any material (preferably rubberized) that can be easily painted with oil paint. The opening is ready!
As a frame, you can use a baguette from a special workshop.
Installation of water supply and sewerage are optional conditions when installing a container with a volume of less than 500 liters. They certainly add convenience. But the water will still need to be replaced using a hose, and with natural drainage of water, as with forced drainage, the dirt will also remain in the sand.
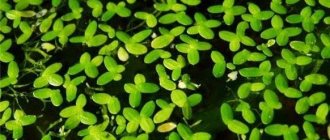
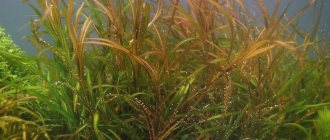
Riccia
Riccia is a lush green plant, a frequent visitor to aquariums. Widely distributed in slow-flowing water bodies on almost all continents.
Riccia belongs to the group of Liver mosses, so it does not have the usual plant organs, such as stems and leaves. The body is represented by a thallus, or thallus, and in appearance resembles a large number of green twigs up to 1 mm thick, intertwined with each other. The tissues of the plant contain a lot of air, so Riccia stays near the surface of the water and, under favorable conditions, is capable of forming very dense floating islands of greenery.
The conditions for keeping Riccia are not difficult. In general, the plant adapts well to a wide range of parameters. You need a tropical aquarium that maintains a temperature of 22-29°C. It is better if the water is soft (2-8 dGH) and almost neutral (pH
7.0). The most important factor when growing Riccia is the availability of sufficient lighting. In conditions of lack of light, the moss breaks up into separate branches.
It is also worth paying attention to the cleanliness of the water in the aquarium. Fine organic suspension, settling on the leaves, can lead to oppression of the plant.
Most often, Riccia is used in spawning aquariums so that the fry can find a safe shelter. But many aquascapers are happy to use the high decorative qualities of this liver moss in their works. Riccia will be a good plant food for golden and Malawian cichlids, and will also provide diffused light if other plant species need it. Sometimes Riccia is used as a ground cover plant in the foreground of the aquarium.
Review
Having an idea of what kind of aquariums are needed, you can choose a ready-made industrial stand - there are many options available.
Russia can offer a huge variety of equipment for pet stores and aquarium farms. The company produces aquariums and, accordingly, stands for them. The racks are equipped with a lighting system and electrical equipment that allows the connection of any other aquarium electrical appliances.
For the manufacture of load-bearing structures, square steel pipes made of ordinary or stainless steel, coated with a polymer composition that prevents corrosion, are used.
Rack CA 3/1 (aquarium stand, three-tier, single-section) can be combined with other similar stands , filling the retail space with aesthetic and convenient shelving that can accommodate aquariums with a volume of about 150 liters.
At the customer's request, aquariums can be equipped with partitions, which doubles the number of reservoirs.
Moscow production company Metallvarim. ru offers aquarium stands for individual orders. The company's specialists will help you design a product for aquariums of any size and shape. The company can produce both all-welded structures and prefabricated ones, if the product cannot be brought into an apartment or store as a whole.
Advantages and disadvantages
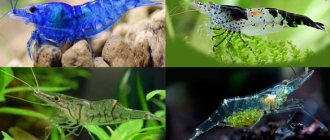
Meristem aquarium plants have many advantages over ordinary ones:
- Lack of spores of other algae and snails. This is perhaps the most important difficulty that aquarists face when purchasing plants.
- Plants grown in the laboratory are absolutely healthy - they have no predisposition to viral, fungal and bacterial infections. Due to this, they do not require painstaking care and there is no risk that with new plants the aquarist will introduce an infection into a clean aquarium.
- Genetic uniformity. Plants grow identical to the mother's, which reduces to zero the likelihood of growing something unpredictable. During standard propagation of plants, varietal characteristics are split and young plants may completely lose their resemblance to their mother plants.
- Meristem aquarium plants can be propagated in the standard way directly in the aquarium.
- Convenient storage and transportation. Plants are packed in dense containers that can be transported for a long time. The main thing is to maintain a temperature of +5-+25°C. Without lighting, plants can be stored for 8-10 days, with normal lighting on a windowsill or table - up to 30 days.
- Compact packaging. A standard container holds as many sprouts as three traditionally grown pots.
Please note that at this time the aquarium plant is not just waiting for planting, but actively continues to grow!
Among the disadvantages, many aquarists note the long process of adaptation of the plant in the aquarium. But this process takes the same amount of time for ordinary plants grown in the traditional way.
Any plant needs time to adapt the metabolic process from the air to the aquatic environment and to form underwater leaves instead of air leaves. The main thing when replanting is to carefully wash off the nutrient with which the plant was transported and place it in a new environment as gradually as possible, ideally over several days.
A few words about the soil
As I mentioned earlier, garden or garden soil can be used as soil for a wet greenhouse. Humus content is also allowed. There is no need to invent anything more here. With a low level of soil layer and a minimum amount of water, plant roots will develop quite well.
My aquarium with plants is located on the sunny side and in clear weather is illuminated by direct sunlight, which on hot summer days can overheat and destroy the plants, and to prevent this from happening, I cover the illuminated side of the aquarium with newspaper.
In autumn and winter, when there is a shortage of lighting, lamps with built-in fluorescent lamps can be additionally used as a light source. If the greenhouse is illuminated by natural light from the window, artificial lighting can be used in winter only in the evening hours, thereby adding more daylight to the plants.
How to plant plants correctly
Planting plants in an aquarium begins with preparation. After preparation, the aquarist determines the order of planting. You should start planting greenery from the background. Long seedlings are planted in the background. In the middle ground, small bushes are planted, which will line the bottom of the tank and form a continuous cover. Low algae is planted in the foreground.
Greens for an aquarium can be ground or floating. Floating algae do not need to be rooted; they can be attached to driftwood or other decor to give the aquarium a neat look and complete composition. The grass with roots must be fixed in the ground.
The roots are placed according to natural growth. If the roots of greenery grow horizontally, they are buried two centimeters from the surface. If the roots grow vertically, they are buried at a depth of 4-6 cm.
The root system must be buried carefully so as not to damage the rhizome. It is recommended to make a small hole the size of the rhizome and carefully lower the seedling. Then the root is covered with soil. To strengthen it, you can press small pebbles on the sides of the plant.
Greens with creeping roots are planted in groups of 5-6 pieces. This creates a unified composition and strengthens the seedlings in the ground. It is better to place creeping grasses a couple of centimeters from each other. The same recommendations apply to slow-growing grass.
Assembly Tips
Having prepared the drawing, materials and accessories, invite an assistant . Making a stand for an aquarium is a responsible task; to connect some parts, they will need to be suspended, and in the absence of additional devices, such as corner clamps, it will be problematic to do this alone.
Assembly should begin with the reinforcing frame. Then the cabinet itself is assembled: the side and rear walls, stiffening ribs, the lower part is mounted and, lastly, the tabletop is installed. At the last step, it is important to install the slab as evenly as possible without damaging it. Even a small pothole can cause cracks to appear on the bulb. And this threatens not only the death of the aquarium and its inhabitants, but also a large bill for repairs from the neighbors.
Installing the cabinet is the very last stage
The final touch is installing the container itself on the cabinet. Soft material such as isospan is laid between the table top and the bottom of the aquarium. Before the final launch of the aquarium, experts recommend checking the design for defects. To do this, install the cabinet with the aquarium in a permanent place, fill it halfway and wait a day. After this, check to see if there are any leaks or cracks. If everything is in order, you can safely start decorating the underwater world.
Making such a piece of furniture yourself is a rather labor-intensive task. With a simple shape and small size, it will most likely come out a little cheaper than the factory equivalent. However, with more complex configurations, you won’t be able to beat the price.
Experienced aquarists assure you: launching a truly beautiful aquarium is impossible without an appropriate stand. Therefore, a stand under the tank is not just a desire to stand out, but a severe necessity. It will not only serve as a support, but will also harmoniously complement the window into the underwater world.
Lighting
Plants love light - perhaps this is the only parameter in which all representatives of the aquarium flora are completely compatible with each other. At the same time, competent adjustment of lighting in different zones of an artificial reservoir will allow it to combine species that need a large amount of carbon dioxide with plants that can be content with a minimal amount of carbon dioxide and do not respond very well to its abundance.
If there is only one lighting source, then active CO2 consumers should be planted in well-lit areas. And plants that do not consume carbon dioxide in large quantities should be placed away from lamps, in the shade - this will slow down the absorption of carbon dioxide, and, therefore, excess carbon dioxide will not harm them.
You can go another way: additionally illuminate the space around cryptocrines or other species that require high concentrations of carbon dioxide. In addition to comfort for aquarium flora with different CO2 metabolism, such complex lighting will create an interesting visual effect and become a full-fledged design element.
Key components of an aquarium stand
Answering the question of how to make a cabinet for an aquarium, it is worth saying that this process is similar to making an ordinary chest of drawers. First, a drawing of the future product is drawn up and the dimensions of all its parts are determined. This design consists of several main parts:
- Back wall. To make the rear partition of the aquarium cabinet, it is recommended to choose a strong and dense (durable) material with a thickness of more than 2.2 cm. Chipboard or MDF are suitable. The fact is that it is this part of the product that is responsible for the stability of the vertical walls and does not allow them to settle under the weight of the aquarium. Embedding a rear partition between the side partitions will help make the structure more durable.
- Frame. Vertical internal walls are installed approximately every 25 cm. They protect the tabletop itself from load and make it more stable.
- Tabletop. One of the most important elements in the manufacture of an aquarium cabinet. Such a table must have a flat, durable and waterproof surface. The larger the tabletop, the more reliable and durable the entire structure will be.
- Doors. Without this detail it is difficult to imagine a full-fledged aquarium cabinet. The doors can be hung using overhead hinges for furniture with a closer. You should first measure the places for their installation on the side partitions, and then cut out the cups for the bases.
- Legs. A ready-made aquarium stand is usually equipped with stable legs. The best option for creating them would be thick aluminum.
It is important to take into account that when adding water and catching fish, drops of water from the artificial reservoir will fall on the table, as a result of which the untreated surface can quickly become unusable, which will lead to damage to the aquarium itself. To avoid such consequences, the mating of all parts, ends and all kinds of sockets with fasteners must be varnished 2-3 times.
Complete cleaning and disinfection after fish death
An ultraviolet lamp illuminates and disinfects the aquarium.
In some cases, simply cleaning the aquarium properly is not enough. If its inhabitants begin to get sick and die, you need to be sure to get rid of the infection, which will be helped by complete disinfection. To do this, you will have to remove all the fish from the mini-reservoir and disinfect its surfaces and contents.
Be sure to keep the plants in a weak solution of antibiotic or potassium permanganate, boil the decor and soil. Fill the seamless container several times with hot water, if there are seams with silicone filler, wipe the glass of the aquarium inside and out with a chlorine-containing detergent, and then rinse thoroughly.
No less effective and more gentle will be the use of hydrogen peroxide, a solution of potassium permanganate or ordinary table salt. These products also require rinsing, but it may be less intense.
There is a way to disinfect an aquarium without relocating the fish and restarting it. An ultraviolet lamp, which turns on instead of conventional lighting, or methylene blue, which is harmless to living inhabitants, allows you to cope with problems. A few drops of the product, diluted in 10 liters of water, kills dangerous microbes.
It is difficult to disinfect and wash an aquarium with fish, especially if it is large. In these cases, it helps to have the help of professionals who perform all the work quickly and efficiently, and the cost of calling a specialist to your home to clean the aquarium is not very high.