4.6
(17)
Trips to the sea, lake or river remain in the memory for a long time. The moments experienced there will always draw you to the water in order to again feel the indescribable sensations of calm and tranquility. Most people live in urban metropolitan areas, and it is not always possible to find privacy near the water. Water is the best remedy for the modern “scourge” - stress! Do you want to again feel that lightness, serenity and peace that gives strength for future achievements?
An excellent analogue for you would be a home aquarium in the Dutch style: here the water expresses calmness, the swimming fish symbolize serenity, the slight vibrations of underwater plants are a sure sign of peace! Also, having an aquarium has other advantages:
– will raise the humidity level in the home,
– will help to instill a sense of responsibility in children by entrusting them with caring for fish.
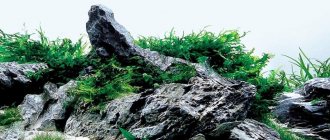
One of the design principles of a Dutch aquarium is complete asymmetry.
What is the Dutch design style based on?
There are many styles and types of aquariums, varying in shape and volume, as well as in flora and fauna. The variety of choice of underwater inhabitants for an indoor aquarium practically knows no bounds. So why do they prefer it?
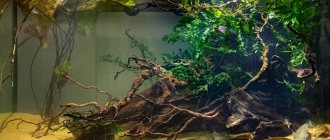
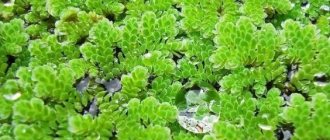
The Dutch aquarium (Dutch Aquascaping) is not just a collection of plants and fish that easily get along together, forming a microcosm. This is an aquascape - an artificially created water garden, the inhabitants of which (mostly densely planted aquatic plants) not only get along, but are compatible in color and complement each other, creating a composition of extraordinary beauty.
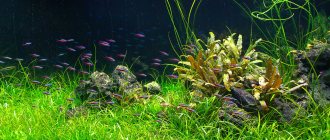
The game of contrasts is a distinctive feature of the Dutch aquarium.
The design of an aquarium of this style must meet the following requirements:
- It is based on plants (about 70%), and not fish, contrary to popular belief about the art of aquarium keeping.
- The use of bright landscapes that have a spectacular appearance in an apartment or house.
- Minimalism when choosing the number of fish; rather, they will be an addition to the landscape.
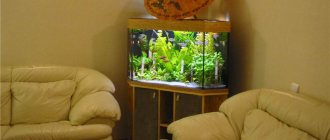
- The volume should not exceed 1 m3, while the length always exceeds the height (according to the rules, in the ratio 3/1).
Aquarium care
Care is divided into daily and weekly.
Daily activities include:
- applying plant fertilizers;
- temperature measurement;
- control of carbon dioxide supplied to the aquarium;
- feeding the fish;
- removal of dying parts of plants.
Weekly measures include:
- partial water replacement;
- cleaning the walls of the aquarium;
- replanting and pruning plants.
The principle of plant arrangement and design rules
The Dutch aquarium is arranged according to the principle of a flower bed (park or “winter” garden), creating a panoramic view. In this case, particular importance is given to the choice of plants: rare and expensive, sometimes collectible species.
The planting scheme is as follows:
– short – in front, tall – behind (exception, small “alleys”, using a low-growing herbalist);
– landing is carried out in places – “islands”, with gaps between them;
– use of the “place of power” according to the principle of the “Golden Section” (draw two straight lines along and across the bottom, dividing it into equal segments, and the intersection points, there will be 4 of them, will be places of power). Only 2 places can be used at a time: one each in the foreground and one in the background;
– in the center there is a complete absence of vegetation (empty zone), and there is complete asymmetry throughout the entire aquarium;
– the main game is designed on the contrast of plants (small ones next to large ones, low ones with tall ones, dark ones with light ones);
– use of snags: bright and eye-catching.
Attention! To make it easier to care for plants, they should be planted in small, inconspicuous pots in the ground. Thereby streamlining the growth of roots and making it easier for yourself to divide the bushes.
Planting is carried out in zones - “islands”, with gaps between them.
How to create a classic Dutch style aquarium
This article will talk about the Dutch style aquarium and how it was created by George Farmer, a famous British aquarium designer.
The Dutch aquarium is a style rarely seen in Britain. George Farmer himself is a fan of the natural style, when stones and driftwood are taken as the basis, and all this is complemented by a small number of plants to complete the composition and place accents. The Dutch style is based on a more traditional design, where plants are planted in even rows and groups, and the effect is achieved by playing with their color, size and texture. It is quite difficult to achieve a truly stunning effect here, so creating a beautiful Dutch-style aquascape is quite a difficult task.
So how was this beautiful aquarium created? Pre-planning:
Choosing suitable plants is the first step when creating such an aquarium. They should be selected based on size, lighting, additive requirements and CO2 system. George was not limited in his choice of aquarium equipment, since he had 4 excellent T5 lamps, an excellent filtration-aeration system and a wide variety of fertilizers and plant nutrients.
It was much more difficult to plan planting locations. How to arrange them in the aquarium so that they both look great and at the same time contrast against each other?
After looking through the catalog, all candidates were divided into three categories: foreground, middle and background, respectively. Quite bright plants were also chosen for accents in the necessary places. It was decided to focus on a combination of classic Dutch plants, such as Lobelia cardinalis, Bacopa carolina, to which it was planned to add Stauroginus repens, Pogostemon helfera and Pogostemon erectus. George drew a plan and decided where each species would be planted. The photo below shows the location of all the plants.
Lighting Issues:
To minimize the risk of algae, George settled on a 7 hour light period using two T8 fluorescent lamps for the first month. While there are no fish in the aquarium, you can use an increased level of CO2 supply.
The plants grew well despite the low light levels, but it soon became clear that in order to get a beautiful appearance they needed to be pruned. Some long-stemmed plants (Cirrus matogros) grow by about 10 - 15 cm per week, while others (Ludwigia glandulosa) grow by only 1 cm. Accordingly, the plants need to be pruned so that they look beautiful and proportionate.
Once the plants begin to grow and fill the available space, the lighting of the aquarium should be increased to provide sufficient light. George replaced two T8 fluorescent tubes with two T5s, and then even four T5s. The dosage of liquid fertilizers and the supply of CO2 were also increased.
One of the benefits of increasing light and nutrients was the emergence of Ludwigia's dark red, shiny coloration. Initially, weekly maintenance took up to three hours, just to keep the aquarium looking good. Super plant growth is great, but only if you can maintain your aquarium several times a week. Many of us lead an active lifestyle, so it is not always possible to devote enough time to maintaining the aquarium.
George decided to lower the light levels and reduce the amount of nutrients, which resulted in a more sustainable result. In an aquarium with a predominance of long-stemmed plants, it is difficult to restrain their growth, so the use of low light, reducing the amount of feeding and reducing CO2 doses is justified. The appearance of unwanted algae is also unlikely under such conditions. Plants and their location:
Foreground: • Lobelia cardinalis (Lobelia cardinalis)
• Pogostemon helferi • Creeping Staurogyne (Staurogyne repens)
Middle plan: • Cryptocoryne wendtii “brown” • Ludwigia glandulosa • Pogostemon erectus • Echinodorus Vesuvius
Background: • Hygrophila difformis • Myriophyllum mattogrossense • Bacopa caroliniana • Vallisneria nana – subsequently removed
Dutch Aquarium maintenance schedule:
Daily: • Adding liquid fertilizer • Checking water temperature • Adjusting CO2 supply • Feeding fish • Removing floating and unhealthy leaves
Weekly: • Cleaning the walls of the aquarium • Removing accumulated dirt around the plants and on the ground, followed by a 50% water change • Cleaning the filter elements • Pruning and replanting plants as necessary
Stages of creating a Dutch aquarium:
1. The aquarium was chosen with dimensions of 80 x 45 x 45 cm without a lid. A nutrient substrate enriched with all the necessary mineral components to nourish plant roots was used as the base layer.
2. The base layer consists of fine quartz with a grain size of 1 – 3 mm, which makes it easy to plant plants. The quartz is laid with a slope towards the front wall of the aquarium to create the effect of depth. The quartz will be completely planted, which will eliminate siltation.
3. A colander is used to pour water into the aquarium, which avoids mixing the previously laid soil.
4. The aquarium is half filled with water. This allows you to plant plants without additional spraying, which must be done when planting simply in a damp substrate.
5. In the foreground are planted a mixture of "classical" and "modern" styles: Lobelia cardinalis, Pogostemon helfera and Staurogyne repens. Lobelia gives the “path” the effect of depth. Staurogin planted in the middle of the composition gives the same effect.
6. Cryptocoryne Wendt and Ludwigia glandulosa are planted on the left in the middle, with Pogostemon erectus in front. The brown of Cryptocoryne and the deep red of Ludwigia will add a pop of green to the other plants. The colors will become saturated within a week or two, after the plants adapt.
7. In the background are planted Hygrophila sinnema, Cirrus matogrosensis, and Bacopa carolina. All of these plants vary in texture, which creates an interesting effect in the background.
8. The aquarium is full. George used 25°C water to help protect sensitive plant species from temperature shock. Slowly filling the aquarium with water avoids disturbing the base layer of soil. Remove any floating leaves or other debris immediately.
9. The black background adds contrast. The aquarium is equipped with an external filter, heater and CO2 system. The aquarium is ready for fish.
10. Final result
Author: G.Farmer for Practicalfishkeeping.co.uk Translation and adaptation of the text: V.Lyuft especially for www.akvabluz.ru | © Copying of materials is prohibited
Ground and lighting
Dark soil is considered the most suitable. Choose crushed granite (basalt), or coarsely sifted river sand, which can be perfectly decorated with larger stones from the same granite, as well as pre-prepared snags. Using a special substrate saturated with beneficial microelements will accelerate the growth of herbs.
When purchasing and placing artificial lighting lamps, give preference to those with relays to automatically regulate the shutdown process. It is advisable to hang the lamps directly above the aquarium. If you have a standard container with a tight-fitting lid, you can enhance the effect of the lamp by adding additional foil reflectors.
We recommend reading the article: How to choose the right soil for an aquarium
Aquarium dimensions
The first step is to purchase a pond of suitable size. When purchasing, the main attention should be paid to the bottom area. It must be big. The recommended width is in the range of 40-70 cm.
If you take more of it, it will be awkward to reach the back corners of the container. As for the length, the longer it is, the better, but two meters will be enough. The height of the aquarium should not exceed 40-60 cm, otherwise it will be difficult to care for the plants, and light will not penetrate well through the water column.
In general, you can select it according to the rule: length/height=3/1, width>height.
The minimum volume of an artificial reservoir is 200 liters, the optimal is 500 liters.
Plants for a Dutch aquarium
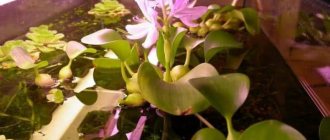
Plants are selected in such a way that some cover the stems of others, as if creating the appearance of a “cascade”. For example, Hygrophila “schisandra” and the like are perfect for the background. Small plants, such as Cryptocrine, are planted in front, and the central plan can be filled with Nymphaea tiger, Amania gracesa, Alternanthera Reineck and the like, while adding bright accents. You can smooth out the gaps by applying Java moss.
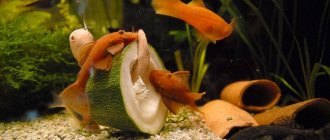
In a Dutch aquarium, fish play a secondary role.
Important! In this case, preference is given to slowly growing ones, however, if it is necessary to quickly fill the space, fast-growing species are also used.
Layout
This stage consists of taking a sheet of paper according to the size of the bottom, and marking areas for different types of plants on it. You can do this in the aquarium itself with soil.
It is recommended to study the range of plants in pet stores in your locality in advance. What to consider when selecting them:
- similarity of living conditions;
- growth rate and maximum plant size;
- vegetation color;
- which instances to focus on and which ones to emphasize;
- Distribute which plants are best placed in the back, middle and foreground.
In no case should there be symmetry, as a Dutch aquarium will look ridiculous and unnatural. Bright plants, which the eye falls on first, should be offset from the center.
What kind of fish can you keep?
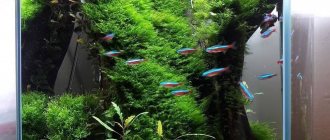
The Dutch aquarium is primarily a plant world; fish play a secondary role. Mostly small schooling species live (catfish, tetras, swordtails, poecillobricons, barbs, zebrafish, neons), less often angelfish, and fish of breeds that do not dig the ground are used. Their selection is carried out according to the following canons:
- Based on 7 liters per individual;
- Population of all water layers;
- Variety of colors and shapes;
- Peaceful nature and compatibility with each other and the environment;
- Compliance with the size of the aquarium (up to 10 cm in length).
Distinctive features of the style
Aquariums began to be decorated in Dutch traditions using the example of landscapes painted by famous artists. This oldest direction of aquarium hobby is characterized by the naturalness and natural harmony of the underwater world. Dutch aquariums are not created to imitate landscapes, but rather to create a picturesque composition. In such reservoirs, the main role is given to diverse vegetation.
Signs of the Dutch style:
- 70-80% of the volume is occupied by herbs;
- There is one plant species for every 10 cm2;
- In the center of the vessel there is a “dead zone” - a place free from accent details;
- Zoning the space into three parts (rule of thirds);
- Terracing - arrangement of plants at different levels;
- “Leiden streets” - ascending rows creating a volume effect;
- The presence of tapeworms - outstanding elements (stones, driftwood, bright large-leaved plants).
Important point! An aquarium with a Dutch design must be equipped with equipment for the growth and nutrition of green spaces. To emphasize the naturalness of the object, the devices should be carefully hidden in the bushes.
Optional equipment
Dutch aquariums are very demanding and will not function properly without additional equipment. What should be prepared:
- Additional carbon dioxide supply system. With its deficiency, plants stop growing.
- A heater that will constantly maintain the temperature at 25 degrees.
- The filter is of good quality, preferably an external one.
- Standard compressor (in case of using a classic aquarium with a lid). If the container is open on top, then it is not needed.
- UV sterilizer to suppress the growth of harmful bacteria. It is not necessary to install it.
- Black or white film for background. A colored background makes little sense, since overgrown plants will hide it anyway.
Terracing
Terracing is an important component of the Dutch style. Often the effect of terraces is hidden by simply planting ferns and anubias on hardscape elements (snags, stones). This way you can quickly create the effect of gorges or a smooth elevation of the ground (usually from the center to the side windows). A more thorough approach to terracing is to build real terraces made of glass, sand or cork. Groups of plants are planted on such elevations and the landscape takes on a more voluminous, complex appearance.
Lighting
As a rule, all store-bought aquariums come complete with a lid that fits tightly to its upper edges and has from 2 to 4 incandescent lamps (depending on the size of the container). This option is absolutely not suitable for a Dutch mini-park.
The abundance of vegetation requires decent lighting.
Its power should be at least 35-50 lumens per liter of water, and its duration should be 10-12 hours. It is better to use special lamps designed specifically for such plant aquariums. They can be attached without a lid.
If you still plan to use a classic pond, then you can equip it with reflectors or, at worst, attach foil to the inside of the lid. These measures will make the lighting brighter.
Aquarium parameters
The Dutch style of the aquarium provides for the correct ratio of the dimensions of the container, where the optimal proportions are: length: height: width - 3:1:1. To create an aquarium with your own hands, the following data is usually used: length from 100 to 240 cm, height no more than 60 cm, and width no less than height. With such parameters, conditions will be provided for proper gas exchange, which is important for plant life.
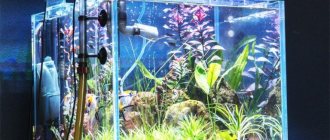
The most suitable design is considered to be a frameless aquarium, which allows you to focus on the beauty of the aquatic landscape.
Return to content
Mosses and ferns
Java moss is very often introduced into Dutch landscapes. It provides an expressive tonal and textural contrast to groups of higher plants, and when attached to driftwood it is very often used as a strong point. The composition that is formed in the foreground must be executed with special care. Unlike a Nature Aquarium, Dutch-style plant groups never mix. To enhance the visual effect, only the views that make up the Leiden street can mix or duplicate each other (no more than 2 views). Thus, E. tenellus is very often planted next to or together with groups of small cryptocorynes.
Equipment
To set up a Dutch aquarium with your own hands, you need to take care of all the important devices on which the existence of the small underwater world will depend. For heating, in addition to the main system, a bottom heater is usually used, which helps the roots feel warm. You need a thermometer and a time relay.
For filtration, canister models and a CO2 system are best suited. Carbon dioxide is especially important in the life of plant cells; if there is a lack of it, they stop growing. However, its excess can be harmful to the health of the fish, so you need to carefully choose the right ratio. At night, the supply of CO2 to the aquarium should be stopped.
Return to content
Equipment
It is very interesting that in the Netherlands, the cradle of the “Dutch” style, for a long time there was a phrase “a Dutch aquarium is an unfiltered aquarium with natural light, little or no equipment.” Perhaps this description of a lush aquarium with many living plants was given by ordinary people in contrast to the German aquarium style, which tended to create the most comfortable “fish” aquariums. Those. was focused primarily on fish. All equipment (filters, pumps) in such aquariums was visible, and the herbal jar seemed to filter and self-clean itself. I don't know, maybe this is just my hypothesis. But I think there is no doubt that the Dutch aquarium today is a high-tech facility. The lighting, however, may be less intense (I compare, for example, with the American style of keeping an aquarium and the Nature Aquarium) and traditional fluorescent lamps are often used, but the filtration here is the most modern. Preference is given to external canister filters and sumps. The CO2 system is a prerequisite for the life of a planted aquarium. The CO2 level in the “Dutch” is low, from 15 to 20 mgl. Soil substrates usually consist of a mixture of laterite, clay, gravel and iron tablets or styx. Some aquarists still use their own recipes for soil mixtures, while others use commercial ready-made varieties of soil.
Design rules
The Dutch aquarium and its successful maintenance directly depend on the correct construction of its composition and human care for it. To create a beautiful landscape, you definitely need a plan. The Dutch type has basic design planning principles:
- The “dead zone” is the center of a Dutch aquarium, which is best left empty. In a container with water, the lens effect is extremely strong and will interfere with observing the plants;
- Plant different types of plants every 10 cm;
- correct placement of the tapeworm - a catchy element in the form of a stone, driftwood or bright plant;
- volume effect due to “Leiden streets” - a common element in the form of a tapering strip of moss and small plants;
- the effect of terracing by planting plants on driftwood or stones, as well as by placing organic glass under the ground;
- correct selection of fish, allowing you to evenly occupy all water layers.
It is advisable to sketch out color sketches of the plan, make a list of plants, and read special literature about the Dutch aquarium style. When creating such an aquarium with your own hands, it is important to compare the compatibility of the selected plants and the fish that will populate it.
Soil for the herbalist
The soil can be purchased at a pet store, but in such quantities it is a little expensive for me. At first I used washed river sand, then replaced it with small pebbles 2-5 mm. They all have their drawbacks: soil that is too fine lays down too tightly, large soil gets heavily packed with dirt and still begins to sour. Now I use 2-5 mm soil, and after 3-4 years I completely rinse it and recharge the aquarium. I haven't used the double bottom system, so I can't say anything about it. An interesting experience on this topic is described in the article by I. Zlatkovsky Aquarium with plants. Instead of a false bottom, you can use drainage, see more details. DIY aquarium drainage. I don’t use any additives; all the plants described above grow well as is. Clay balls are added under the roots of plants that receive nutrition from the soil (cyptocaranes, echinodorus), but this is not necessary. Clay is needed more as a buffer (it absorbs minerals dissolved in water and releases them when they are deficient). Only “Water Lily” is planted in a separate pot, glued together from ABS d: 15mm in height no higher than ground level. Soil with clay chips of 1-15 cm is laid at the bottom, and ordinary gravel is placed on top. You can do this for the entire aquarium. But, if you want to subsequently recharge it and wash all the soil, the process will turn out to be too labor-intensive. Such containers are easily removed from the aquarium and are much easier to handle. If possible, the layer with clay can be left untouched; it hardly becomes clogged. Clay can be bought at a pharmacy. Blue clay (ask for a face mask) is fine. Under no circumstances do I recommend adding organic additives to the soil, or especially garden soil. Especially for beginners, your aquarium may bloom in the first week, and the soil may turn sour. Instead of a pleasing picture, you get a dirty swamp.
The terrace is made of black ABS plastic, onto which gravel and ordinary aquarium silicone are glued. Plastic can be bent by heating over an electric stove, gas burner, or heated with an industrial hair dryer. It is better to work with gloves (knitted cotton gloves). In addition, it makes sense to separate the borders of plants that reproduce vegetatively from the root (valisneria, cryptocarina, echinodorus) with strips of plastic or plexiglass. Strips of plastic are cut so that it does not protrude above the ground. This will limit the growth of plants in the designated area; of course, visually this will not give any effect, but it will make maintenance easier.
To the begining