Why is there co2 in an aquarium?
The CO2 system includes the gas necessary for this, which enriches aquarium plants with health and beauty. The level of carbon dioxide in the reservoir is almost zero. The amount of gas does not increase in the process of natural production due to the life activity of aquarium inhabitants. In aquarium water, the process of photosynthesis and the best absorption of fertilizers by plants occur, thanks to the timely and correct supply of carbon dioxide. Photosynthesis begins only after the flora in the aquarium absorbs water and carbon dioxide, which consists of carbon molecules. That's why plants need it so much.
reactor CO2 generator – do it yourself HD 720p – The best videos
8 years ago
active CO2 reactor.
3 years ago
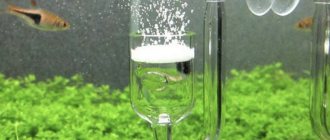
DIY Co2 diffuser and bubble counter - 2 in 1. Do it yourself - easy, fast and cheap. Materials used: PVC hose 4/6 mm Syringe (any size “I took 10 ml”) Cigarette filter Aquarium – Suction cup with holder Homemade co2 supply system to the aquarium: https://www.youtube.com/watch?v=Z6fdvfhgtw4
8 years ago
A simple glass CO2 reactor, made from a 250ml volumetric cylinder. A hole saw was used to cut openings for the CO2 supply tube and a 12/16mm tube supplying water from a pump. The reactor is approx. 27cm tall – the aquarium is 180lt
5 years ago
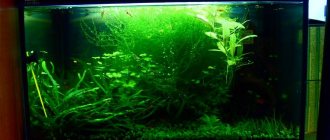
This aquarium design example is well suited for beginner aquarists. https://oformi-akvarium.ru/vybor-akvariuma/akvarium-dlya-nachinayushhikh-na-125-litrov Since only hardy plants are used.
3 years ago
In this issue I bring to your attention my development - my version of a carbon dioxide reactor, which, in my opinion, is the most effective in relation to analogues, is easy to create at home, is able to work with carbon dioxide supply systems both on brew generators and on cylinder systems and saves money money for you. Video of the “Bereg” aquarium in which this carbon dioxide reactor was used https://www.youtube.com/watch?v=8TJ1IT_DV4M
3 years ago
CO2 diffuser + bubble counter + check valve. Designed for balloon systems. These two ideas are taken as a basis: https://www.aquafanat.com.ua/forum/index.php?showtopic=28880&st=0 and https://www.aquafanat.com.ua/forum/index.php?showtopic =43200&st=0 A syringe is needed for 5 ml.
The filters from the dripper are ideally suited for its diameter and it fits very tightly onto the check valve. The syringe barrel contains a flange at its rear end, which serves as a support for the fingers during injection. You only need to cut off the flange itself so that a stiffening ring remains at the edge of the syringe cut (see the cut line in the photo).
On this side there will be a diffuser itself consisting of 2 filters from the dropper with cotton wool between them. The edge of the syringe, from which the “nose” will be cut, is heated in hot water and, with sufficient force, is pushed onto the check valve.
The plastic of the syringe fits the valve very tightly, but the design is assembled/dismountable - the check valve can always be disconnected and the filters can be pulled out to replace them or clean them in, for example, a bleach solution. Filters are quite easy to damage, so it is convenient to fill and move them inside the cylinder using a piston rod from the same syringe.
The space between the two filters does not need to be heavily filled with cotton wool, just a little force is enough. If necessary, experiment with the amount and strength of cotton wool. IMPORTANT – the cotton wool must be wet for the diffuser to work properly. The graduated scale can be erased with acetone.
If the bubble counter is not important, then the diffuser can be made even more compact - cut the syringe shorter and cut off the “spout” at the check valve at the outlet. PS I installed the CO2 cylinder system quite recently.
The supply solution for two aquariums is simple - CO2 is fed into the pump through a needle inserted into the sponge from a syringe, broken up by an impeller and released through a flute, the holes of which are directed towards the wall and downwards (it is shown in the video; the supply of CO2 through it was turned off at that time).
I was looking for an idea for a compact diffuser in a shrimp tank, since it does not have a pump, but a Sobo WP-303H “Waterfall” mounted filter. The diffuser had to be installed under the filter, where the water falls, and somehow secured to the bottom. There is no way to attach the diffuser to the rear window with a suction cup, because... A three-dimensional background of soil is applied to the glass. I solved the fastening problem by fixing the hose with a stainless steel wire passed through it. At the same time, I made the device smaller - I shortened the body and sawed off the spout near the check valve with a hacksaw (it now almost touches the filters). In this case, I didn’t need a bubble counter.
4 years ago
Sehr lange JBL CO2 Diffusor/Reaktor. Um sehr gute Diffusionswerte zu erreichen (am ende sehr kleine Blasen) müsste ich die länge vergrößern.
4 years ago
https://www.youtube.com/YoursAquaLife - to help the aquarist. In this video I will show you how to effectively clean aquarium equipment from algae growth using a CO2 reactor as an example. An aquarium CO2 reactor is a device for effectively dissolving gas in aquarium water.
In the process of dissolving CO2 gas in the aquarium, plants actively absorb it, but unicellular algae also love CO2 gas. Therefore, if light falls on the reactor, algae happily settle on it since the reactor contains the highest concentration of CO2 gas.
Algae fill all the most secluded places of the aquarium CO2 reactor and therefore it becomes very difficult to clean the reactor from them. This method of my video will show how to EASILY and effectively clean algae from the reactor.
4 years ago
Source: https://1-tube.ru/watch/WVE-YdTgoAg
CO2 supply methods
There are several ways to supply CO2 to an aquarium:
- Using a balloon installation. Such a system requires considerable financial costs, but is justified by automation and ease of use. Most often used for large tanks.
- Installation created by myself. It costs the aquarium owner much less. But correctly supplying CO2 using this method is a rather labor-intensive process.
- A simple and economical method for supplying an aquarium with carbon dioxide through carbonated drinking water.
- Brazhka is an ideal system for those lovers of the aquarium world who are just starting their journey.
- other methods
Drinking sparkling water
To enrich with carbon dioxide, simple drinking carbonated water is added to a small artificial reservoir (10–20 l). After opening the bottle, carbon dioxide decreases several times. Twenty milliliters of soda is enough to supply a ten-liter tank. To do this, it is necessary to pour sparkling water into the aquarium every day, thereby saturating the water with CO2, and after it has evaporated, continue to add it as often as possible.
The main condition when supplying water is that it must be unsalted.
Braga
Braga is the basis of CO2 for an aquarium, which consists of yeast, water and sugar. There are bread, dry and brewer's yeast, but dry and brewer's yeast are more suitable for mash. All ingredients are mixed and sealed in a vacuum container. The process of yeast fermentation is completely different from the process of photosynthesis, whereby the necessary gas is released for the reservoir by the use of sugar by the yeast.
How to make a carbon dioxide (CO2) reactor for an aquarium
One of the popular aquarium accessories is a carbon dioxide reactor. Its principle is similar to the operation of a compressor for aerating water, only the compressor increases the amount of oxygen in the water, and the reactor increases the amount of carbon dioxide.
Thanks to it, plants grow more intensively and metabolic processes occur more efficiently, but its excess can lead to suffocation of fish. CO2 reactors are quite expensive at retail, but there is a simple and cheap way.
Step No. 1. Materials
The reactor will require an empty 2-liter plastic bottle; a tube, like those used in water aeration (it connects the compressor and the sprayer); valve; spray. Drill a hole in the lid; it should be slightly smaller than the diameter of the plastic tube.
Step No. 2. Cut the tube to the desired length
Cut the end of the plastic tube at an angle - this makes it easier to pull through the hole.
Step #3: Pull the tube through the cap
Using pliers, pull the tube through the hole about 4-5 cm. If the tube does not fit, widen the hole.
Step No. 4. Sealing the junction of the cap and tube
Where the tubes enter the lid should be sealed to prevent gas leakage, since when the reactor is ready, high pressure will form inside. You can seal it with silicone sealant, spreading it in a thick layer. Cut the tube about 15 cm from the cap. Install a valve, they are sold in pet stores, thereby connecting the separated tube.
Step No. 5. Connecting the tube and the spray pebble
Attach the sprayer to the free end of the tube, ensuring that it is long enough to fit on the bottom of the aquarium.
Step #6: Fill the bottle with water
Fill the bottle with warm water about ¾ of the entire volume. Important - the inner end of the tube should not reach the water!
Step No. 7. Add sugar
Using a funnel, pour 200 grams into a water bottle. Sahara.
Step No. 8. Pour in yeast
Using the same funnel, add half a teaspoon of yeast.
Step No. 9. Mix the contents
Place the cap on the bottle and shake vigorously for 5-10 seconds.
Step No. 10. Place the Spray Pebble in the Aquarium
Place the bottle near the aquarium. Place the sprayer inside the tank. During the day, gas bubbles will begin to come out of the nebulizer - this is CO2.
Note: The proportions can be selected individually; in this recipe, the reactor will last for about 2 weeks. Then the mixture should be replaced. If you increase the amount of yeast, the reaction will proceed quickly with more gas, but not for long, and if you increase the amount of sugar, the reaction will proceed for more than two weeks, but less gas will be produced.
Source: https://www.aqvium.ru/7-kak-sdelat-reaktor-uglekislogo-gaza-co2-dlya-akvariuma
How to spray CO2
To uniformly spray CO2 into the aquarium, use:
- Rowan branches form small bubbles, but quickly become dirty.
- Pebble atomizers produce large bubbles, so the gas dissolves less well.
- Bell - cap. Make it yourself or buy it in a store. This device traps carbon dioxide.
- Glass diffusers work great in a bottled gas supply system and with a system based on citric acid and soda solution. To supply CO2 based on mash, you need to wait 2 days for the pressure in the homemade installation to increase.
- Ladders are an ideal option for mash.
Chemical CO2 generator using citric acid and soda
Tekhi
— Yur, you talked about why carbon dioxide is needed in an aquarium, and about methods for producing CO2 in aquarium farming. Can you tell us a little more about your generator?
Yu.V.
— About the one that we modestly called “Yuri TPV Generator”?
Tekhi
- Yes, about him. On what principle does it work?
Yu.V.
— There is nothing revolutionary about the principle. Common chemical reaction of citric acid and baking soda releasing carbon dioxide
3NaHCO3+C6H8O7=3CO2+3H2O+Na3C6H5O7
With equipment, yes, we have slightly improved the well-known Kipp apparatus. The fact is that in its classic form it is vertical. The acid is above the alkali. This is not very convenient in practical use. We modified it to this form, when it is made from two containers standing next to each other. In our case, most often these are two plastic bottles.
Tekhi
- Why bottles?
Yu.V.
— They are convenient, they are affordable, they can withstand high pressure, they are well sealed with standard lids.
Tekhi
- And how does it work?
Yu.V.
- Here is his diagram. It was once drawn for the forums by my partner in the development of the valveless system, Ukrainian aquarist Pavel Tereshchenko (TPV).
In the left bottle (hereinafter we will call it “soda” there is dry soda. It is in a glass raised above the bottom - for the smooth removal of reaction products from it (there are holes in the bottom of the glass for this purpose). In the right bottle (hereinafter - “acid "- a solution of citric acid. I’ll tell you the proportions later. As soon as we feed the acid into the soda, (for example, by squeezing the acid bottle, or better yet, squeezing and releasing the soda bottle), the acid begins to flow through the acid supply tube into the soda bottle and the reaction begins. The gas released raises the pressure in the soda bottle, squeezes the acid out of the tube back into the acid one and goes there itself. Until the pressure equalizes. After that, no one comes anywhere and the generator stops. When we start taking gas into the aquarium, the pressure in the soda bottle decreases (and in an acidic one it remains the same) and therefore the gas from the acidic again squeezes out the acid into the soda.The reaction resumes and continues until the pressure equalizes. And so on until all the reagents are used up. Is it clear yet?
Tekhi
- Yes. What's the catch? Why doesn't everyone succeed? It seems so simple...
Yu.V.
— The catch is in two things. In hysteresis - some delay in the stages when the generator runs each cycle and in the citrate crust - sodium citrate, one of the reaction products, which, if you give very little water, will cover the soda with a crust and stop the generator, and if you give a lot of water, then it will simply will wash the soda into the cavity under the glass and the reaction will become uncontrollable.
Tekhi
— And how did you solve these problems?
Yu.V.
— We solved the problem of hysteresis by installing a choke on the acid supply tube in the acid bottle—a small narrowing of the hole. I usually install a tap from the compressor
Here it is, at the end of the blue acid tube. If you open it more than necessary, the generator may go into overdrive; if you tighten it more than necessary, it will die out. For the proportions of reagents that I will give below, it is usually enough to screw it all the way and then unscrew it one turn. Sometimes, after the first run, adjustments may be required. Well, or I put a needle from a syringe, but the thickest one. From 20 cc.
Tekhi
— Why is there a second tube on the acid cap?
Yu.V.
— The second tube is the outlet to the safety valve. Just in case))) If the pressure jumps for some reason, he will simply release it. In this case, the valve is from a Chinese generator. But it could also be homemade. Maybe even just a 5 ml syringe - if the pressure rises above 3-4 atm, the syringe piston will simply fly out and the generator will stop.
I would like to draw your attention to the fact that the safety valve is on the acid bottle. As you remember from the principle of operation, it is in this area that the pressure release stops the generator. The release of pressure in a soda bottle, if it is sharp, on the contrary accelerates it. By the way, this is why you need to open the generator if it is under pressure by first unscrewing the acid cap .
Tekhi
— Why is the tube going to the safety valve so long?
Yu.V.
— It’s not long))) Here’s a better angle - it’s curved.
This was done to prevent splashes from the acid solution from getting into it and clogging the safety valve.
Tekhi
- Clear. Are there any special features in the soda cap?
Yu.V.
- There is a little))
The right tube is the tube for supplying acid to soda. Its length is not just that)) It should be such that it is approximately 3 cm+ - from the surface of the soda. If it is closer, a stream of acid can simply burn a hole in the soda and then move on freely without reacting. If it is higher, then when starting the generator, while the soda is still dry, a stream of acid can splash heavily and you can run into a citrate crust.
The second hole is the gas outlet into the aquarium. I put a syringe needle in it. It throttles the gas flow and makes fine adjustments easier.
Tekhi
- Yuri, how do you collect these lids? I see you have some kind of glue there?
Yu.V.
- Epoxy. First I drill the holes. For hoses from droppers it is 3mm
Then I cut the hose at an angle and tighten it into the hole with pliers
Then I install a cotton swab tube into the hose (bottom)
Next, I coat the joint with superglue.
Then I pull the hose back a little so that my tube appears on the opposite side. The glue, in this case, enters the gap between the hose and the lid, and the tube also wedges the hose in the lid.
Well, after that I pour epoxy inside the sealing band of the lid. I don’t have this particular photo, but here’s an absolutely similar one, which I took when I was making the “blonde” generator.
Well, if I have to connect the hoses, I also glue them with superglue. He takes PVC normally. The main thing is that the dropper does not turn out to be made of silicone hoses. Not only do they not adhere well, but silicone also allows a lot of CO2 to pass through itself - diffusion.
Tekhi
- Do you pour soda directly into the glass?
Yu.V.
— I tried it in different ways, Ir. And right into the glass, and under the foam rubber, and under the skein of fishing line. The main problem is distributing a portion of acid over the surface of the soda in such a way that the reaction proceeds actively, and so that the stream of acid does not burn holes in the soda to the bottom of the glass. We tried different ways to remove the holes for removing the reaction products (“working off”) from the soda. Ultimately, we came to the conclusion that the holes in the cup should be in the bottom, and the soda itself should be in the bag. The most comfortable one was a sock from old thin tights.
You place the sock in a glass, pour the required amount of soda into it through a funnel, and then put the entire part of it that was above the neck when filling it into the bottle and press it slightly with your finger so that it doesn’t stick out))
There are also nuances with citric acid. So as not to weigh and measure the required amount of water each time, I once poured a portion of acid into the new generator and marked it with a marker. I poured in the required amount of water and also marked it with a marker. This makes refilling easier and faster.
Tekhi
— What are the proportions of the reagents?
Yu.V.
— The reagents will be produced approximately simultaneously if for every 100 grams of citric acid there are 120 grams of soda. I usually take a little extra soda. It is cheaper and in this case all lemon is produced completely guaranteed.
Tekhi
- How much water do you pour into citric acid?
Yu.V.
— For every 100 grams of acid, 150 ml of water. In this case, a fairly concentrated solution is obtained (the generator lasts longer) and there is some excess water, due to which the sodium citrate dissolves and does not become crusted. These proportions have been tested many times by many aquarists and I consider them optimal. Well, how much to pour - 100, 150 or 200 grams - it depends on the volume of bottles in a particular generator.
Tekhi
- It's clear. How do you launch it?
Yu.V.
— The generator is started, as I already said, by supplying acid to soda. In practice, this is done by squeezing the bottle. Or acidic (seems more logical?), or soda. I prefer squeezing soda. When it is compressed, part of the air from it enters the acidic one, creating some excess pressure in it, due to which the acid is squeezed out of it into the soda.
Tekhi
- And why?
Yu.V.
— In this way I reduce the amount of ballast gases (air) in the soda bottle. After all, we need CO2, not CO2 with air))) Three or four presses of the soda bottle, and the amount of air remaining in it can already be bothered with it)))
Tekhi
— What is the pressure in the generator?
Yu.V.
— It’s how you set it))) The pressure in the generator is set at startup. It can be accelerated more or less by supplying more or less acid. And this pressure will be maintained in it throughout its entire work cycle. If it is assembled correctly))) Well, if the pressure needs to be reduced or increased during operation, then this can be done by releasing the gas through a slightly open acid or soda cap. Discharging gas through the acid cap reduces the overall pressure in the system, discharging gas (quite voluminous) through soda causes a large amount of acid to be supplied and the generator accelerates.
Tekhi
— Now I understand why a safety valve is placed on an acid bottle!!!
Yu.V.
— )))
Here's a look at the entire generator startup cycle.
Tekhi
- How clear everything is! It’s not clear, but you know what? How did you get this glass into the bottle?
Yu.V.
- Yes, it’s as simple as shelling pears))
Tekhi
- Yes, it’s really not difficult.
You know what else I wanted to clarify with you? Now there are many Chinese clones of this system on sale. Are they normal? Can they be used?
Yu.V.
- This type?
These are not clones. Chinese generators are structurally different from ours. They do not have a glass and they do not work with dry soda, but with a solution of soda in water. And this leads to some instability a priori. If at the beginning of the cycle the acid is supplied to a pure soda solution, then it is then added to a mixture of soda solutions and reaction products. This leads to an increase in hysteresis - a delay in the system’s processing of changes. In addition, all the soda does not dissolve immediately; its solubility is low and it lies as sediment at the bottom. At the same time, it cakes and because of this, the hysteresis also increases. But for some reason the Chinese do not consider it necessary to equip their systems with chokes (remember the faucet at the end of the acid tube?). Yes, this, in general, is not realistic; if in our systems the hysteresis is the same throughout the entire cycle, then in them it grows as the reagents are produced. Adds problems, etc. “Tee” - they have such a part in a soda bottle. The thing is good (as an idea), but taking into account the catastrophically low quality of Chinese consumer goods casting, they have different hole sizes from tee to tee. Which also creates some “lottery” when working with the generator. They are simpler, as I showed above, they are more decent, assembled in monoblocks, but the essence of the problems is the same. Therefore, if they fall into my hands, then I tune them a little))
Tekhi
- How?
Yu.V.
— I leave what is really convenient in them - the caps themselves, pressure gauges, safety valves, control taps. But I completely change the entire “bottom” - I put a throttle on the acid intake, I put a curved tube on the safety valve, I put a throttling needle on the gas outlet, I put a tube of the required length on the supply of acid to soda in a soda bottle and, of course, I put a soda bottle with a glass - everything is as I told you above. And then they work great)) Although, nowadays they cost so much that, as for me, rather than taking an expensive thing and redoing it, it’s easier to spend a couple of hours and assemble your own for almost free))
Tekhi
— Do they indicate normal proportions of reagents?
Yu.V.
- Irish, you know, I didn’t get into them - I’m not interested. I know for sure that what I told you above (I repeat, for 100 grams of citric acid dissolved in 150 ml of water there is 120-130 grams of soda) is the optimal ratio. If they write differently, then they are giving obviously less correct recommendations.
Tekhi
- Thank you, Yuri! Will you allow me one last question?
Yu.V.
- Yes, sure))
Tekhi
— Does it matter what specific reagents are used? Which manufacturers?
Yu.V.
— The quality of citric acid is of great importance. It is best to take chemically pure chemically pure. A very good “natural” or “food” product, which is sold in small wholesale or through the “chemical reagents” line. But when it gets into grocery stores after being packaged in 25 or 100 gram bags, for some reason it becomes significantly worse. I have no idea what they mix it with.
It’s not so noticeable with soda, but I also noticed that with the same citric acid, generators using soda, which our companies package in Ukraine (I don’t know its source), the generator works a little longer than on your Bashkir one. Although, in the case of soda, I repeat, you shouldn’t bother - it’s almost unnoticeable.
Tekhi
- Clear. Thank you, Yur! I’ll probably take the risk and make such a generator for myself.
Yu.V.
- You're welcome))) Good luck to you!
Discuss the article on the forum
Share link:
Similar
Useful tips
After CO2 is supplied to the aquarium, active growth of flora can be observed. To maintain ideal water softness in the aquarium, it is necessary to install the correct carbon dioxide supply. The inhabitants of the aquarium feel great and look healthy. But if their health worsens and algae appears, it is necessary to reduce the supply of carbon dioxide. And in some cases it is completely turned off.
Previous
Aquarium9 elements for decoration in an aquarium
Next
AquariumWhich aquarium siphon can be used to clean the soil?
Drilling rigs for bored piles
- SO is a self-propelled base and a pile driver drilling system with an auger, a telescopic rod and a mechanical extender (the complex is additionally equipped with a removable bucket drill).
- BIS-3M is a drilling injection pumping unit with a hollow auger, “injecting” a sand-containing mixture or water-cement mortar.
- BS is a crane-based drilling complex with a removable bucket drill, a grab for cleaning the mouth of a vertical pile well and a hydraulic bit, drilling under the protection of metal casing lock pipes.
- URP-1 - a base and a cylindrical bucket drill, located not on the base, but separately, on a rigid support table.
- USG-10 is a rotary-type base and vertical drilling system with a hydraulic casing table and a Kelly bar.
- MBS-1.7 - a base with a bucket mounted drill and a mechanical grab, with clay reinforced walls of the working well. Other types of soil drilling installations are derivatives of the main ones mentioned above.