Hello to all readers of my blog! Today I will tell you how to make wabi-kusu for an aquarium. What is wabi-kusa? Wabi-kusa is a composition of herbaceous water-loving and aquatic plants. Wabi-kusu is used in phyto design. The ancestor of the wabi-kusa style is the Japanese art of ikebana.
Soil composition for wabikus
And now about what is needed to create wabi-kusa? You will need: nutritious peat soil, any clay - you can use red clay, expanded clay, any type of moss - in this example, meadow moss, as well as threads for tying and fastening the future hummock.
It is advisable to use nylon threads, but cotton ones can also be used. Over time, the cotton threads will decay, but by this time the hummock will be held together by the roots.
LiveInternetLiveInternet
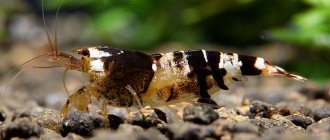
Sometimes it can be difficult to catch a lot of shrimp from a shrimp tank at once without stressing them out by swinging a net... I thought I could try to lure them into a trap based on the idea of a fish trap.
The basic idea is to create an entrance, a stimulus (like food inside), and make it as impossible as possible to escape from it. I scoured the Internet in search and found an English-language site with a description. I tried it and it really works! The construction is very simple. You will need the following tools and materials: 1. Plastic drink bottle 2. Serrated kitchen knife or something similar. But you can cut with a non-serrated one 3. Shrimp food
Here's how it's done:
Drink the contents of the bottle - don't throw it away :). Wash it thoroughly, several times. Use only hot water to wash the bottle. Never use soap! Leftover drink and soap can poison the aquarium! Using hot water, you can wash everything very well without using detergents. Cut the bottle about 2/3 from the top
Make a hole in the lid that the shrimp can fit through, but not big enough that the fish can't get through if your shrimp are kept with fish:
(experience has shown that a hole with a diameter of 7-9 mm is necessary, since only very young fish can fit into a 6 mm hole)
Now we try on the resulting halves
And we make holes in the workpiece along the upper half. They are needed for water exchange inside the trap so that the shrimp caught in it do not suffocate
Now we pour in the bait - I poured in the SERA Shrimps Natural food
Assembling the trap and placing it in the aquarium
And so they climbed
I have found that placing the trap vertically works better than placing it on its side. Come back in a few hours to collect your shrimp.
Note by Joel MacClellan
: There have sometimes been problems with the shrimp suffocating and dying in the bottle, probably due to insufficient water exchange. I've never had this problem, either because the trap is near the filter outlet, or because I haven't left the bottle in for too long. This could be helped by poking small holes all over the bottle with a hot pin to aid water exchange (it is advisable to make the holes some height from the bottom so that water and shrimp do not spill back into the tank when the trap is pulled out of it). In any case, I am not responsible if your shrimp die in your trap.
Author of the idea: Joel MacClellan https://rus-shrimps.ucoz.ru/publ/1-1-0-12
Where can I get materials for wabi-kus?
Peat soil, moss and expanded clay can be bought at a flower shop, and blue clay at a pharmacy. In this example, purchased peat soil is used; the remaining materials: clay, expanded clay and moss were extracted independently.
Red clay can be found on hillsides, meadow moss in pastures and meadows, and expanded clay in construction sites or the attic of a home. True, you need to work with expanded clay, and in order to reduce expanded clay to the required size you will have to break it into small pieces.
Let's start creating wabi-kus
Well, now let's start creating wabi-kus. We need to mix peat soil, clay and expanded clay in approximately equal proportions and adding a little water and clay at a time to achieve the viscosity of the mixture so that the resulting mass resembles a tight dough.
When the nutrient mixture is ready, you can begin to create a mound. Take some mixture and form a ball. To keep the future bump stable, let’s make the lower part of the ball flat. Now all that remains is to cover the ball with moss and wrap it with thread.
How to make wabikus with your own hands
Vabikusa in an aquarium is a kind of work of art, akin to creating bonsai compositions. A new direction, like the term itself, appeared in phytodesign thanks to Takashi Amano, a professional aquatic designer from Japan. Wabikusa is essentially one of the elements of Takashi Amano’s concept of the aquarium world as part of the natural environment.
The motto “Follow nature in everything,” as conceived by the designer, is embodied in the aquarium decor through a combination of exclusively natural components. Decoration in the “wabi-kusa” style is not just an installation with fish. Rather, it is the creation of a unique sketch, similar to the artist painting a picture.
Cover the hummock with moss
Moss is needed to create an outer shell and prevent the nutrient mixture from leaking into the water. You can cover a hummock with moss before or after planting plants in it. It is correct to start covering the hummock with moss from its underside. Lay down the moss and place the ball. Next, we cover the sides and top and wrap it tightly with thread. Well, our hummock is ready and we can start planting.
Almost any moss and root plants can be planted on the finished hummock, and the nutritional value of the hummock will last for approximately 2-3 years. Plants in the nutrient mound are quickly accepted and grow.
Using stabilized moss
Phytodesigners are engaged in creating a unique and unique interior in an office or home. Colorful compositions, panels, paintings made of moss and other plants will help transform the decor of the room from neutral and monotonous to bold and bright. Efficient interior decoration creates a pleasant atmosphere in the interior. With natural landscaping, you can divide a space by adding a green divider or create a low-maintenance vertical garden. Vertical gardening is a popular trend in phyto-interior design. Long-lasting moss is used to create:
- a living wall made of plants does not require additional or time-consuming care and is in harmony with other interior items. Gives the interior a unique appearance, suitable for the bathroom;
- moss panels are bright and unique, suitable for the kitchen, bedroom, nursery or living room;
- The panel is a stylish and unique element of the interior that will make the room feel natural. Multi-colored moss can be used in a child's room;
- paintings - decorate a bedroom or living room and give the room a cozy appearance;
- decorative inserts - natural additions to the design of walls, tables, chairs, vases, making them exclusive and stylish;
- apron for the kitchen - it looks elegant and goes well with other elements of decorating the room;
- winter garden decor - stabilized plants do not require constant watering, pruning and replanting, therefore they save your time and delight you with their beauty and freshness for a long time;
- geometric installations - used in office premises. Advantages: quick installation, no sunlight or special care required.
Long-living plants are used in various rooms because they have different types and shades. Moss looks harmonious with other natural materials - wood, stone, etc. Long-living plants will help create a unique eco-friendly style in your home or office.